This guide is intended for Linux SDK integrators. It provides complete steps from installation and configuration to enabling acceleration, including calling examples in both Shell and Go. By default, the SDK provides an HTTP API at 127.0.0.1:9801 on the local machine.
1. Overview
The Linux SDK provides acceleration capabilities externally through a local HTTP interface. Customers can complete policy-based routing configuration, acceleration parameter delivery, service traffic steering configuration, and acceleration startup by simply calling a few APIs in sequence.
Note:
Usage Pattern: This guide provides a standardized process for first-time integration. In a production environment, all configuration items (policy-based routing, acceleration parameters, network interfaces, service traffic steering, and so on) need to be configured only once, and the configuration is persisted. If the configuration remains unchanged, subsequent daily Ops only requires calling the two APIs for starting and stopping acceleration, eliminating the need to repeat the configuration steps.
Prerequisites:
Operating System: Linux (amd64 / aarch64 / armv7l).
Required Permissions: root (required for operations involving policy-based routing, iptables, and tun devices).
Prepare the dataKey (device key) obtained from the Tencent Cloud console.
The SDK is released as a self-extracting BIN package, and its naming format is:
MP_SDK_V1.0R002_<commit>_<arch>.BIN
The installation command is:
chmod +x MP_SDK_V1.0R002_xxxx_x86_64.BIN
./MP_SDK_V1.0R002_xxxx_x86_64.BIN
Note:
If the BIN package installation fails: Some operating system environments (such as those with a low glibc version, custom kernels, and so on) may not be able to execute the BIN package directly. In this case, you can manually install it using the tar package method.
Key Paths After Installation:
Path
Description
/usr/local/bin/mp-sdk/mp-sdk
SDK main program (HTTP service)
/usr/local/bin/mp-speeder/mp-speeder
Accelerate processes
/usr/local/etc/mp-speeder/mp_client_ifname.conf
Network interface configuration file
/usr/local/etc/mp-speeder/data/mp_client.json
Acceleration parameter configuration file
Verify the installation command:
# Check whether the SDK process is running
ps -ef | grep mp-sdk | grep -v grep
Configure the network interface (one-time operation): After installation, you need to write the network interface configuration once to generate local authentication parameters. It is recommended to select a network interface whose MAC address does not change (for example, eth0).
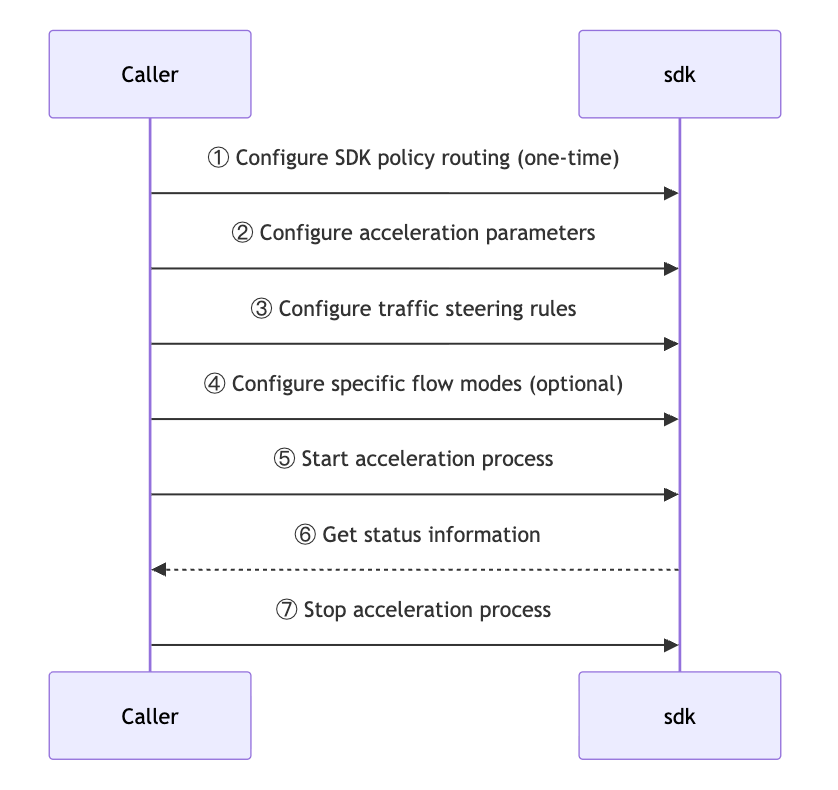
The interaction sequence between the caller and the SDK is as follows:
1. The caller first performs a one-time policy-based routing management configuration.
2. Then, configure the acceleration parameters for the SDK in sequence.
3. Business traffic steering policy;
4. Optional configuration for directing specific traffic to a specific mode;
5. After all parameter configurations are completed, the caller sends an instruction to the SDK to start the acceleration process.
6. During runtime, the SDK can feed back status information to the caller (dashed lines indicate asynchronous/callback returns).
7. When the business ends, the caller sends an instruction to the SDK to stop the acceleration process, thereby completing the management of the entire lifecycle.
3.2 API List
Function
Methodology
Path
Enable policy-based routing.
POST
/api/v2/route/policyRouteManagement
Configure acceleration parameters.
POST
/api/v2/client/mp-speeder
Add business traffic steering.
POST
/api/v2/route/businessRoute
Add multi-mode rules (Optional).
POST
/api/v2/client/multi-mode
Start acceleration.
POST
/api/v2/client/mp-speeder/start
Query acceleration status.
GET
/api/v2/client/mp-speeder
Stop acceleration.
POST
/api/v2/client/mp-speeder/stop
Restart acceleration.
POST
/api/v2/client/mp-speeder/restart
3.3 Core Concepts
The acceleration link involves three key concepts, which correspond to the "inbound" and "outbound" directions of traffic:
Service traffic steering (inbound): Determines which traffic goes to the acceleration program. It is typically implemented using iptables. Traffic that does not match the steering rules follows the original path and is not affected by acceleration. This corresponds to Step 3.
Default mode (outbound · fallback): All traffic that goes to the acceleration program uses the forwarding mode by default. This mode is configured in the scheduleMode field during Step 2, "Configure Acceleration Parameters" (bonding / redundant / rtc). This corresponds to Step 2.
Multi-mode rule (outbound · special, optional): Assigns a forwarding mode different from the default mode to specific quintuples. This rule has a higher priority than the default mode. If not configured, all traffic follows the default mode.
Typical scenario: By default, traffic uses bonding aggregation, while mission-critical services that require high reliability use redundant dual-send.
In summary: Service traffic steering handles inbound traffic, while modes handle outbound traffic. The default mode serves as a fallback, and the multi-mode rule is for special cases.
3.4 Detailed Description
Step 1: Enable Policy-Based Routing
Let the SDK take over the management of policy-based routing for multi-NICs. Enable this feature by setting the Header enable: true (set to false to disable it).
Note:
It is strongly recommended that you call the enable function only once during initial integration. The configuration is persistent, so you do not need to enable it again subsequently.
Step 2: Configure Acceleration Parameters
Deliver parameters such as dataKey, network interfaces participating in acceleration, and scheduling modes. These parameters are persisted to /usr/local/etc/mp-speeder/data/mp_client.json. Here, scheduleMode is the default mode.
The key fields in the Body are as follows:
Field
Type
Required
Description
dataKey
string
Yes
Device key obtained from the console
interfaces
[string]
Yes
List of network interfaces participating in acceleration, for example, ["eth0","eth1"]
scheduleMode
string
No
Default mode: bonding / redundant / rtc. The default is bonding. It serves as the fallback forwarding mode.
Step 3: Add Service Traffic Diversion
Declare which quintuple traffic needs to be accelerated. This corresponds to the service traffic steering (inbound) described in section 3.3, Core Concepts. Traffic that does not match the steering rules follows the original path and does not go to the acceleration program.
Field
Example
Description
srcIP
192.168.1.0/24
Source address segment, optional.
dstIP
10.0.0.0/24
Destination address segment
protocol
TCP / UDP
Protocol
srcPorts
0-65535
Source port range, optional
dstPorts
443 or 8000-9000
Target port
Step 4: Add Multi-Mode Rules (Optional)
This corresponds to the multi-mode rule (special). This rule applies only to traffic that has already entered the acceleration program. It assigns a forwarding mode different from the default mode to specific quintuples and has a higher priority than the default mode. If you do not need this rule, you can skip this step. In that case, all traffic follows the default mode.
Key fields in the Body: speedMode (0=default / 1=direct / 2=bonding / 3=rtc / 4=redundant). The other quintuple fields are the same as described above.
Step 5: Start Acceleration
Start the acceleration process.
Step 6: Query Acceleration Status
Poll this API until the returned field ready == true, which indicates that the acceleration tunnel has been established.
If acceleration is not ready for an extended period (for example, one minute), see the official website FAQ documentation or contact project personnel for troubleshooting.
Daily Start and Stop
After the initial integration is completed, the configuration is already persisted. Subsequently, if the configuration remains unchanged, you only need to call the following API on a daily basis:
Start acceleration: POST /api/v2/client/mp-speeder/start
Stop acceleration: POST /api/v2/client/mp-speeder/stop
Restart acceleration: POST /api/v2/client/mp-speeder/restart
Note:
After a configuration change (for example, replacing the dataKey, adjusting network interfaces, or modifying service traffic steering rules), you need to call the restart acceleration API to make the new configuration take effect.
4. Complete Example
The following example must be executed strictly in the order of the six steps above and can be run directly.
Note:
After the BIN package installation is completed, the acceleration process is automatically started. Therefore, after calling the configuration API, you need to make the new configuration take effect. There are two methods:
1. Before calling any configuration APIs, first call the stop acceleration API (POST /api/v2/client/mp-speeder/stop) once. Then, proceed with the configuration steps normally. Finally, call the start acceleration API.
2. Proceed with the configuration steps normally. Finally, instead of calling the start acceleration API, call the restart acceleration API (POST /api/v2/client/mp-speeder/restart) to make the new configuration take effect.
The following example uses Method 2 and directly calls the restart acceleration API at the end.
4.1 Shell Example
Save the following script as quick_start.sh. Modify variables such as DATA_KEY as needed, and then execute it:
#!/bin/bash
# Linux SDK One-Click Integration Example
set -u
SDK="http://127.0.0.1:9801/api/v2"
# ==== Modify the following variables according to your actual situation ====
DATA_KEY="PUT_YOUR_DATA_KEY_HERE"
ACC_IFS='["eth0","eth1"]' # List of network interfaces participating in acceleration
SRC_CIDR="0.0.0.0/0"
DST_CIDR="10.0.0.0/24"
DST_PORTS="443"
PROTO="TCP"
# =============================
# Check whether the user has forgotten to modify DATA_KEY
[ "$DATA_KEY" = "PUT_YOUR_DATA_KEY_HERE" ] &&{ echo "Please modify the DATA_KEY variable to the actual dataKey first"; exit 1;}
echo "[1/6] Enabling policy-based routing"
curl -s -X POST "$SDK/route/policyRouteManagment" -H "enable: true"
echo
echo "[2/6] Configuring acceleration parameters"
curl -s -X POST "$SDK/client/mp-speeder" \\
-H "Content-Type: application/json" \\
-d "{
\\"dataKey\\": \\"$DATA_KEY\\",
\\"interfaces\\": $ACC_IFS,
\\"scheduleMode\\": \\"bonding\\"
}"
echo
echo "[3/6] Adding business traffic steering"
curl -s -X POST "$SDK/route/businessRoute" \\
-H "all: false" \\
-H "Content-Type: application/json" \\
-d "[{
\\"srcIP\\": \\"$SRC_CIDR\\",
\\"dstIP\\": \\"$DST_CIDR\\",
\\"protocol\\": \\"$PROTO\\",
\\"dstPorts\\": \\"$DST_PORTS\\"
}]"
echo
# Step 4 (Optional, use only when scheduling in a specific mode is required)
log.Println("Acceleration is not ready within 30 seconds")
os.Exit(1)
}
Stop acceleration (standalone call):
call("POST","/client/mp-speeder/stop", nil, nil)
5. Test Verification
5.1 Accessing via the Acceleration Channel
curl --interface mp_tun0 https://www.qq.com
A normal return of HTML indicates that the acceleration tunnel is reachable.
5.2 Verifying Whether Service Traffic Is Routed
iptables -t mangle -nvL
Check the chains associated with the service traffic steering rules you configured (where the pkts/bytes count keeps increasing). This indicates that service traffic has been steered to the acceleration tunnel.
6. FAQs
Q1: What should I do if ready remains false after the call is initiated?
A2: Confirm that the traffic steering rules from Step 4 match the actual service quintuple. Use iptables -t mangle -nvL to observe whether the hit count for the corresponding rules is increasing.
Q3: How do I modify acceleration parameters (for example, change the dataKey or network interface)?
A3: Simply call the API from Step 2 again, and then start the API.
Q4: Does the SDK service need to be reconfigured after an abnormal restart?
A4: No. The configuration has been persisted to /usr/local/etc/mp-speeder/ and will be loaded automatically after the SDK starts.