SDK Quick Integration
Download
Focus Mode
Font Size
Note:
Prerequisites
Environment requirements
iOS >= 9.0
Xcode >= 10.0
Component dependency
tars
MQQComponents
TMFShark
SSZipArchive
PromiseObjC
MJRefresh
SocketRocket
Brotli
CocoaAsyncSocket
Integration method
TCMPPSDK can be integrated in the following ways:
CocoaPods integration
Manual integration
SPM integration
CocoaPods integration
1. Add the source and mini program dependency modules to the Podfile in your project:
# Pods repositorysource 'https://github.com/TCMPP-Team/tcmpp-repo.git'target 'YourTarget' do# ――― TCSAS -----―――――――――――――――――――――――――――――――――――――――――――――――――――――--- #pod 'TCMPPSDK'pod 'TCMPPExtScanCode'pod 'TCMPPExtMedia'# Preset base librarypod 'TCSASBaseLib'end
Here,
YourTarget refers to the name of the target in your project where you want to integrate the SDK.2. Run cd on the Terminal to go to the Podfile directory and run pod install to install the component.
$ pod install
Note:
If you encounter the error
Couldn't determine repo type for URL: 'https://github.com/TCMPP-Team/tcmpp-repo.git': you need to run the following command before executing pod install: pod repo add specs https://github.com/TCMPP-Team/tcmpp-repo.git.Manual integration
Note:
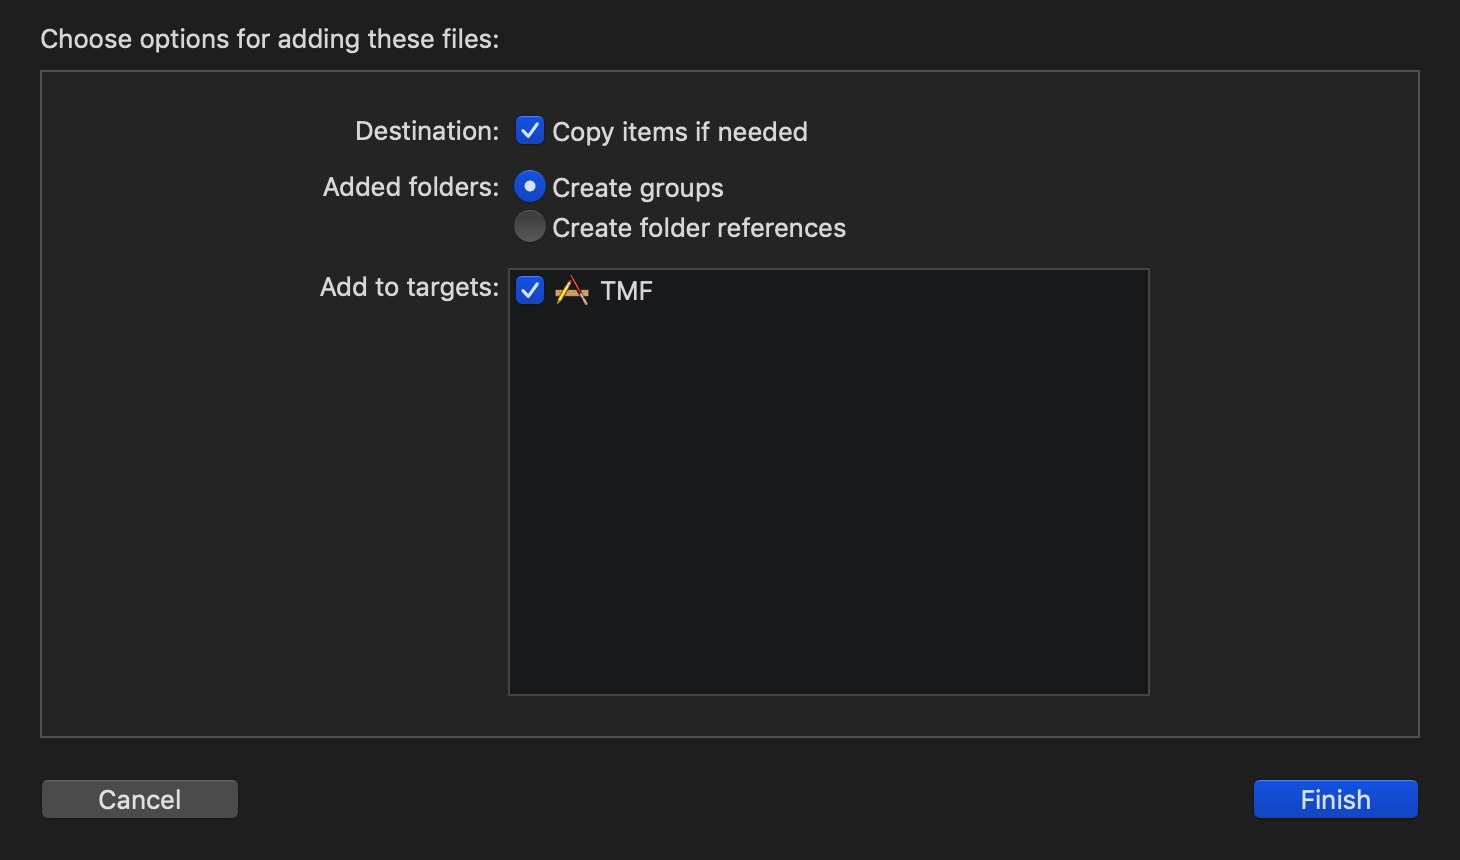
1. Add the SDK
Add the directory of the SDK components to the appropriate location in your Xcode project and select the relevant target.
You can quickly add the components by dragging the directory directly from Finder into your Xcode project.
2. Add dependent SDKs
Add all components depended on by SDK to the project. For the list of dependent components, see Component dependency.
3. Add dependent system libraries
Add the system libraries that the SDK depends on to the project, open the project settings page in Xcode, select the target, and click General to add them under Linked Frameworks and Libraries.
4. The system library dependencies are as follows:
Foundation.framework
CoreTelephony.framework
CFNetwork.framework
Security.framework
SystemConfiguration.framework
CoreService.framework
CoreFoundation.framework
libz.tbd
libc++.tbd
libc.tbd
libbz2.tbd
libsqlite3.0.tbd
5. Project settings
After adding the SDK, you need to make the following project settings in Xcode:
Select Build Settings > Linking > Other Linker Flags, and add
-ObjC.Select Build Settings > Apple Clang - Custom Compiler Flags > Other C Flags, and add
-fshort-wchar-D__FIXWCHART__
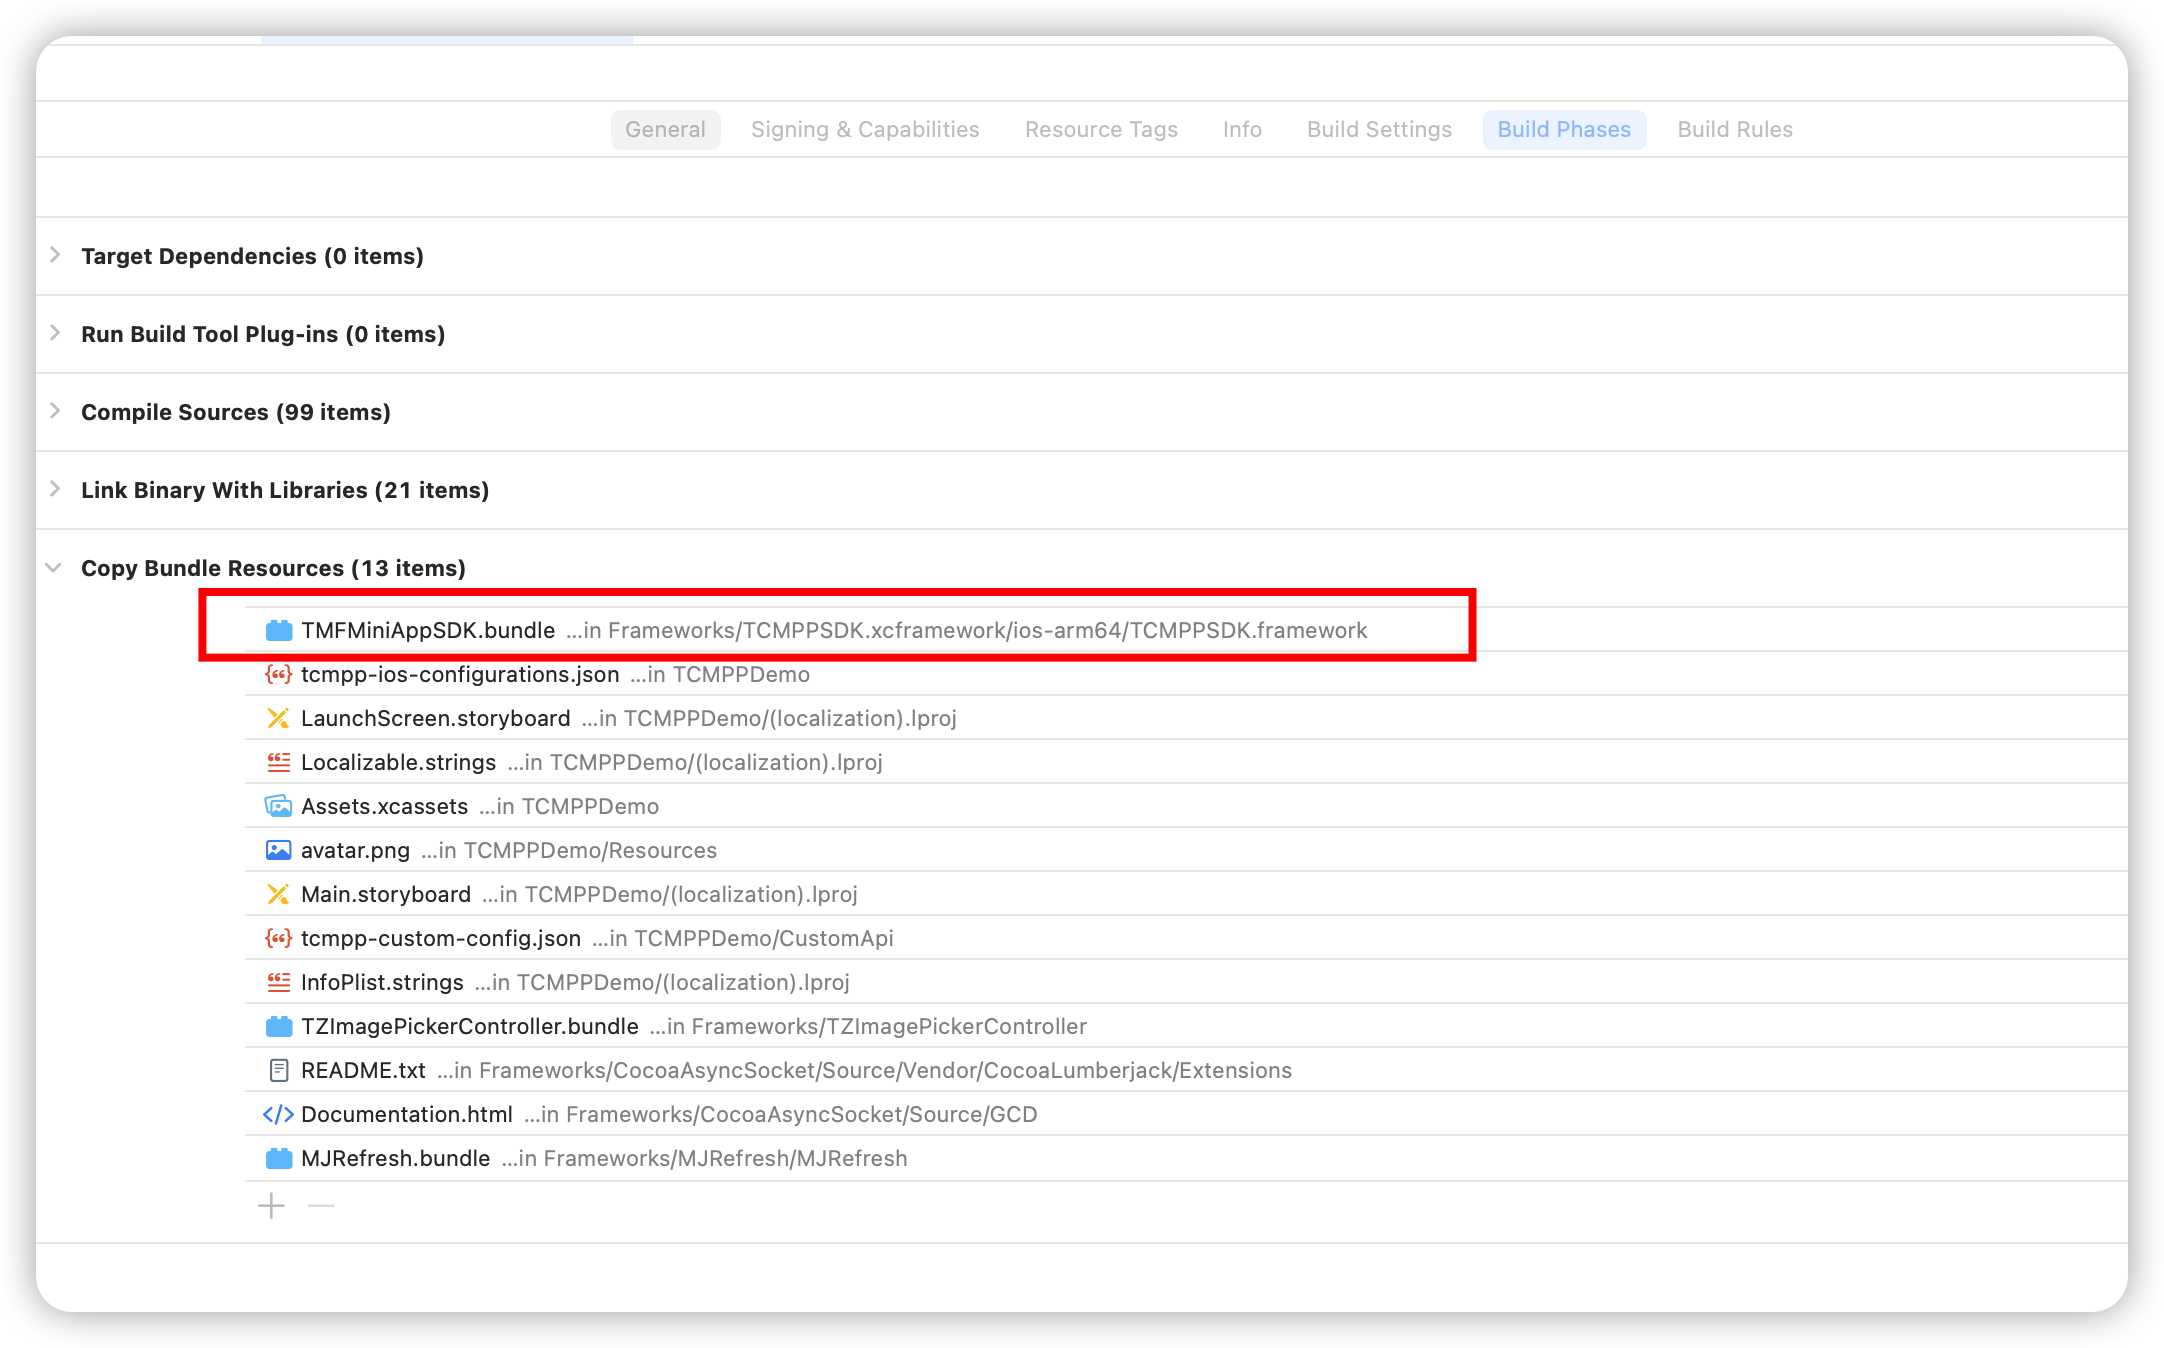
Select Build Phases > Copy Bundle Resources, and add the SDK resource file:
SPM integration
Select File > Add Packages in Xcode, and enter the URL in the search window:https://github.com/TCMPP-Team/TCMPPSDK.git
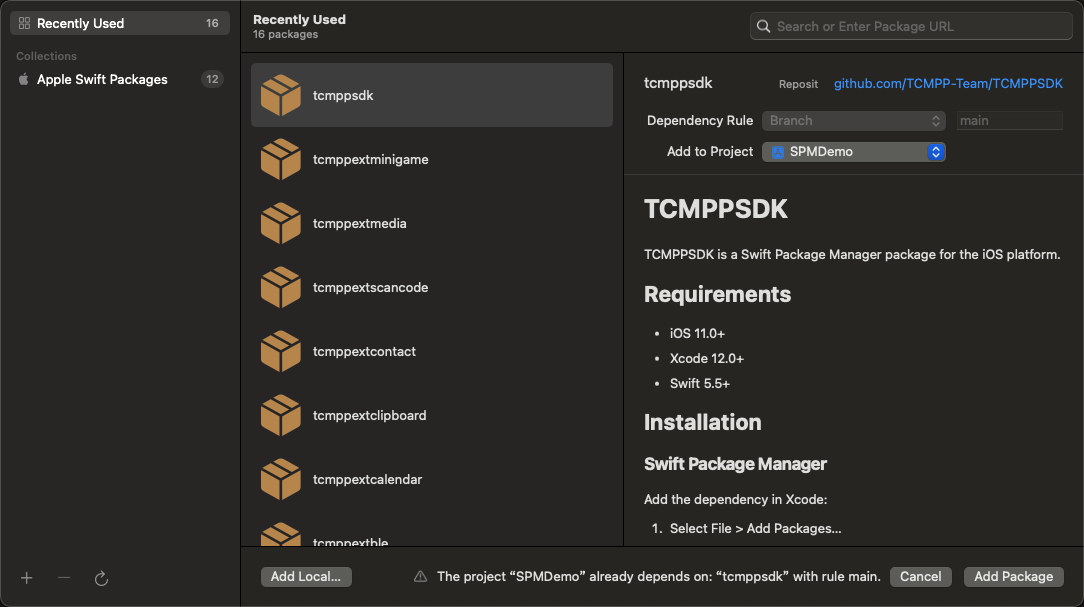
Select the version rule (Up to Next Major Version is recommended) and click Add Package.
After adding the SDK, make the following project settings in Xcode:
Select Build Settings > Linking > Other Linker Flags, and add -ObjC.
Initialization
Create a superapp in the console
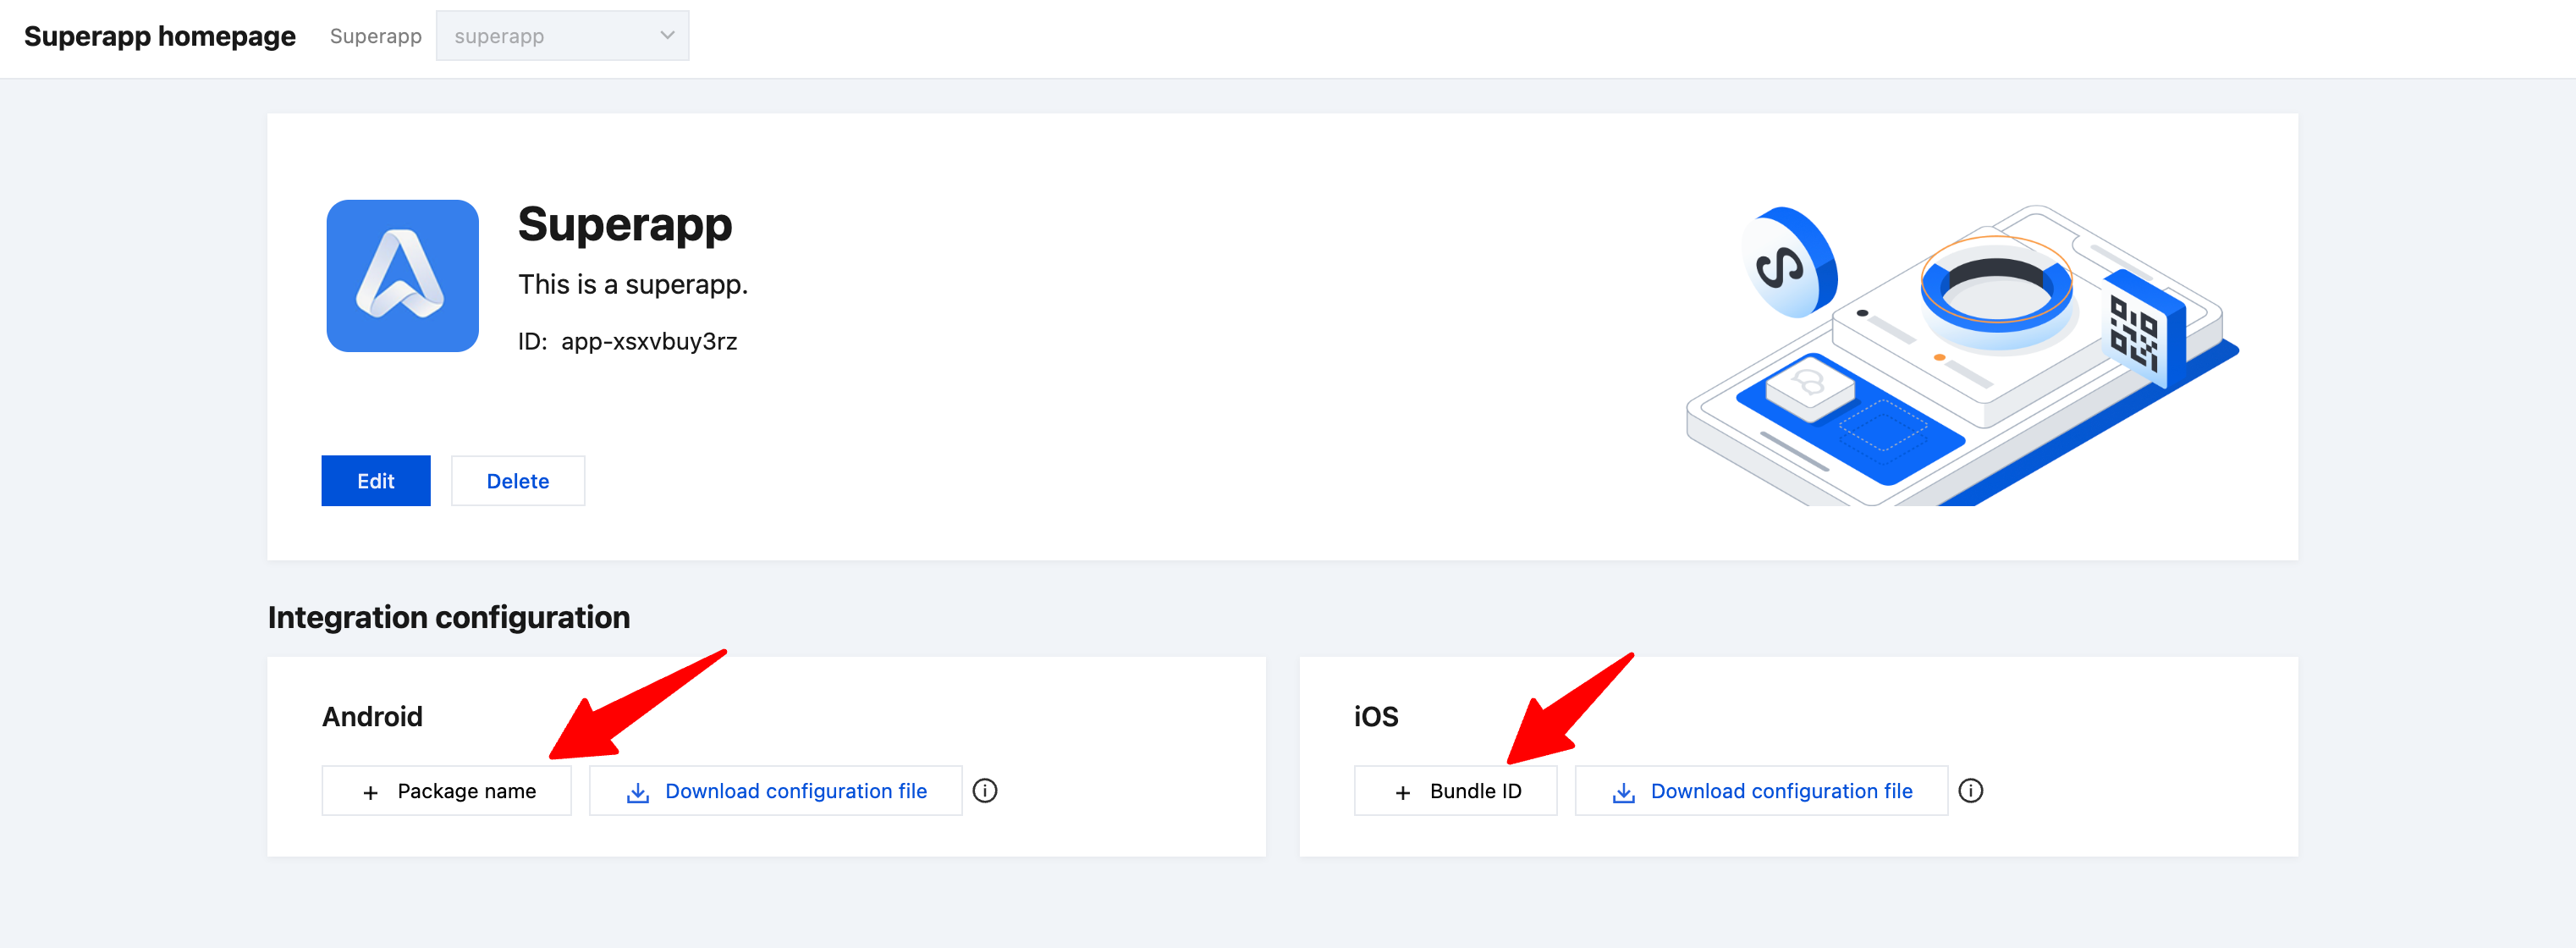
Initializing the mini program SDK requires an encrypted key or an SDK configuration file obtained from the mini program console. If you haven't created a superapp in the console, follow these steps to create one.
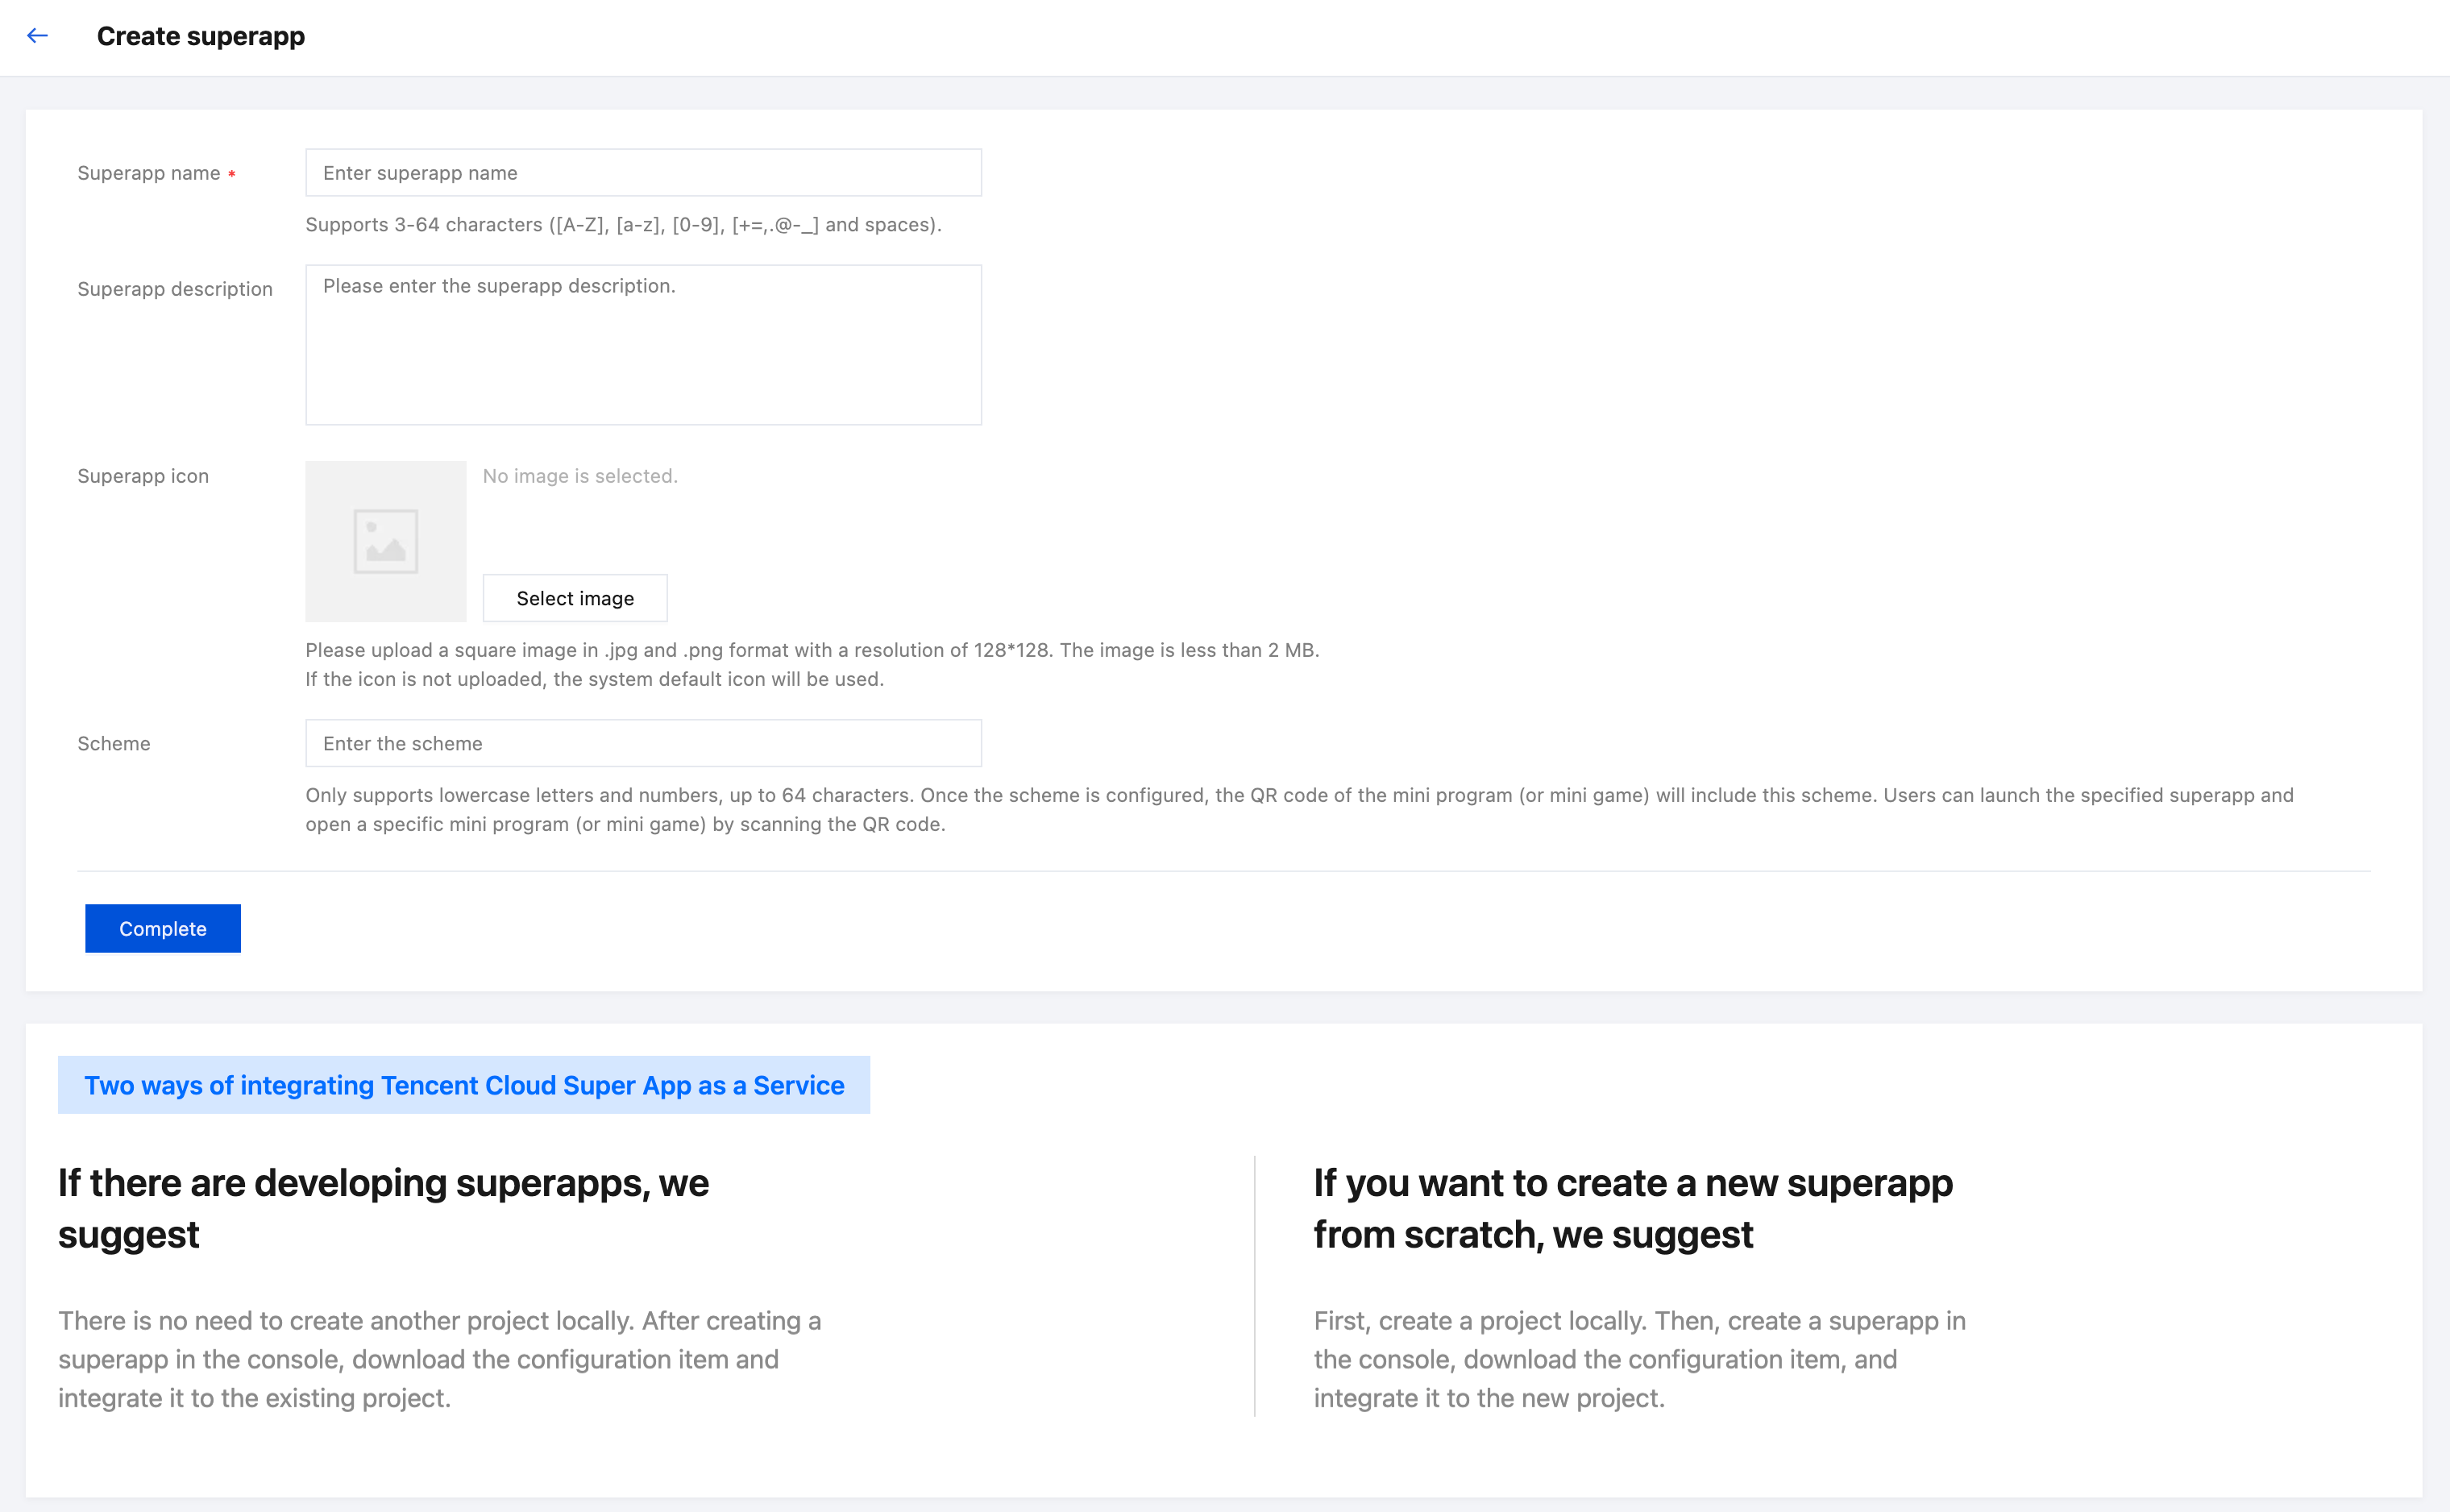
Log in to the console, and click Create superapp.
Fill in the superapp information.

Required information:
Superapp name: Supports 3-64 characters including a-z, A-Z, 0-9, spaces and some special symbols ("+", "=", ",", ".", "@", "-", "_").
Optional information:
Superapp description: Brief introduction of the superapp, primarily for internal reference.
Superapp icon: Supports uploading square images in .jpg or .png format, with a resolution of 128 × 128 and a file size under 2 MB. If the icon is not uploaded, the system default icon will be used.
Scheme: Only supports lowercase letters and numbers, up to 64 characters. Once the scheme is configured, the QR code of the mini program (or mini game) will include this scheme. Using the phone system’s built-in scanning function, users can directly launch superapp and open the mini program (or mini game).
Add a superapp package name:
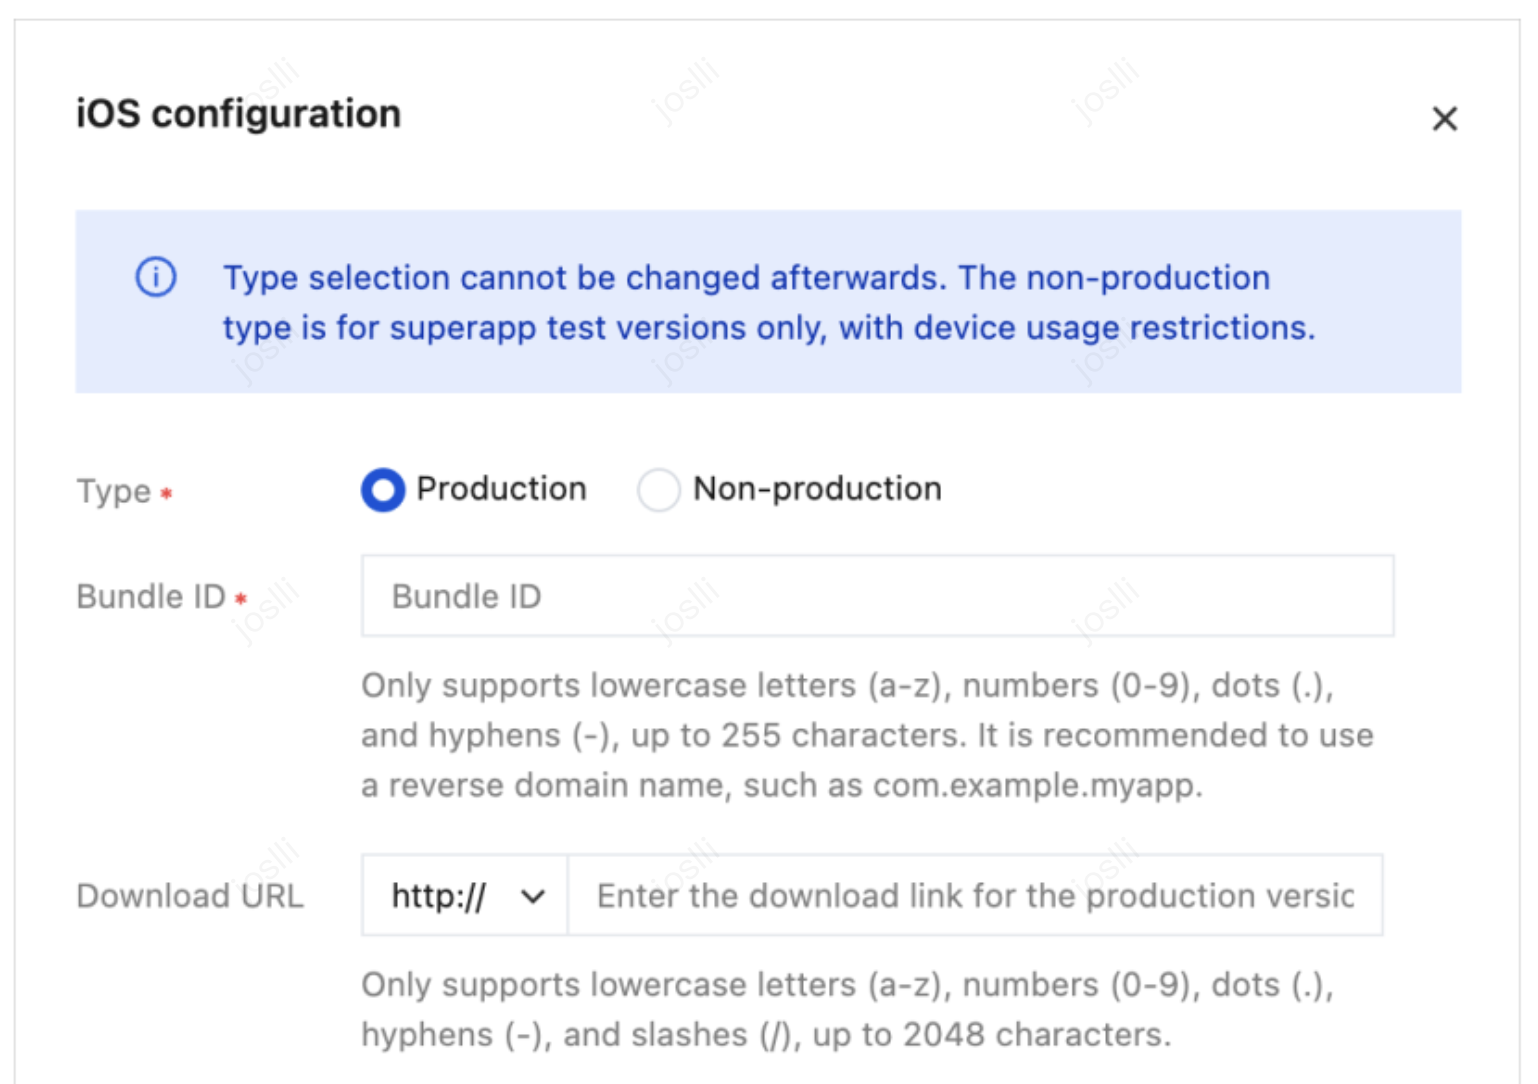
When adding a Bundle ID, configure the following fields:
Type: Once selected, the type cannot be changed. Package names for non-production types are only used for superapp test versions and have a monthly device usage limit (up to 500 devices).
Bundle ID: Only supports lowercase letters (a-z), numbers (0-9), dots (.), and hyphens (-), up to 255 characters. It is recommended to use use reverse domain name notation, such as com.example.myapp.
Download URL: Only supports uppercase letters (A-Z), lowercase letters (a-z), numbers (0-9), dots (.), hyphens (-), and slashes (/), up to 2,048 characters.
Obtain superapp configuration and complete initialization
Method 1: Use encryption key.
This method requires SDK version 2.3.8 or later. If your SDK version is earlier than 2.3.8, use Method 2 (configuration file).
Generate an encryption key
You can generate a unique encrypted key for each Package Name/Bundle ID. The SDK uses this key for initialization. The key is bound to the package name in a 1:1 ratio, providing higher security than a plaintext configuration file.
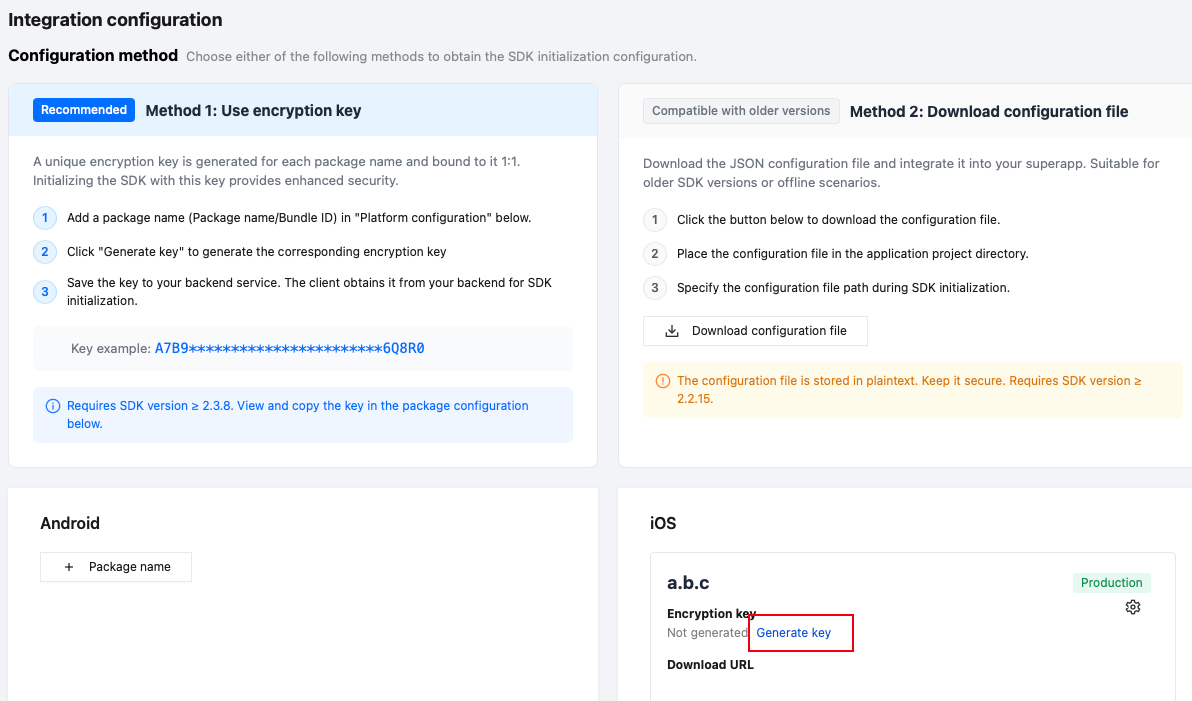
After generation, click Get key. In the pop-up window, click Copy to copy the encrypted key to your clipboard.
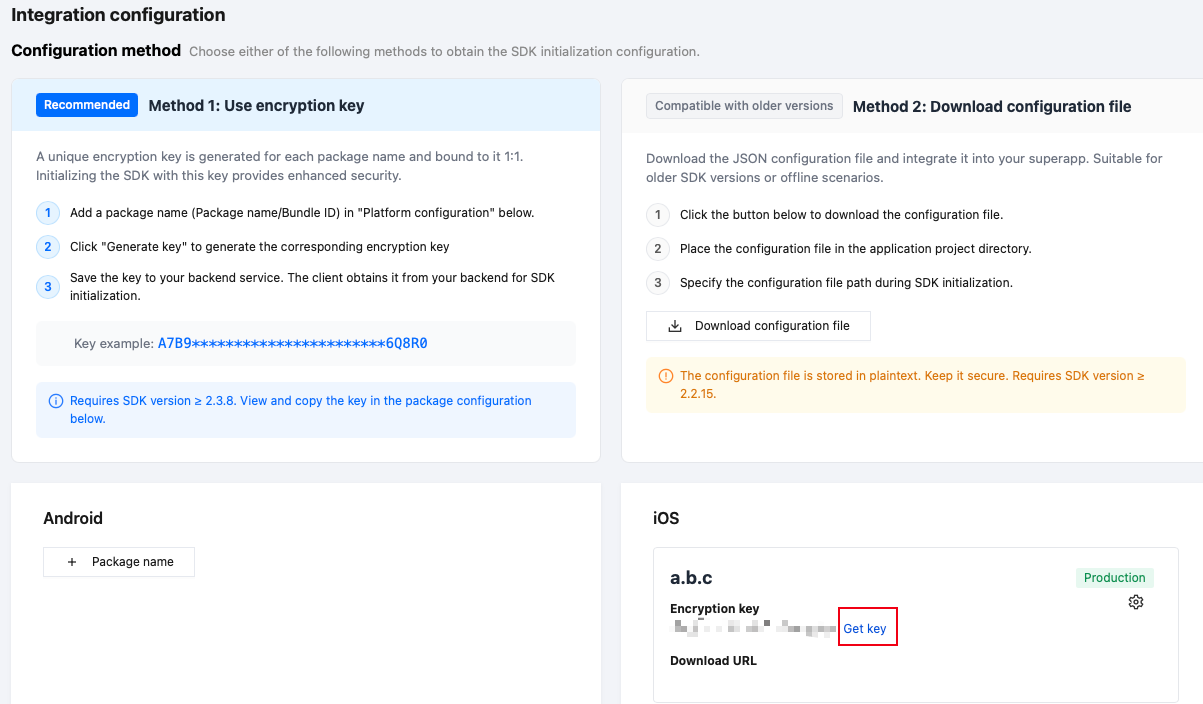
Save the copied key to your backend service, which will then distribute it to the client. The client uses this key during SDK initialization to complete the integration.
Notes:
The encryption key is bound 1:1 with the Package name/Bundle ID. Different package names correspond to different keys and cannot be used interchangeably.
This method requires SDK version ≥ 2.3.8.For earlier versions, use Method 2: Download configuration file.
Do not hardcode the key in the client code or public repositories.We recommend keeping it in your backend and distributing it to the client on demand at runtime.
Only the superapp administrators/senior superapp developers have the permission to generate keys. Superapp developers can view and copy existing keys. Other roles have read-only access to check if a key has been generated.
If you suspect a key leak, contact the superapp administrator (e.g., to regenerate the key or change the package name) and update the key stored in your backend accordingly.
Import the configuration
Import the SDK header file in AppDelegate.m:
#import <TCMPPSDK/TCMPPSDK.h>
Obtain the configuration information using the encrypted key retrieved from the backend:
// 1. Asynchronously fetch the AppSecret from your business backend (implement the API yourself; never hardcode the AppSecret in the client).[self fetchAppSecretFromBackend:^(NSString *appSecret) {// 2. After obtaining the AppSecret in the callback, complete the SDK configuration.// setConfigurationWithAppSecret: returns a BOOL indicating whether the configuration is successful.BOOL success = [[TMFMiniAppSDKManager sharedInstance] setConfigurationWithAppSecret:appSecret];if(success) {NSLog(@"SDK initialization failed");}}];
2.3 Method 2: Use a configuration file
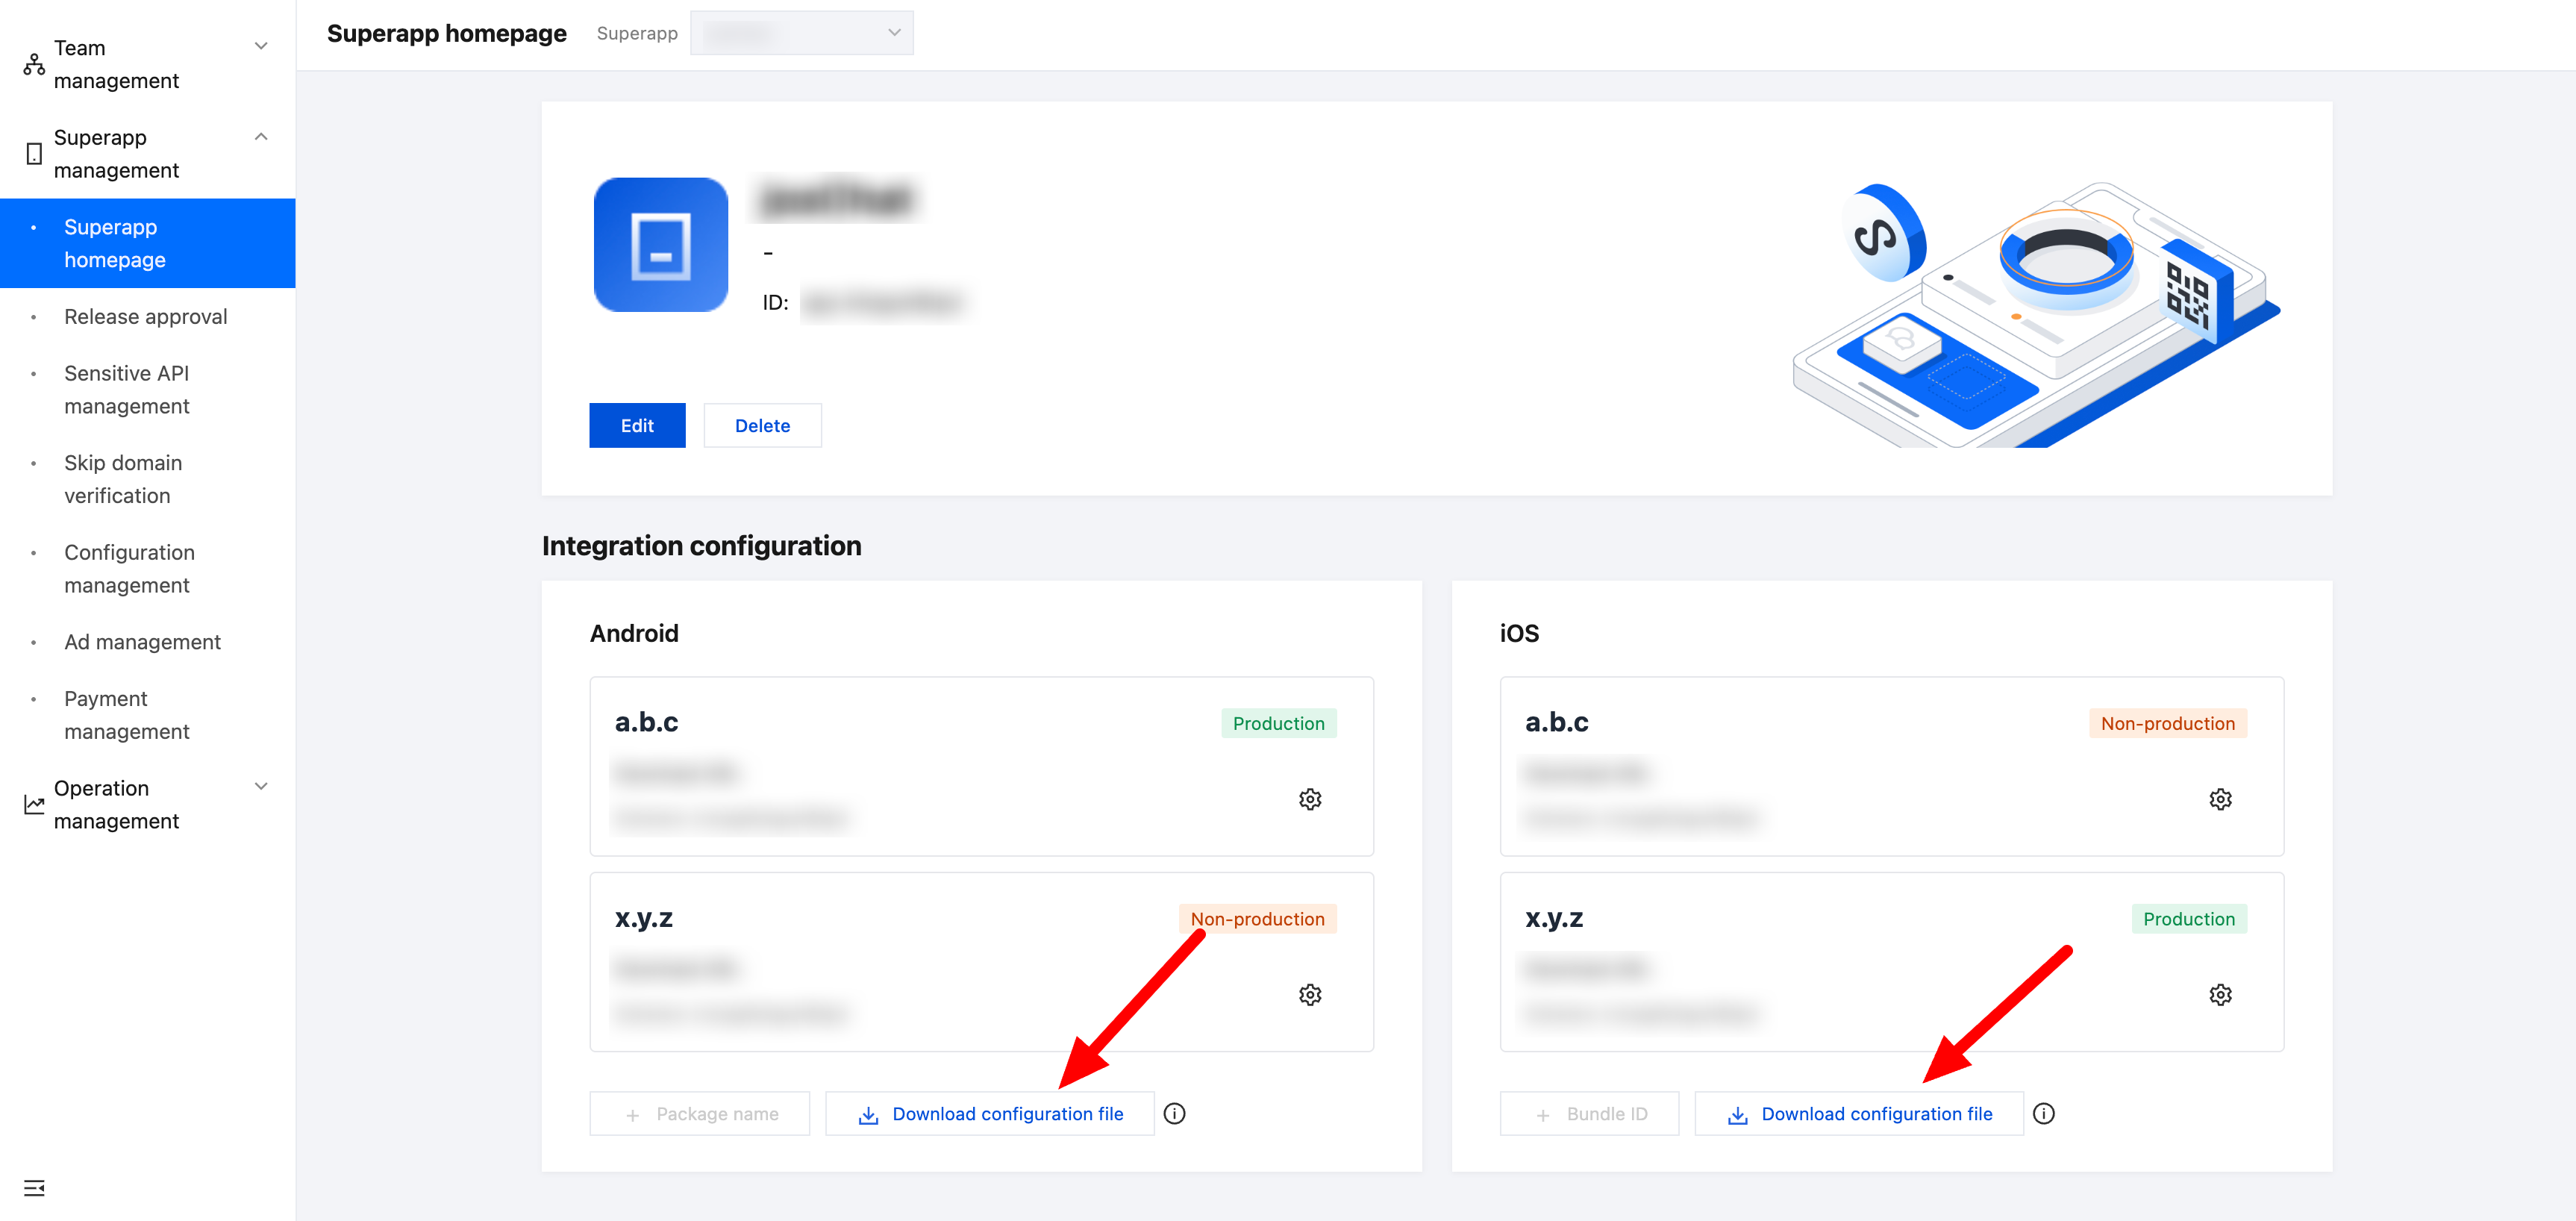
Download a configuration file:
Note:
The default name of the downloaded configuration file is tcsas-ios-configurations.json.
Add the configuration file to the project
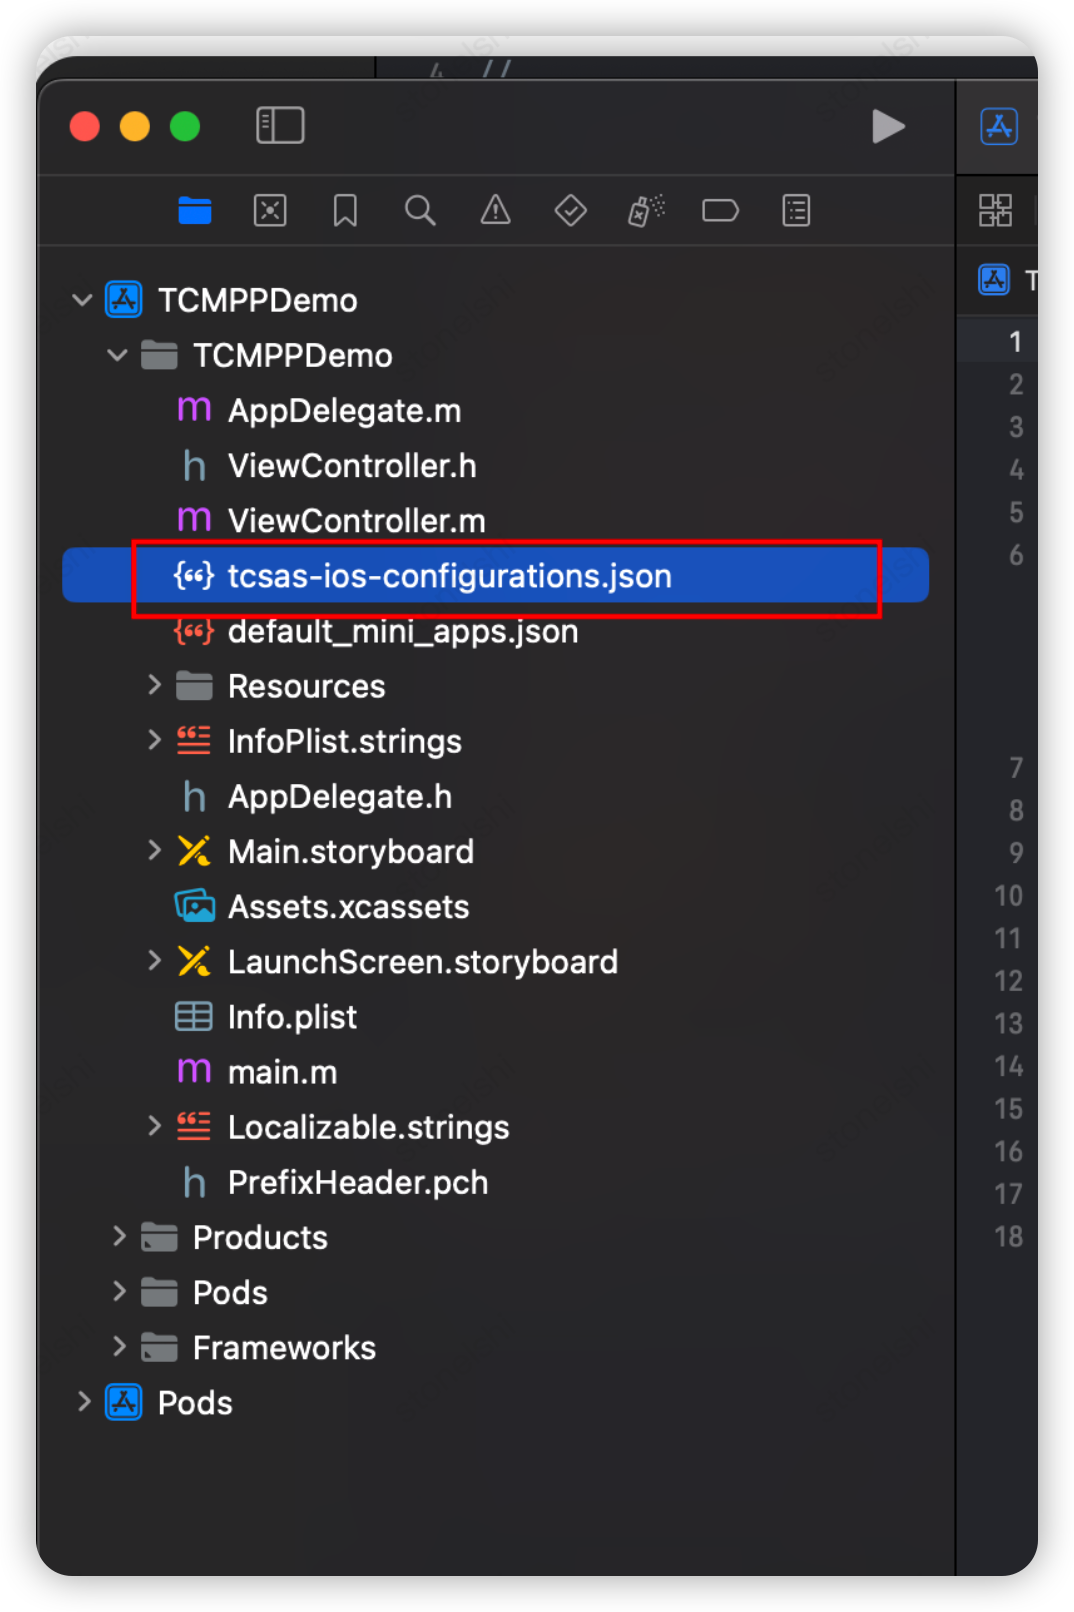
After obtaining the configuration file, add it to your superapp’s source code.
Note:
The bundleId of the iOS project must match the bundleId configured in the console. Otherwise, it will result in abnormal SDK initialization.
Import the header file
Import the header file into AppDelegate.
//TCSAS#import <TCMPPSDK/TCMPPSDK.h>
Set the configuration information
Initialize the TMAServerConfig object based on the configuration file, and use it to initialize the mini program engine.
The SDK supports direct engine initialization, preparing network connections in advance, and updating base library and configuration information to speed up mini program loading. It can also support initialization when needed.
Example:
// Configure the environmentNSString *filePath = [[NSBundle mainBundle] pathForResource:@"tcsas-ios-configurations" ofType:@"json"];if (!filePath) {TMAServerConfig *config = [[TMAServerConfig alloc] initWithFile:filePath];// Direct initialization[[TMFMiniAppSDKManager sharedInstance] setConfiguration:config];}
Add permission settings
If you have only integrated the core library of the SDK, namely TCMPPSDK, you need to add permission request information in the info.plist file.
The permissions involved with the core SDK (TCMPPSDK) are as follows:
Permission | Key | Related APIs |
Write to photo album | NSPhotoLibraryAddUsageDescription | saveImageToPhotosAlbum, saveVideoToPhotosAlbum |
Camera | NSCameraUsageDescription | CameraContext (Camera component) |
Microphone | NSMicrophoneUsageDescription | CameraContext (Camera component) |
If you need to use the extension SDK, you must also add the corresponding permission request information in the project's info.plist file.
Enable landscape mode
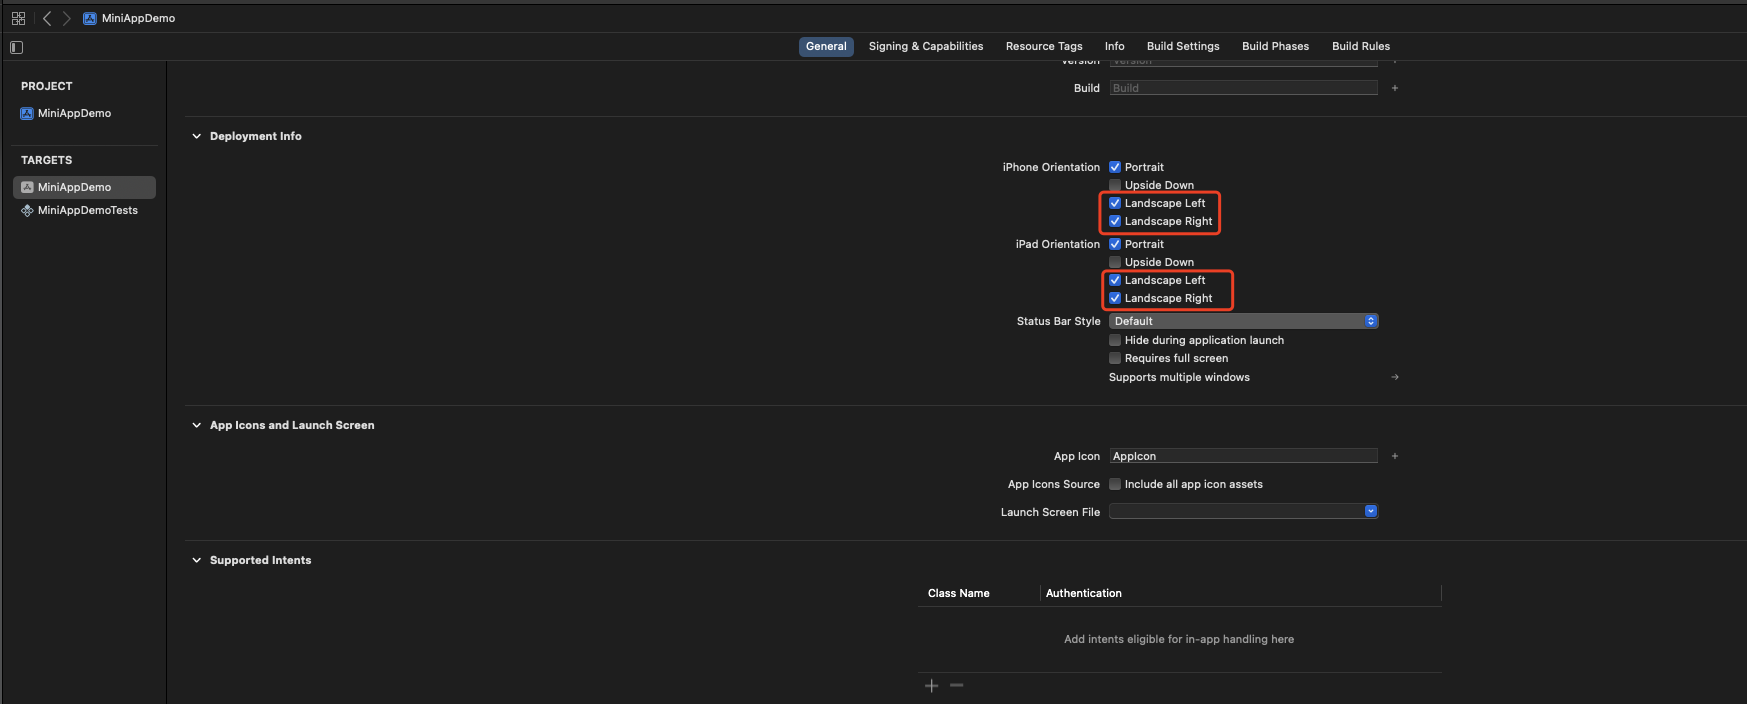
The loading page and video components in the SDK support landscape mode, provided that the superapp project supports it.
Please check the following options in Xcode settings:
Note:
If landscape mode is not enabled, the landscape features in the SDK will not work.
Other initialization operations
You can set up the implementation instance of the open API as needed. If integrating extension modules, prepare the initialization of the extension API.
// Set the mini program engine delegate[TMFMiniAppSDKManager sharedInstance].miniAppSdkDelegate = [MIniAppDemoSDKDelegateImpl sharedInstance];
MIniAppDemoSDKDelegateImpl must implement theTMFMiniAppSDKDelegate protocol. See the introduction and the MIniAppDemoSDKDelegateImpl file in the Demo project.
Open a mini program
You can directly call the API to open the mini program using the appid:
[[TMFMiniAppSDKManager sharedInstance] startUpMiniAppWithAppID:appId parentVC:self completion:^(NSError * _Nullable error) {NSLog(@"open applet error:%@",error);}];
Help and Support
Was this page helpful?
You can also Contact sales or Submit a Ticket for help.
Help us improve! Rate your documentation experience in 5 mins.
Feedback