Advanced
Baixar
Modo Foco
Tamanho da Fonte
Prerequisites
Purchase WAF and BOT Traffic Management, and then enable the BOT switch for the domains that have been added to WAF.
Global Configuration
1. Log in to the WAF console, and then select BOT Management in the left sidebar.
2. On the BOT Management page, select the domain to protect in the top-left corner to view the global settings.
3. Global Settings allow you to centrally configure the protection settings for all modules. Once configured, these settings will be applied to all scenarios under the current domain.

Browser Bot Defense
The browser bot defense feature protects website business security by using client-side dynamic security verification technology to generate a unique ID for each client making a business request and detecting potential bot and malicious crawler activities during client visits to Web or HTML5 pages.
This feature is disabled by default in the BOT protection configuration. After you enable it and configure a handling action, it performs browser bot defense on the pages within the specified scope of the domain to protect against security threats. It identifies potential crawler activities in client requests and takes the configured handling action against requests identified as crawler activities. This policy does not currently apply to APPs and mini programs.
Enablement Configuration
1. In Global Settings, click Configure now for the browser bot defense module to enter the Browser Bot Defense Configuration page.
2. On the Browser Bot Defense page, you can configure the switches for features such as Webpage anti-debugging and Automated identification, and add Allowlist policies.
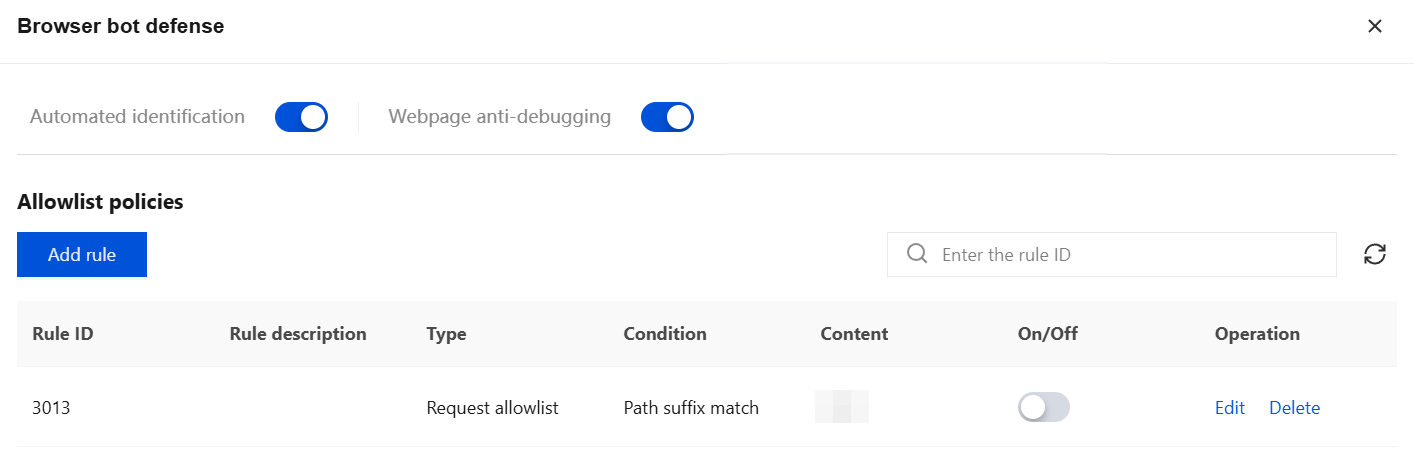
Field Description
Automated identification: Enabled by default, this capability assists in dynamic threat detection after being enabled.
Webpage anti-debugging: Enabled by default, this feature prevents users from tracking page logic when they open the browser's developer tools, thereby protecting the page logic from being viewed.
Note:
We recommend that you enable this protection feature for sensitive directories that require protection.
Configuring an Allowlist
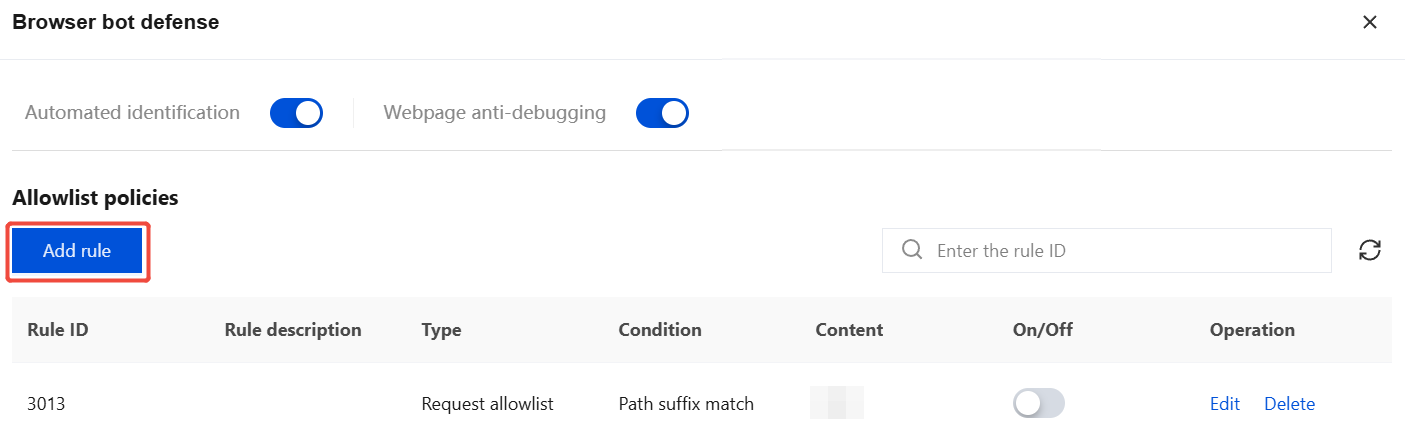
1. On the Browser Bot Defense page, click Add Rule to open the Add Allowlist Rule window.
2. In the Add Allowlist Rule window, configure the relevant parameters and click OK.
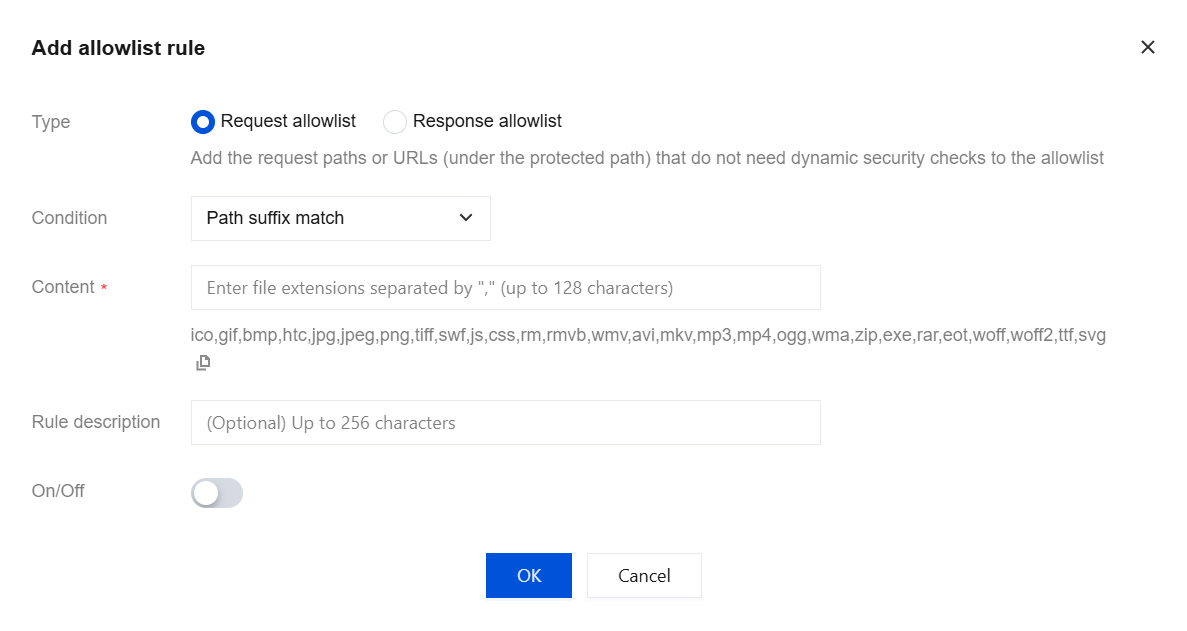
Field Name | Description |
Type | Request allowlist: Add the request paths or URLs (under the protected path) that do not need dynamic security checks to the allowlist. Response allowlist:The response page of the protected path is inserted with JavaScript by default, and you can cancel it for specified pages to improve the website compatibility. |
Condition | Supports Path suffix match, Equal to, Start with and Include. Default: Path suffix match. |
Content | When the matching condition is Path suffix matching, the system provides a default list of file extensions to be added to the allowlist, including: ico, gif, bmp, htc, jpg, jpeg, png, tiff, swf, js, css, rm, rmvb, wmv, avi, mkv, mp3, mp4, ogg, wma, zip, exe, rar, eot, woff, woff2, ttf, svg. You can modify this list as needed. For other matching conditions, enter the allowlist path according to your actual requirements. |
Rule description (optional) | Enter the rule description. |
Rule switch. | Disabled by default. You can adjust it according to your actual requirements. |
Intelligent Analysis
The Intelligent Analysis module analyzes BOT traffic using threat intelligence, AI policies, intelligent statistics, and UA policies. It identifies BOT access behavior in a multi-dimensional and intelligent manner, thereby achieving precise interception of risky access.
Session Management
This feature is similar to the Session setting in CC Protection. By configuring different session identifiers, it is used to distinguish visits from different visitors under the same IP address and to separately analyze the access behavior characteristics of each visitor.
At the same time, by configuring different session identifiers, it can continuously record the access behavior of different visitors, thereby solving the problems of being unable to accurately handle BOT access behavior from residential IPs/public egress IPs and being unable to collect session characteristics from rapidly changing proxy IPs.
1. In the Global Settings card, click Configure now for Session Management.

2. On the Session Identifier Management page, click Add Configuration, configure the relevant parameters, and then click OK.
Note
The session identifier should be a tokenId that can be persistently recorded, such as the value of the set-cookie header after login.
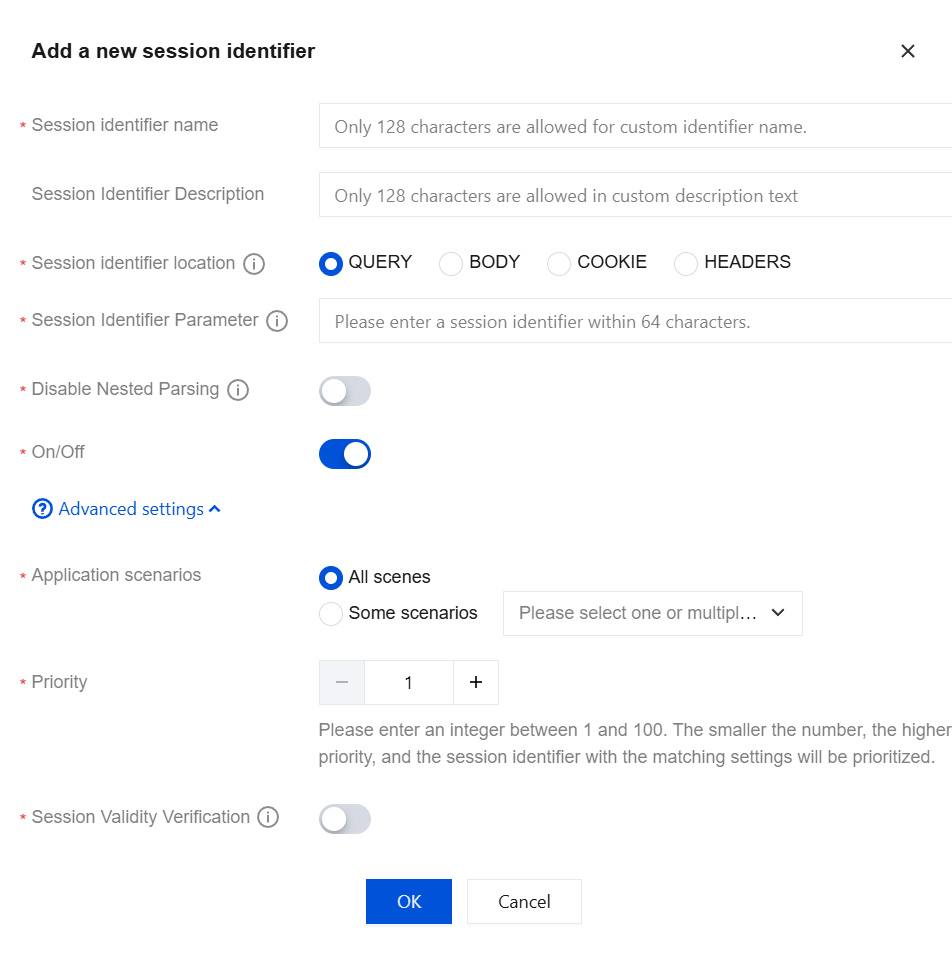
Field Name | Description |
Session Identifier Location | Specify the parameter name from a specific location (QUERY, BODY, COOKIE, or HEADERS) as the session identifier, and use the value corresponding to that parameter name as the session ID. |
Session Identifier Parameter | The value identifier uses the . character to separate parameters at different levels. For example: test: Identify that the value of the test parameter in the JSON string is the session ID. test1.test2: Identifies that the value of the test2 parameter contained in test1 within the JSON string is the session ID. |
Advanced Settings | Click Advanced settings to configure. If not specifically set, the settings are applied to all scenarios by default with a priority of 1. Application scenarios: It supports selecting All scenes or Some scenarios, and the rules take effect on the selected scenarios. Priority: It supports entering an integer between 1 and 100. A smaller number indicates a higher priority, and the system prioritizes matching the correspondingly configured session identifier. When priorities are equal, a more recent update time takes precedence. Session Validity Verification: After it is enabled, the system supports verifying the validity of the extracted session ID value. It provides five verification methods: JWS verification, JWE verification, inclusion verification, length verification, and regular expression matching. |
3. After the configuration is completed, it takes effect automatically. The system will then start analyzing BOT traffic based on the fields where session characteristics are located.
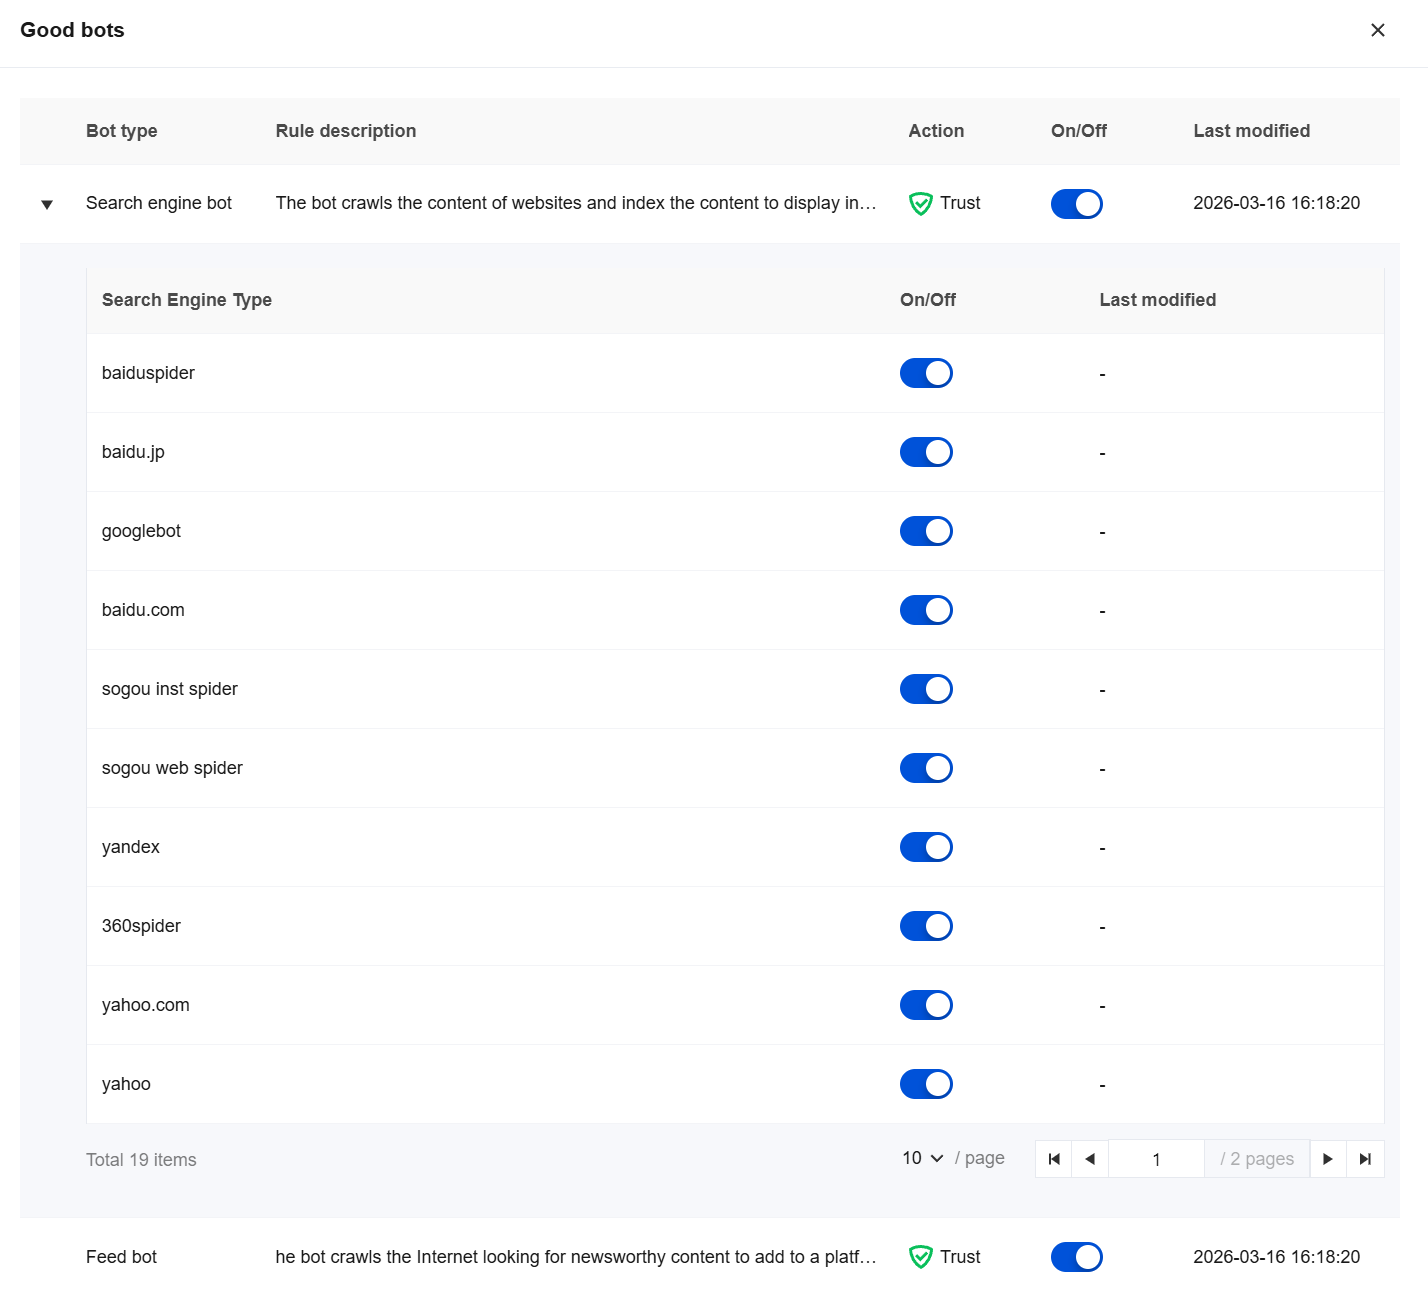
Good Bots
1. In the Global Settings card, click Configure now for Got bots.
2. On the Good Bots page, you can use the toggle to appropriately allow beneficial BOTs that contribute to website data, enabling the website to process requests from search engines and external partner crawlers.
BOT Allowlist
1. Log in to the WAF console, and then select BOT Management in the left sidebar.
2. On the BOT Management page, select the domain to protect in the top-left corner, and then click BOT allowlist.
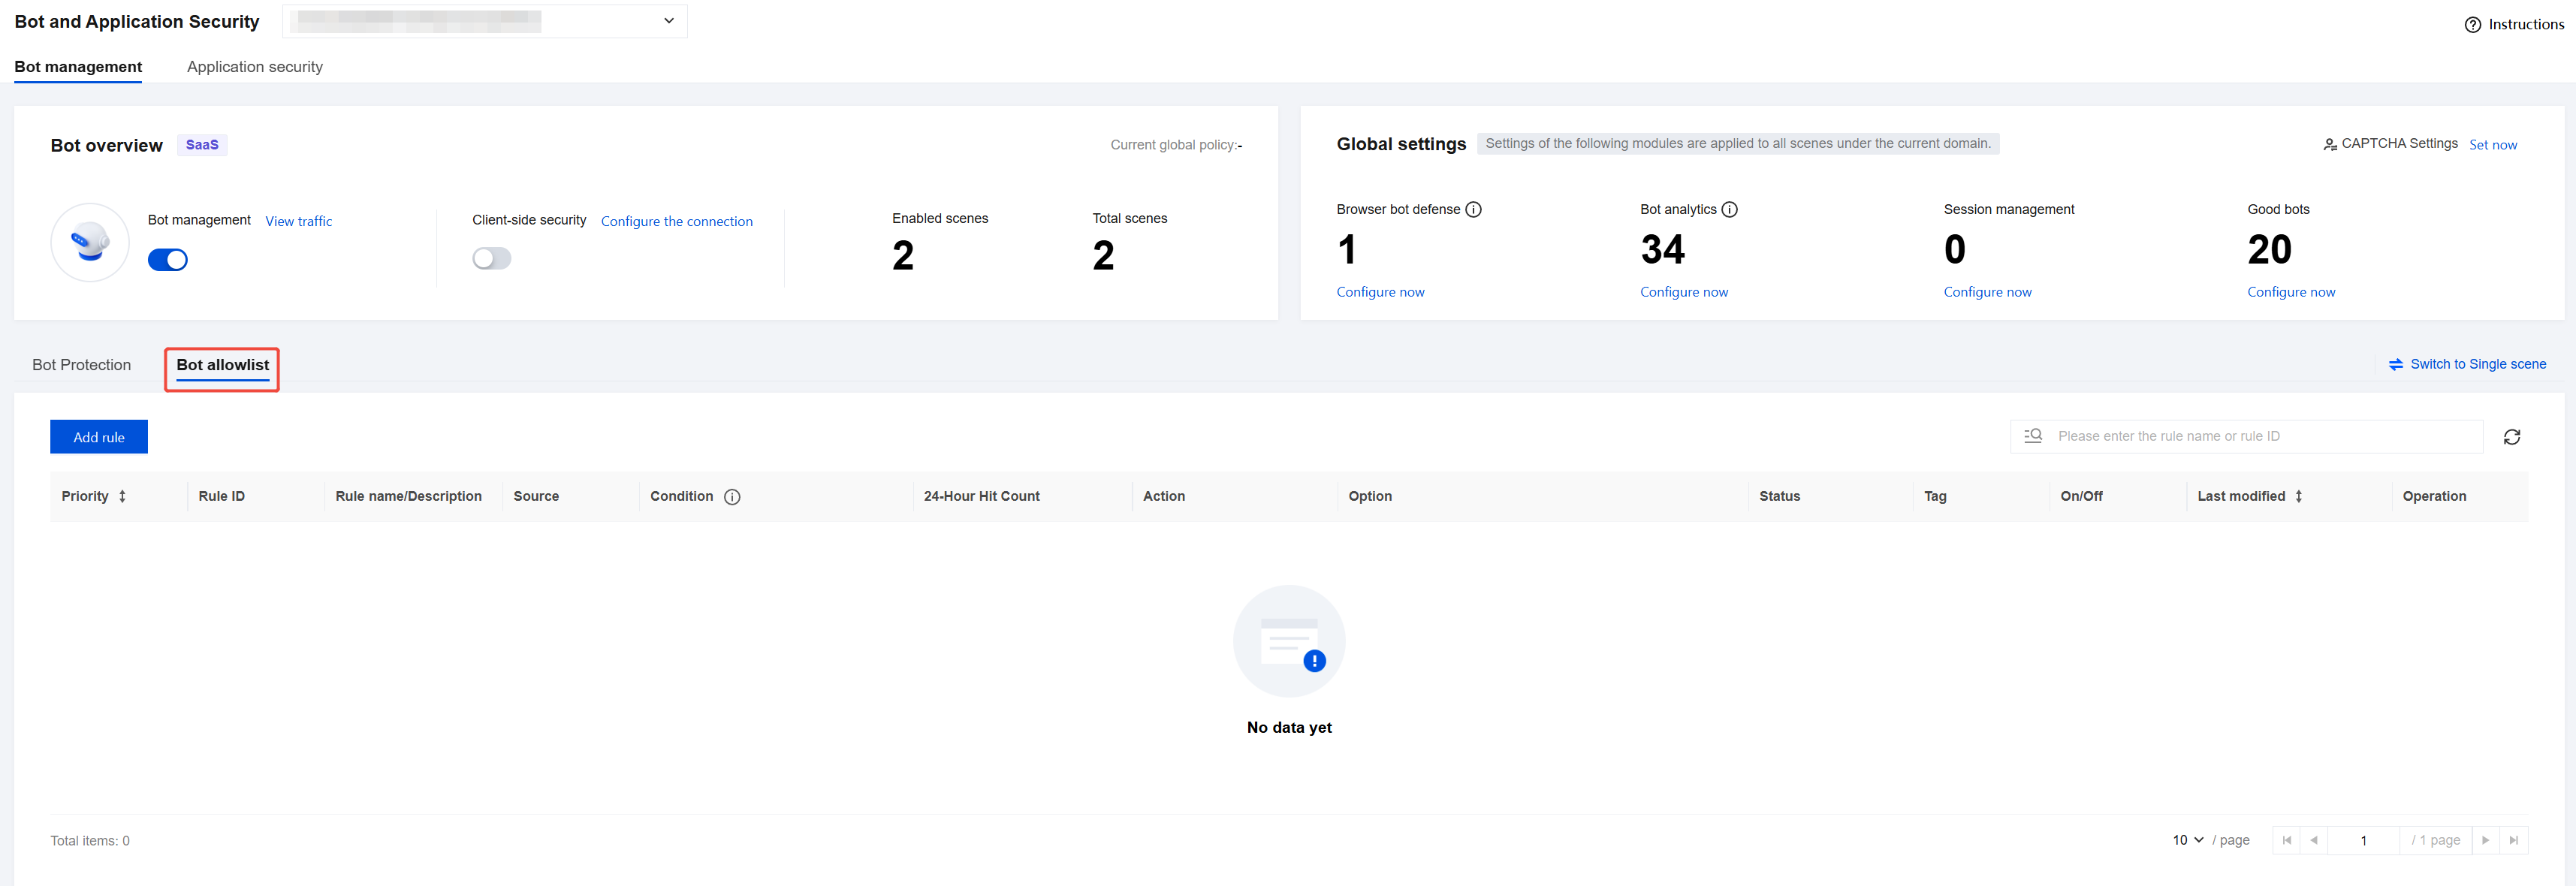
3. On the Add bot allowlist page, click Add rule, configure the relevant parameters, and then click OK.
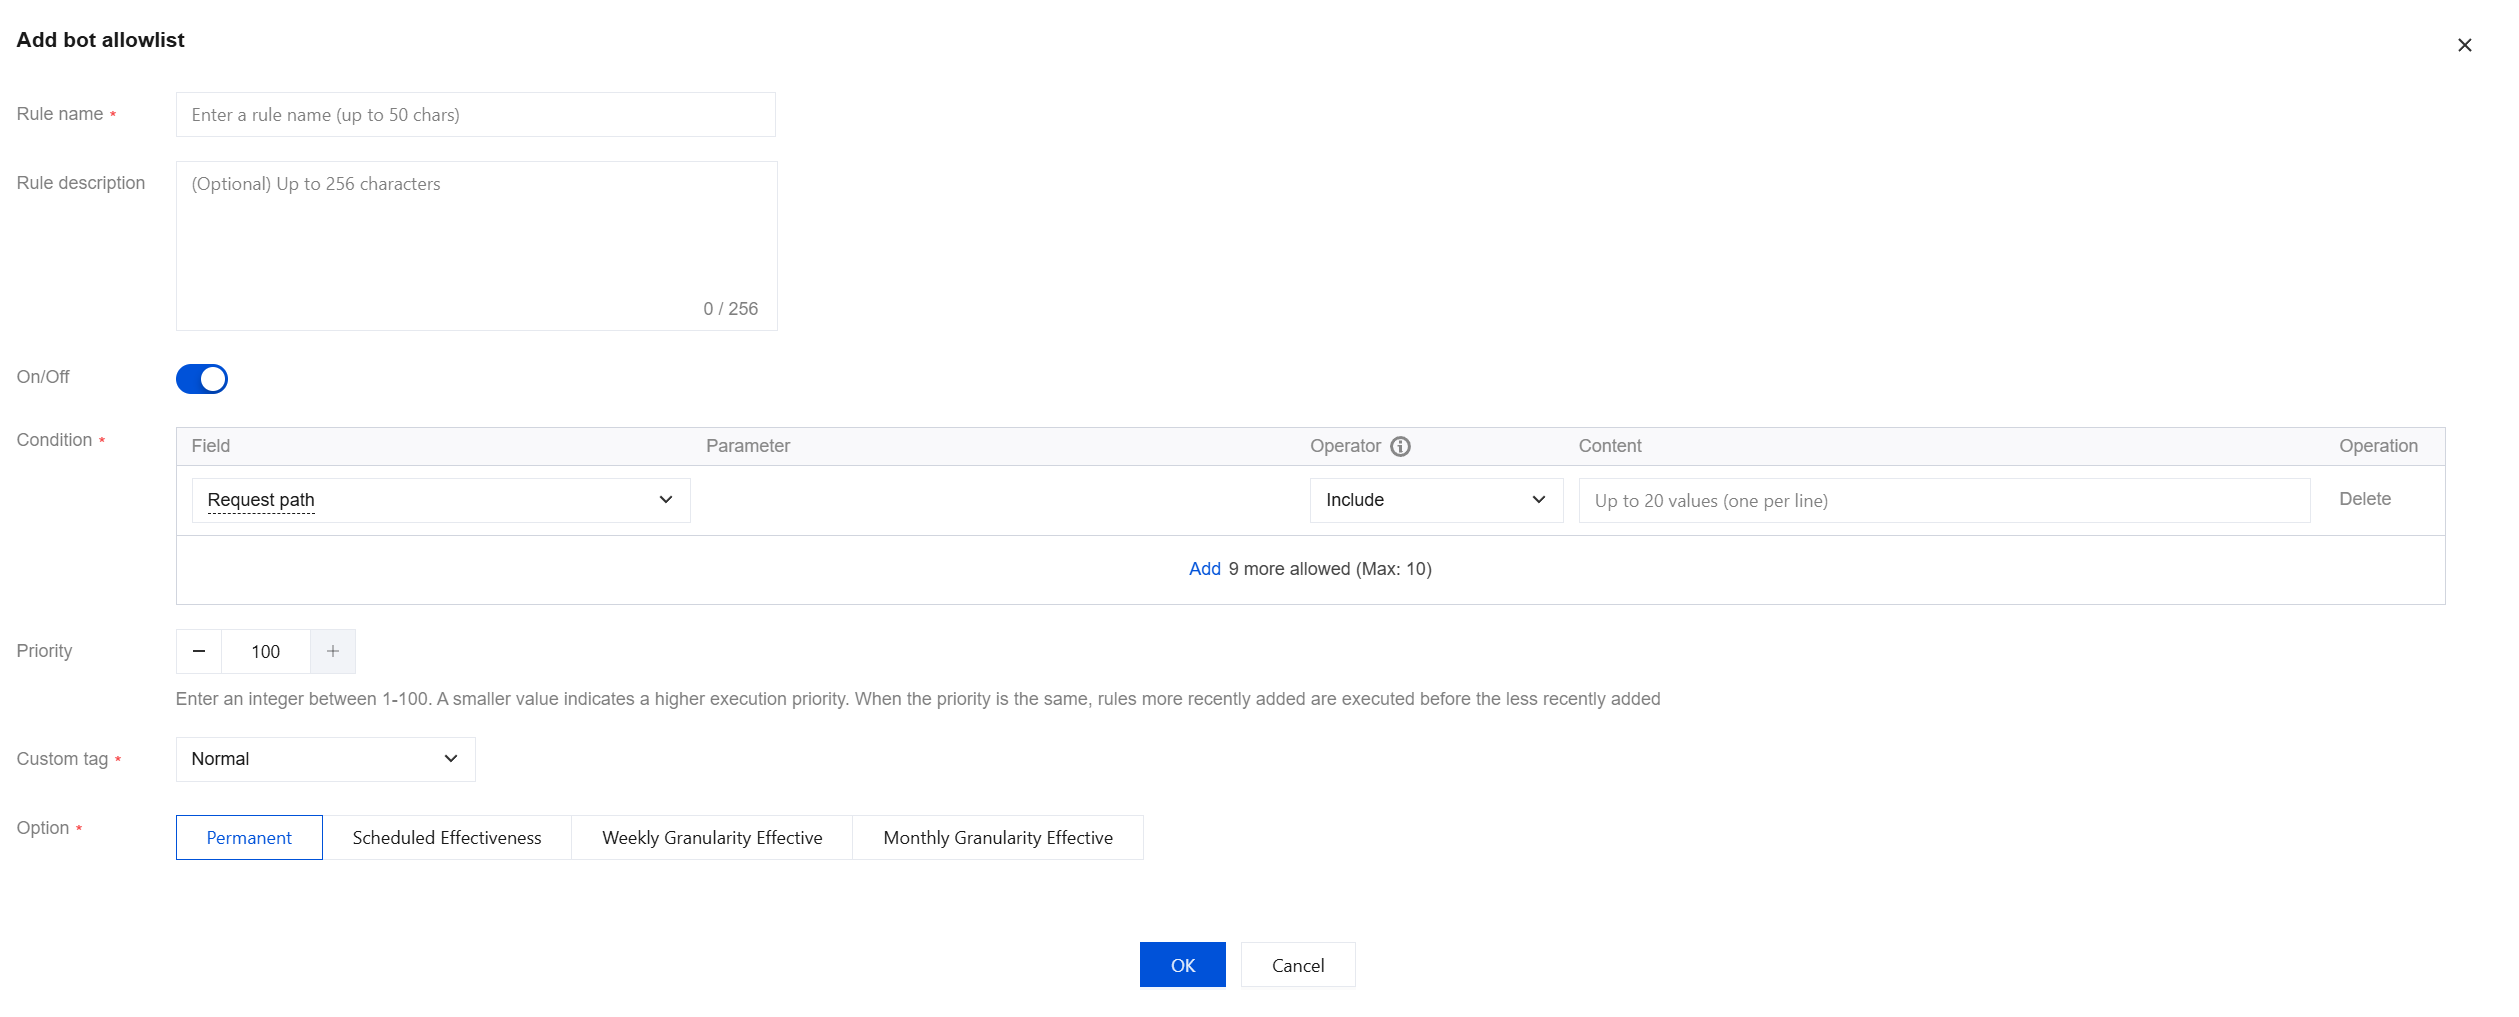
Field Name | Description |
Rule name | Rule name field. |
Rule Description | Rule description field. |
On/Off | Rule switch status. Enabled by default. |
Condition | Configure matching conditions for the BOT rule. You can configure up to 10 matching conditions, and the relationship between conditions is "AND". Hover the mouse over a specific matching condition to view its corresponding description. |
Priority | Enter an integer between 1 and 100. A smaller number indicates a higher execution priority for this rule. For rules with the same priority, the later the creation time, the higher the priority. |
Custom Tag | Friendly bot, Normal. |
Option | Permanent: It takes effect permanently for all time. Scheduled Effectiveness: It takes effect according to the specified daily time periods. Weekly Granularity Effective: It takes effect according to specific days and time periods each week. Monthly Granularity Effective: It takes effect according to specific dates and time periods each month. |
4. After the addition is complete, you can view the newly created rule in the rule list. Click Edit or Delete to edit or delete the rule.

5. The priority order from highest to lowest is: BOT allowlist > Scenario 1 (Priority 1) > Scenario 2 (Priority 2) > ... > Scenario n (Priority n).
Ajuda e Suporte
Esta página foi útil?
Você também pode entrar em contato com a Equipe de vendas ou Enviar um tíquete em caso de ajuda.
comentários