React Native
Baixar
Modo Foco
Tamanho da Fonte
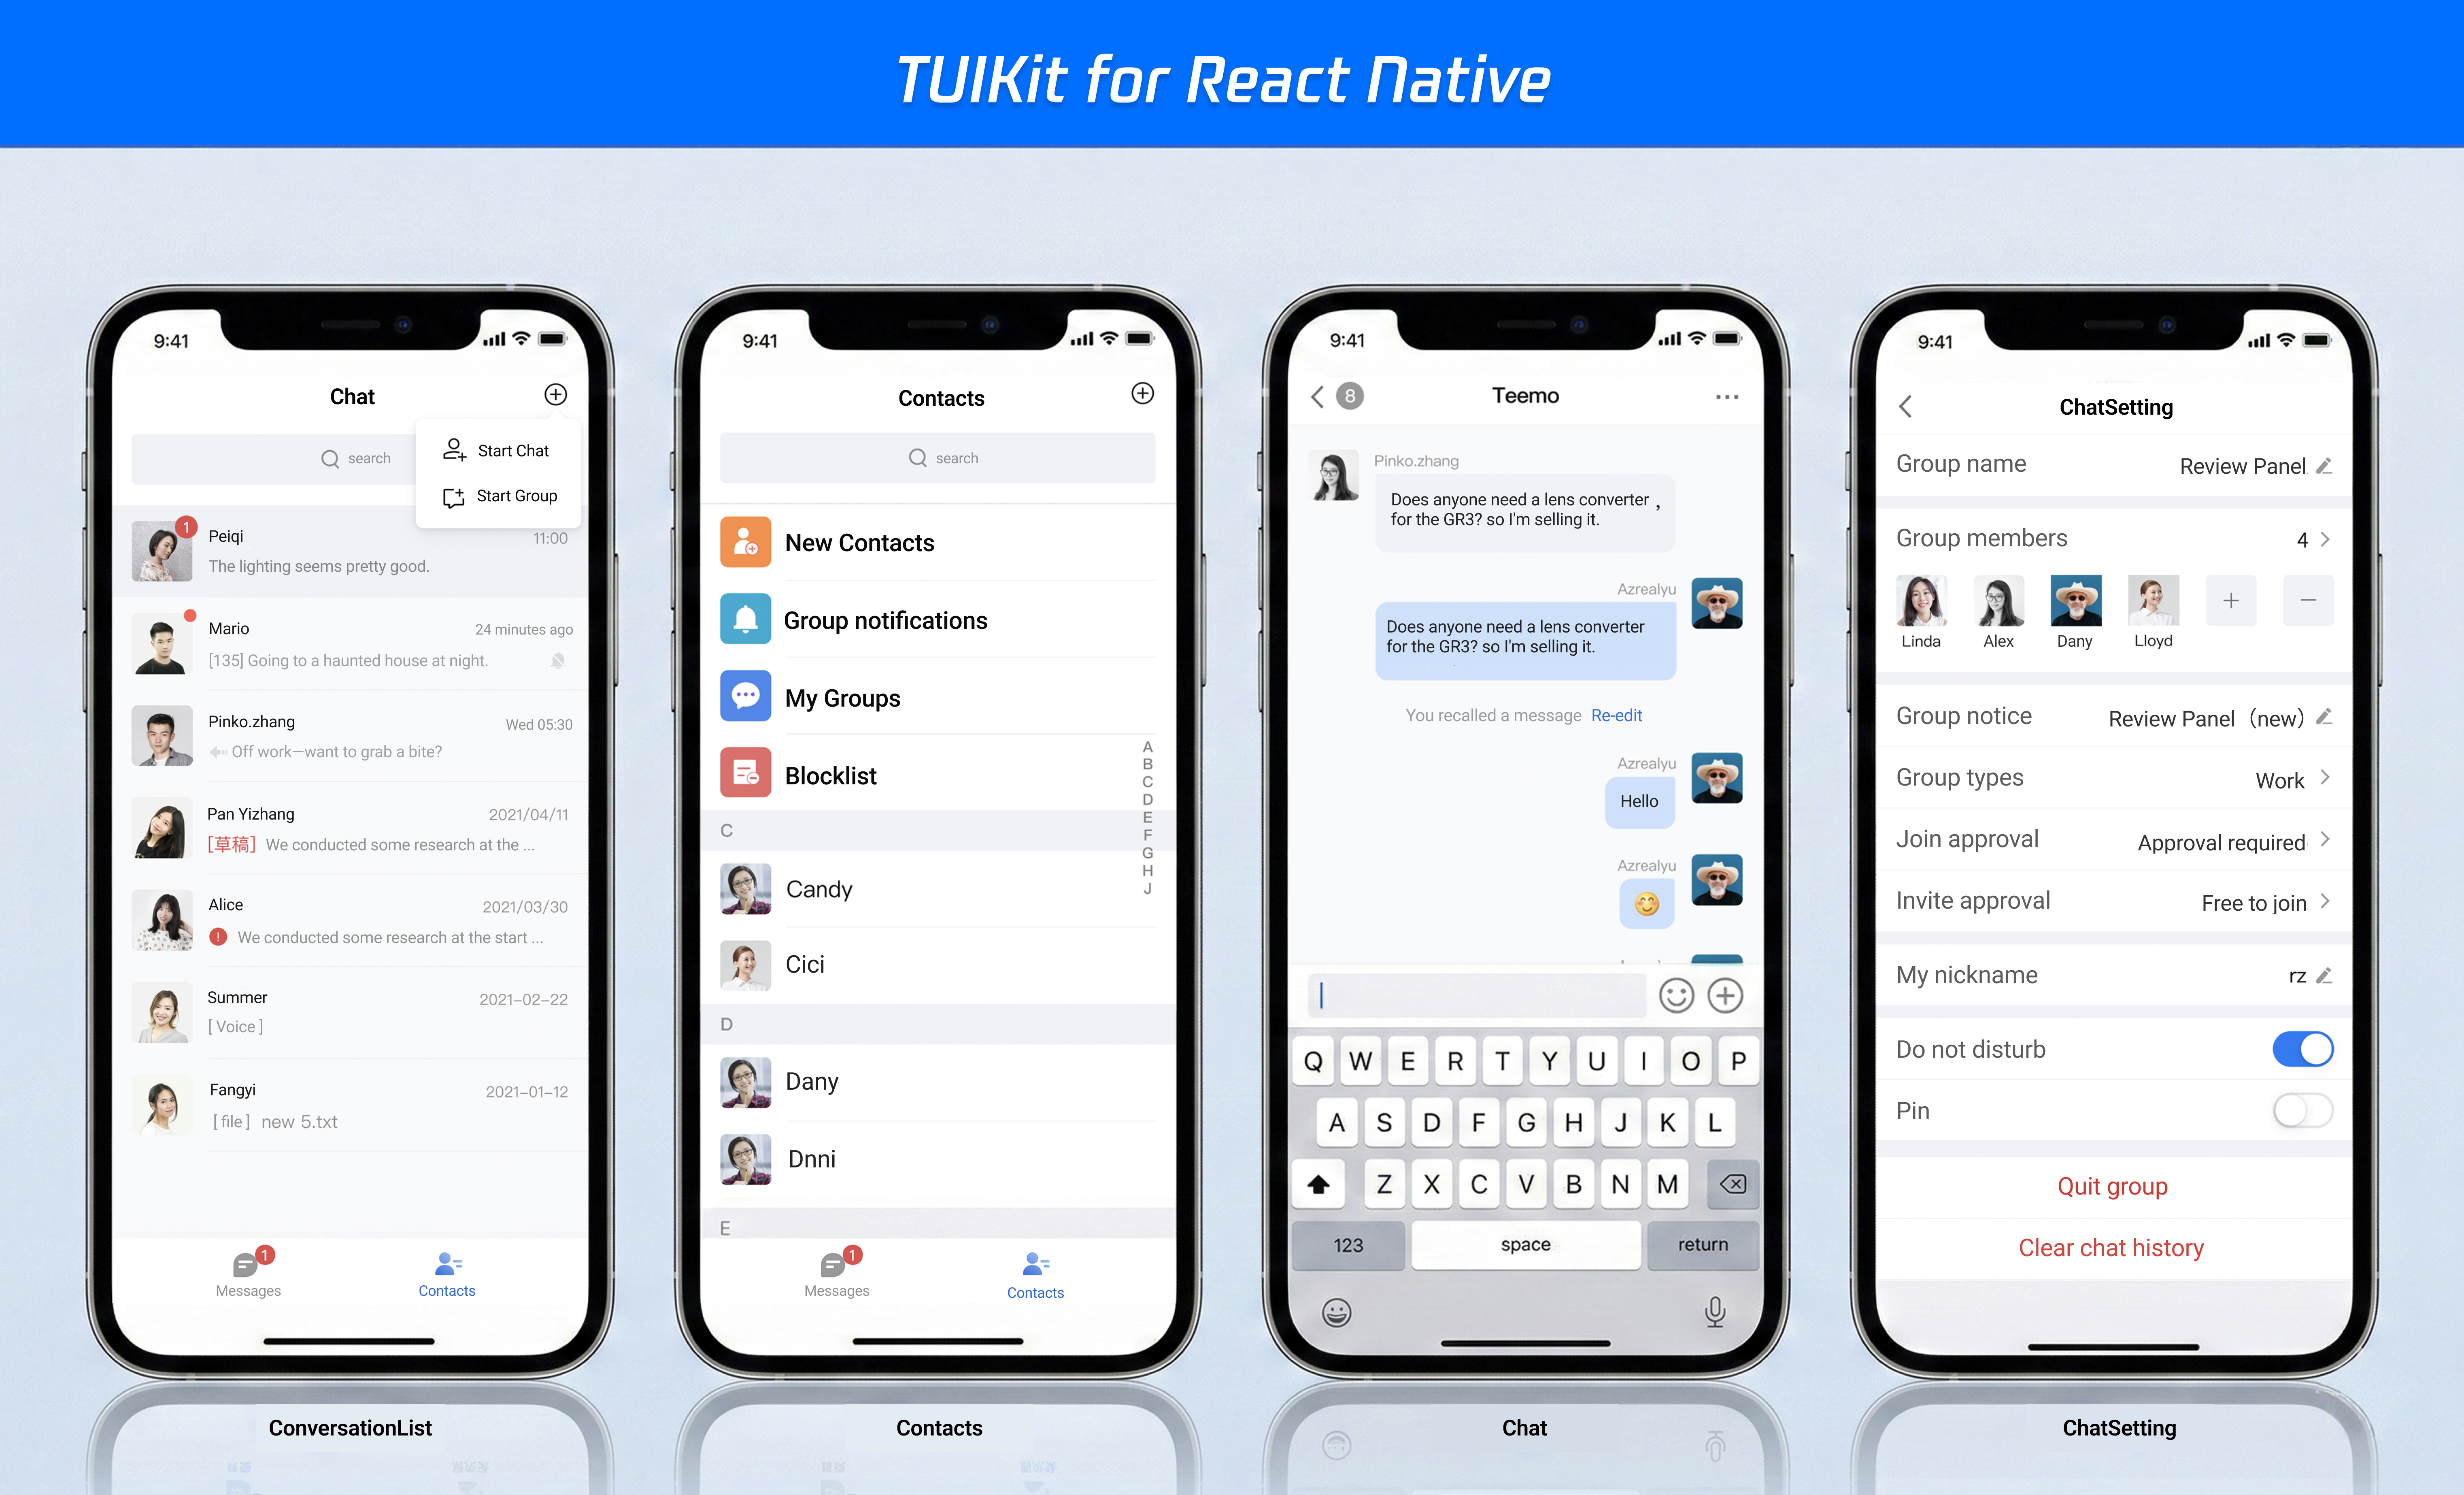
TUIKit is a React Native UI component library based on Tencent Cloud Chat SDK, providing common UI components such as session, chat, and group features. With these well-designed UI components, you can quickly build elegant, reliable, and scalable chat applications. The UI style developed based on React Native is more in line with the habits of overseas users and supports internationalization. You are welcome to integrate it.
The interface effect of TUIKit is shown below:
Prerequisites
React Native version: ≥ 0.85.3
Node.js version: ≥ 22
iOS version:≥ iOS 16.0
Android version:≥ 24
Installation and Setup
Step 1: Create a project (this example creates a project using Expo.)
npx create-expo-app@latest my-app --template blank-typescript
Step 2. Integrate TUIKit
1. Install UIkit: Download chat-uikit-react-native via npm/yarn and use it in the project.
npm install @tencentcloud/chat-uikit-react-native tuikit-atomicx-react-native
yarn add @tencentcloud/chat-uikit-react-native tuikit-atomicx-react-native
2. To install third-party dependencies: TUIKit relies on native modules for features such as voice recording, image selection, and internationalization, which require manual installation.
npm install react-i18next i18next react-native-nitro-modules react-native-nitro-sound react-native-video react-native-create-thumbnail react-native-image-picker @react-native-documents/picker @react-native-async-storage/async-storage react-native-safe-area-context react-native-screens
yarn add react-i18next i18next react-native-nitro-modules react-native-nitro-sound react-native-video react-native-create-thumbnail react-native-image-picker @react-native-documents/picker @react-native-async-storage/async-storage react-native-safe-area-context react-native-screens
3. Set up navigation. Screens within TUIKit use
@react-navigation/native for route management.npx expo install @react-navigation/native @react-navigation/native-stack
Step 3: Permission Configuration
Configure the relevant Android and iOS permissions in
app.json.{"expo": {"ios": {"infoPlist": {"NSCameraUsageDescription": "You need to use the camera to take photos and send images and videos.","NSPhotoLibraryUsageDescription": "Access to your photo library is required to select and send photos and videos.","NSPhotoLibraryAddUsageDescription": "Need to save the image to the photo album.","NSMicrophoneUsageDescription": "Microphone access is required to record voice messages.","NSDocumentsFolderUsageDescription": "File access is required to select a document to send."}},"android": {"permissions": ["CAMERA","RECORD_AUDIO","READ_EXTERNAL_STORAGE","WRITE_EXTERNAL_STORAGE","READ_MEDIA_IMAGES","READ_MEDIA_VIDEO","READ_MEDIA_AUDIO","ACCESS_NETWORK_STATE","ACCESS_WIFI_STATE","VIBRATE","WAKE_LOCK"]}}}
Step 4. Import TUIKit
1. Integrating the UIKit: Copy
@tencentcloud/chat-uikit-react-native/src/screens to ./src/screens (to facilitate customization, route adjustments, etc.).cp -R node_modules/@tencentcloud/chat-uikit-react-native/src/screens ./src/screens/
xcopy /E /I /Y "node_modules\\@tencentcloud\\chat-uikit-react-native\\src\\screens" ".\\src\\screens"
2. Configure page routing: Replace the contents of
app.tsx with the following.Note:
The routing in the example uses
@react-navigation/native; if you wish to replace it, you will also need to update the corresponding routing in ./src/screens.import React, { useState } from 'react'import { StatusBar, StyleSheet, useColorScheme, View } from 'react-native'import { SafeAreaProvider } from 'react-native-safe-area-context'import { NavigationContainer } from '@react-navigation/native'import { createNativeStackNavigator } from '@react-navigation/native-stack'import {LoginScreen,ChatScreen,ChatSettingScreen,ConversationListScreen,ContactListScreen,SearchScreen,AddFriendScreen,AddGroupScreen,ApplicationVerifyScreen,BlackListScreen,ContactInfoScreen,FriendApplicationListScreen,GroupApplicationListScreen,GroupListScreen,SetRemarkScreen,GroupManagementScreen,GroupMemberListScreen,GroupTypeInfoScreen,CreateGroupScreen,SearchInConversationScreen,UserFilterScreen,UserPickerScreen,BottomTabBar,type BottomTabKey,} from './src/screens'import { ToastRoot } from '@tencentcloud/chat-uikit-react-native'const Stack = createNativeStackNavigator()const MainScreen: React.FC = () => {const [activeTab, setActiveTab] = useState<BottomTabKey>('message')return (<View style={styles.mainScreen}>{activeTab === 'message' ? (<ConversationListScreen />) : (<ContactListScreen />)}<BottomTabBar current={activeTab} onChange={setActiveTab} /></View>)}function App(): React.JSX.Element {const isDarkMode = useColorScheme() === 'dark'return (<SafeAreaProvider><StatusBar barStyle={isDarkMode ? 'light-content' : 'dark-content'} /><ToastRoot /><NavigationContainer><Stack.NavigatorinitialRouteName="Login"screenOptions={{ headerShown: false }}><Stack.Screen name="Login" component={LoginScreen} /><Stack.Screen name="Main" component={MainScreen} options={{ freezeOnBlur: true }} /><Stack.Screen name="Chat" component={ChatScreen} /><Stack.Screen name="Search" component={SearchScreen} /><Stack.Screen name="ChatSetting" component={ChatSettingScreen} options={{ freezeOnBlur: true }} /><Stack.Screen name="AddFriend" component={AddFriendScreen} /><Stack.Screen name="AddGroup" component={AddGroupScreen} /><Stack.Screen name="ApplicationVerify" component={ApplicationVerifyScreen} /><Stack.Screen name="BlackList" component={BlackListScreen} /><Stack.Screen name="ContactInfo" component={ContactInfoScreen} /><Stack.Screen name="FriendApplicationList" component={FriendApplicationListScreen} /><Stack.Screen name="GroupApplicationList" component={GroupApplicationListScreen} /><Stack.Screen name="GroupList" component={GroupListScreen} /><Stack.Screen name="SetRemark" component={SetRemarkScreen} /><Stack.Screen name="GroupManagement" component={GroupManagementScreen} /><Stack.Screen name="GroupMemberList" component={GroupMemberListScreen} /><Stack.Screen name="GroupTypeInfo" component={GroupTypeInfoScreen} /><Stack.Screen name="CreateGroup" component={CreateGroupScreen} /><Stack.Screen name="SearchInConversation" component={SearchInConversationScreen} /><Stack.Screen name="UserFilter" component={UserFilterScreen} /><Stack.Screen name="UserPicker" component={UserPickerScreen} /></Stack.Navigator></NavigationContainer></SafeAreaProvider>)}const styles = StyleSheet.create({mainScreen: {flex: 1,backgroundColor: '#F5F5F5',},})export default App
Execution and Testing
1. Log in
src/screens/LoginScreen.tsx, enter the SDKAppID, userID, and SecretKey, then click Log In.Parameter | Type | Description |
SDKAppID | Number | 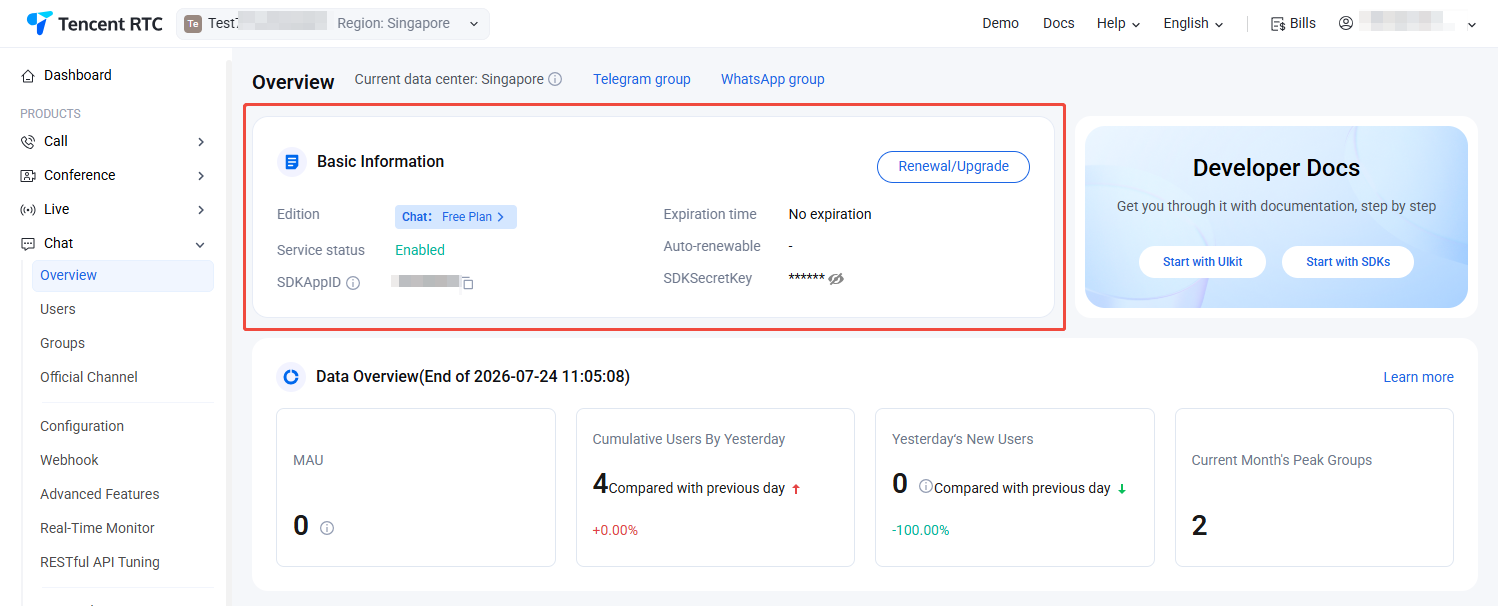 |
SecretKey | String | The SecretKey is the key for the instant messaging Chat client application. You can obtain it from the Chat Product Details. Safety Notice: The sample supports generating userSig via the genTestUserSig function. However, the SecretKey used in this method is vulnerable to reverse engineering; if the key is compromised, attackers could hijack your Tencent Cloud traffic. This method is suitable only for local functional debugging. For the correct way to issue UserSig, please refer to "Generating UserSig on the Server."Sensitive information (such as SecretKey) is intended solely for demo testing and must not be committed to code repositories or used in production environments. |
userID | String | A unique user identifier defined by you; it may only contain uppercase and lowercase letters (a-z, A-Z), numbers (0-9), underscores, and hyphens. |
import React, { useEffect, useState } from 'react'import { useNavigation } from '@react-navigation/native'import type { NativeStackNavigationProp } from '@react-navigation/native-stack'import { useLoginState } from 'tuikit-atomicx-react-native'import { genTestUserSig } from './debug/GenerateTestUserSig'type RootStackParamList = {Login: undefinedMain: undefined}type Nav = NativeStackNavigationProp<RootStackParamList, 'Login'>export const LoginScreen: React.FC = () => {const navigation = useNavigation<Nav>()const [loading, setLoading] = useState(false)const { login, logout, loginStatus, loginUserInfo } = useLoginState()const [userID, setUserID] = useState('') // userIDconst SDKAppID = 0 // SDKAppIDconst SecretKey = '' // SecretKeyuseEffect((): void => {if (loading && loginStatus === 1) {navigation.reset({ index: 0, routes: [{ name: 'Main' }] })}}, [loading, loginStatus, navigation])const doLogin = async (): Promise<void> => {setLoading(true)try {await login({sdkAppID: Number(SDKAppID),userID: userID.trim(),userSig: genTestUserSig({SDKAppID: SDKAppID,userID: userID.trim(),SecretKey: SecretKey}).userSig,})} catch (error: any) {console.error(error)} finally {setLoading(false)}}return /* UI */;}
2. Compile and run the project:To compile and run the project, you need to use a real device or an emulator. It is recommended to use a real device. You can refer to the React Native official website running-on-device for connecting a real device for debugging.
1. Enable Developer Mode on the phone and turn on the USB Debugging switch.
2. Connect the phone with a USB cable, it is recommended to choose the Transfering File option, do not choose the Charge Only option.
3. After confirming the phone is successfully connected, execute
npm run android to compile and run the project.npm run start
1. Connect the phone with a USB cable and open the project ios directory with Xcode.
2. Configure the signing information according to the running-on-device section on the React Native official website.
3. Go to the ios directory and install dependencies.
cd iospod install
4. Go back to the root directory and execute npm run ios to compile and run the project.
cd ../npm run start
Exchange and Feedback
Join Telegram Technical Support Group or WhatsApp Communication Group for professional engineer support to solve your problems.
FAQs
What to do when there is a runtime environment error?
You can run the following command for environmental diagnosis.
npx react-native doctor
Ajuda e Suporte
Esta página foi útil?
Você também pode entrar em contato com a Equipe de vendas ou Enviar um tíquete em caso de ajuda.
comentários