Self-integrated push only supports regular message push and is no longer maintained. It is strongly recommended to use the Push Plugin (TChatPush), which requires only simple configuration for one-click integration with multiple vendors' push services. It supports not only regular message push but also full-member push and user tag-based push. It offers complete push lifecycle query, data statistics, troubleshooting, and other features, providing you with a stable, timely, and diverse one-stop comprehensive push service.
This article aims to introduce how to self-integrate various vendor push services.
Running the demo for offline push
Step 1. Register your app with vendor push platforms
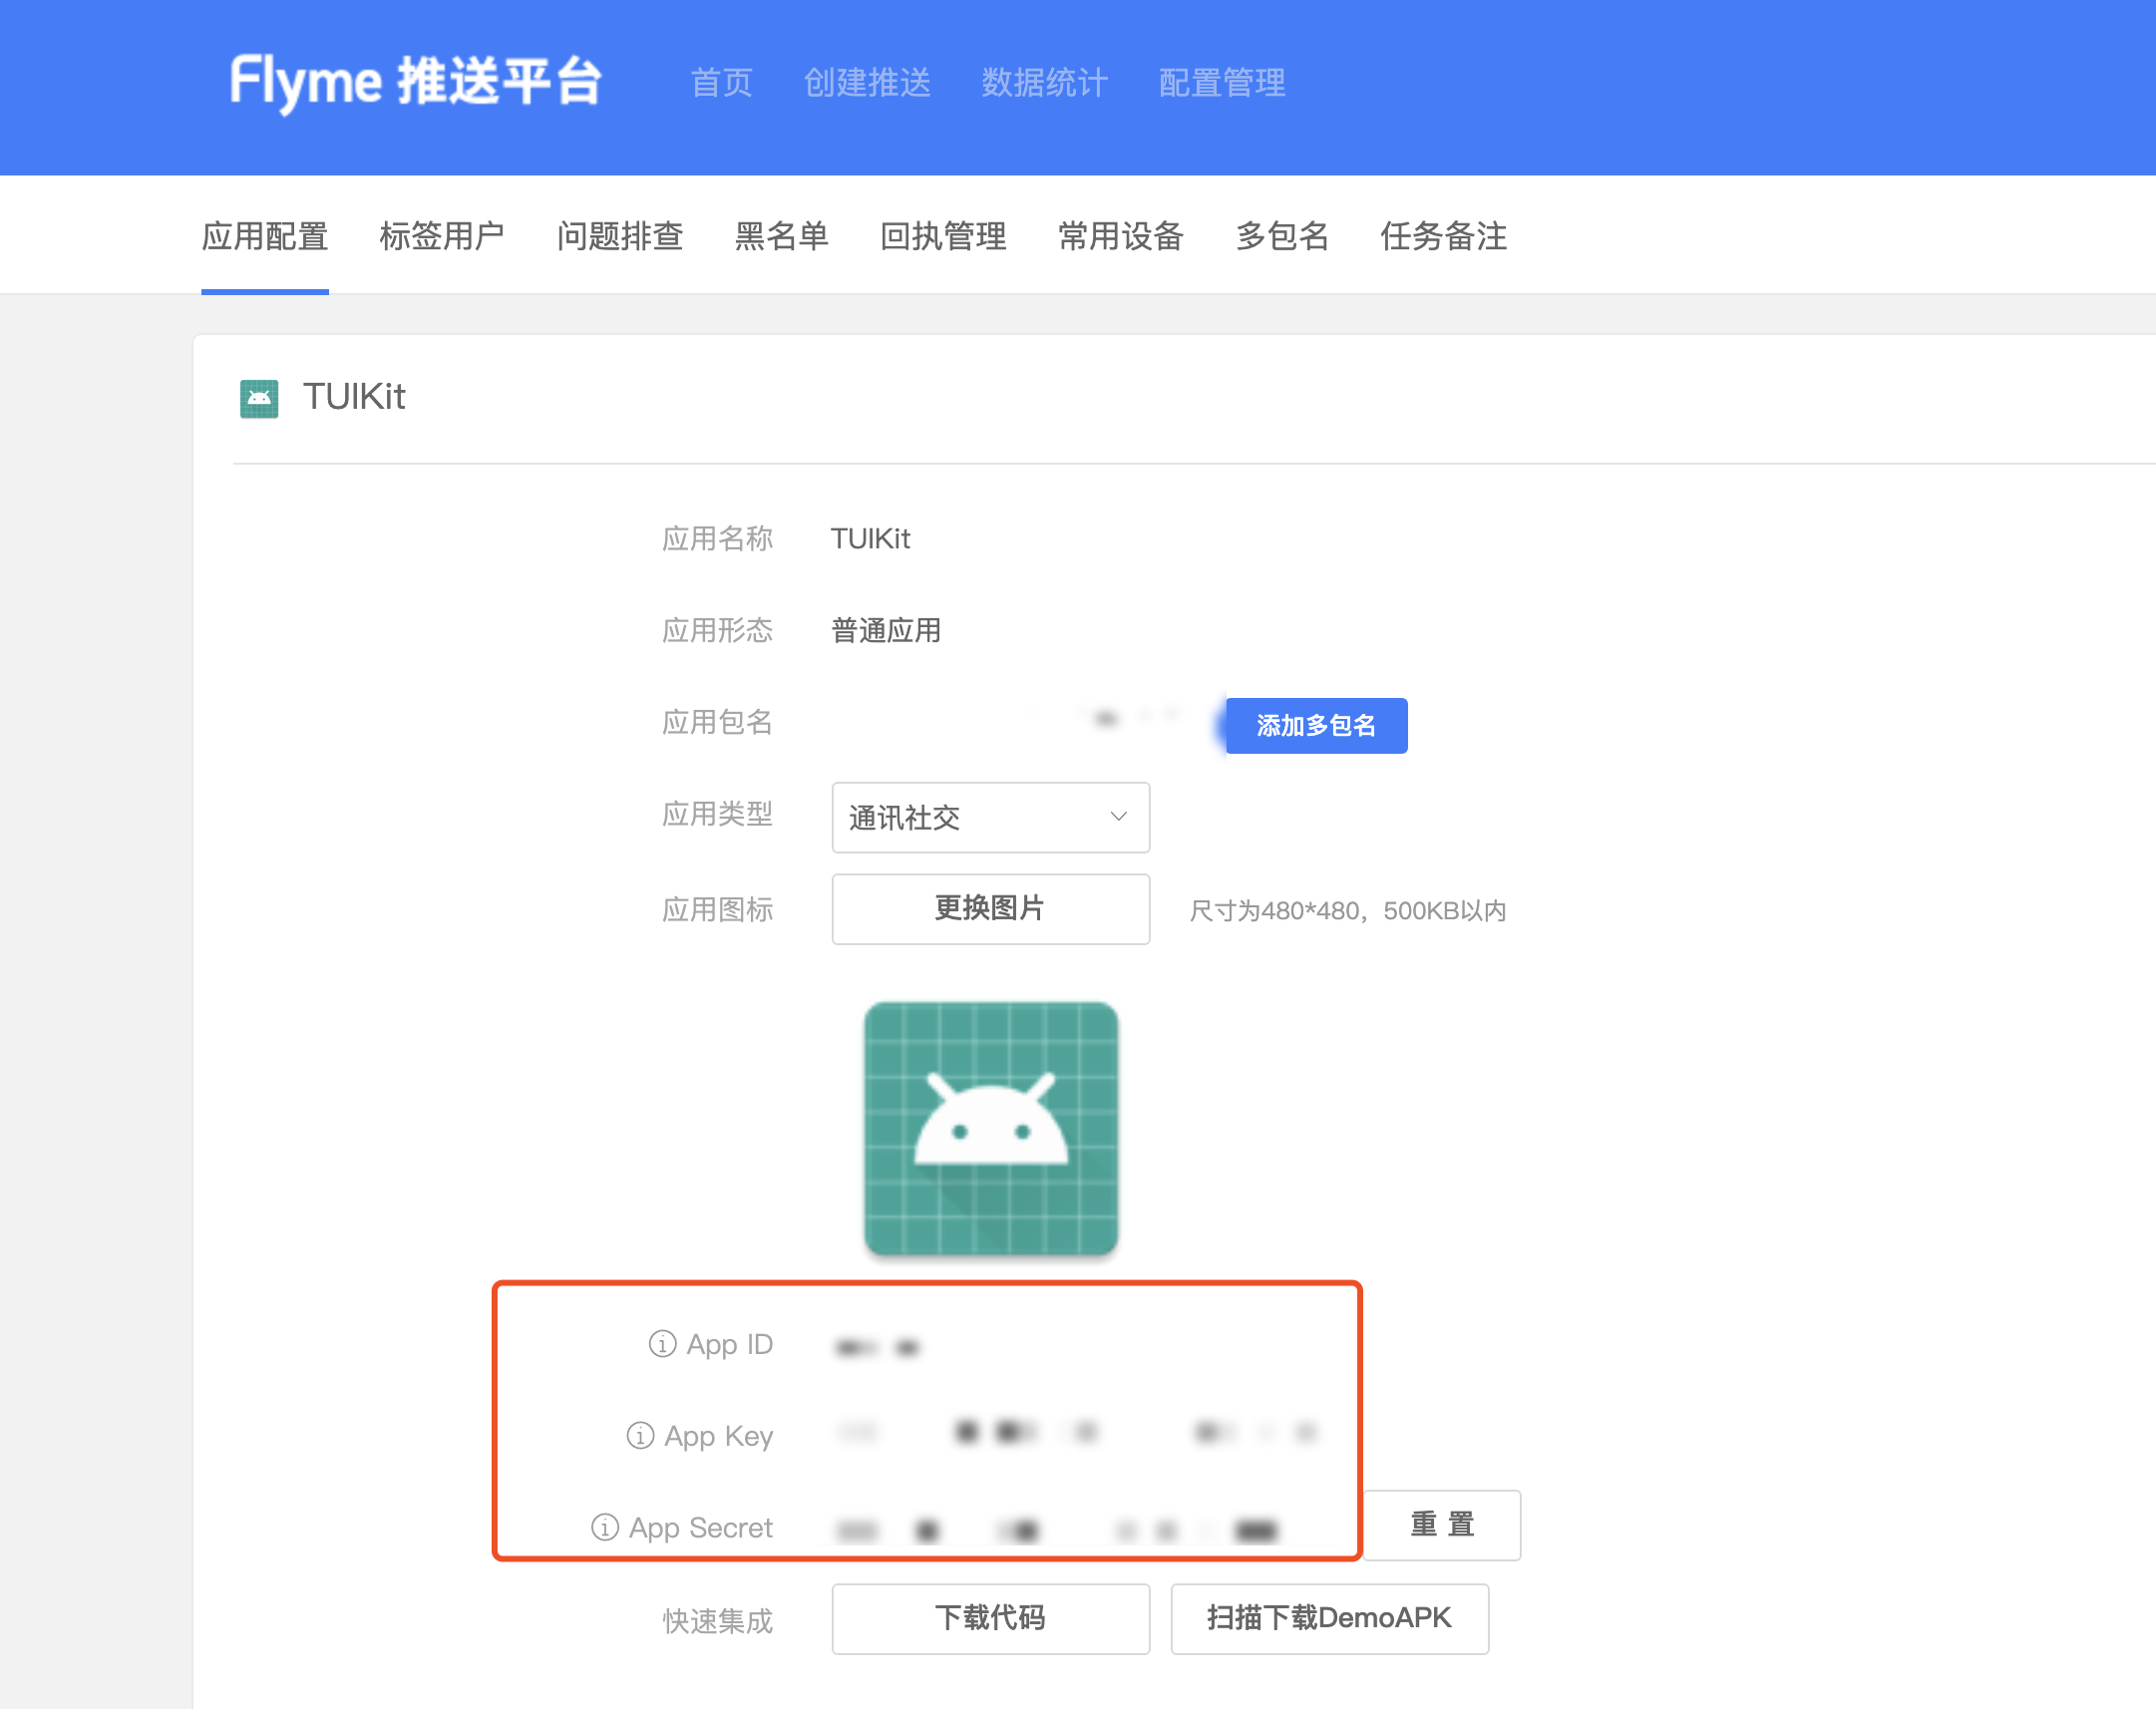
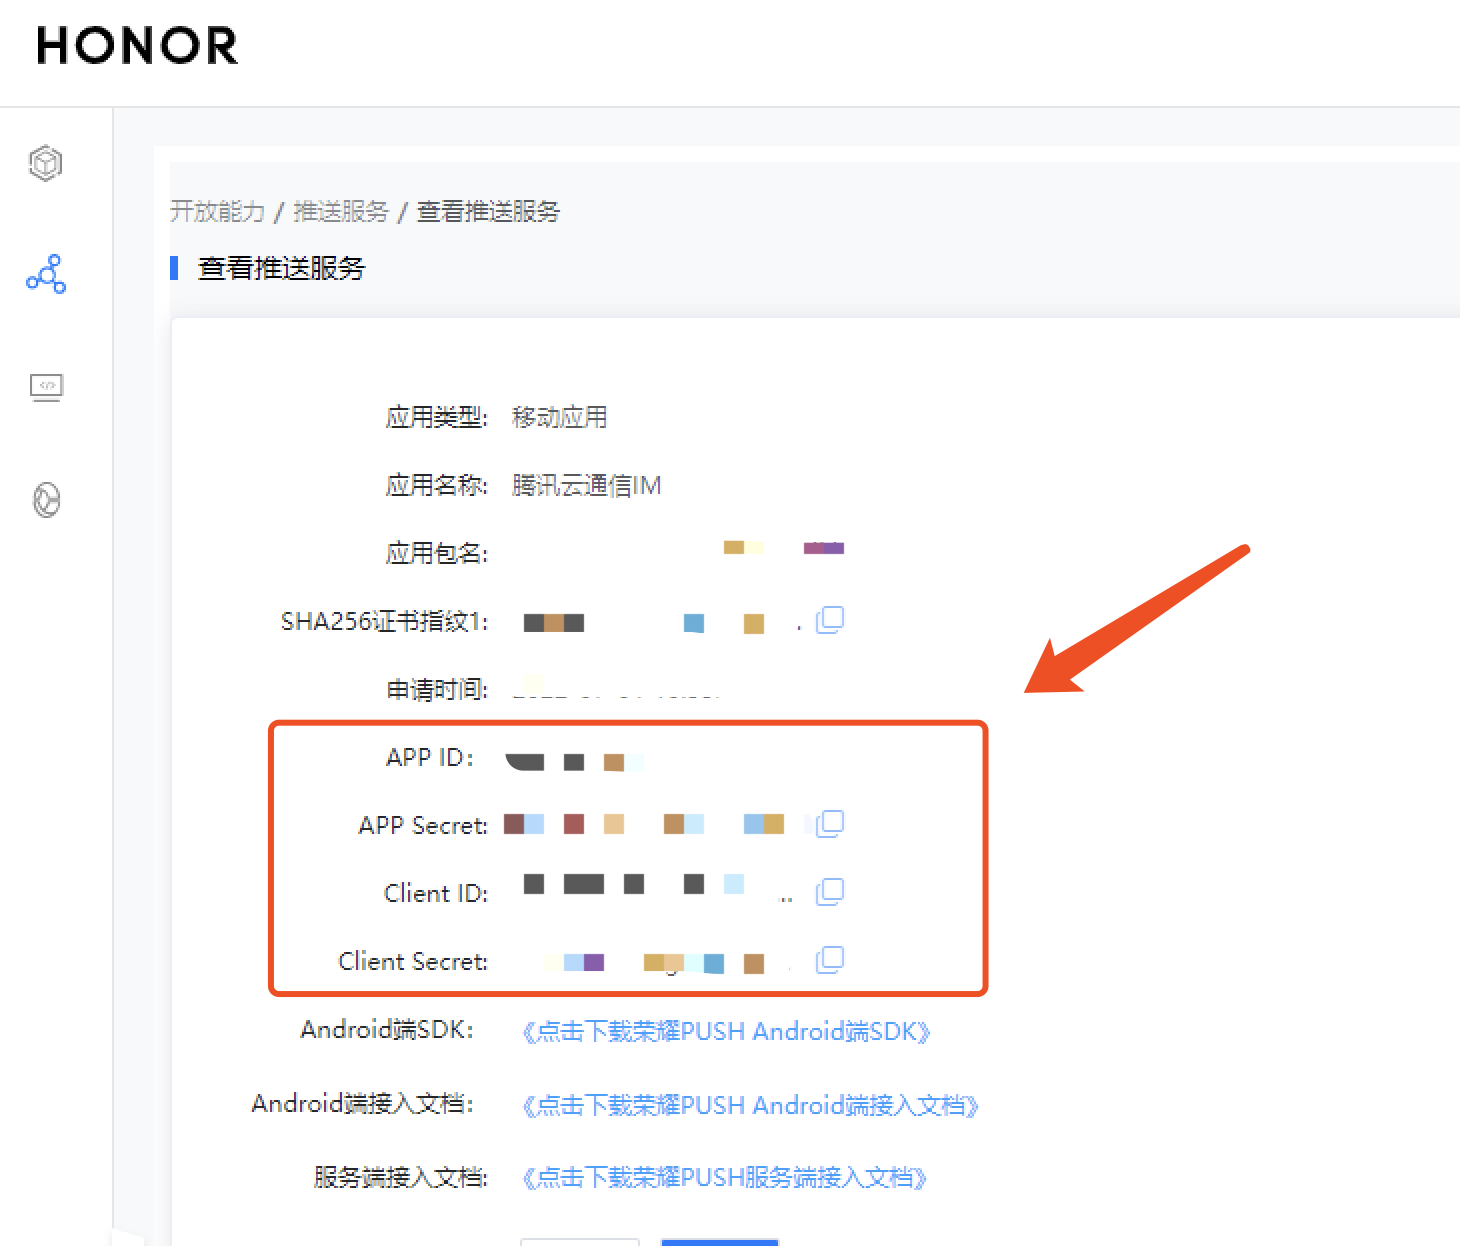
The offline push feature depends on vendors' original channels. You need to register your app with each vendor's push platform to obtain parameters such as AppID and AppKey. Currently, mobile phone vendors supported inside the Chinese mainland are: Mi, Huawei, HONOR, OPPO, vivo, Meizu, and the mobile phone vendor supported outside the Chinese mainland is Google FCM.
Step 2. Create resources in the Chat console
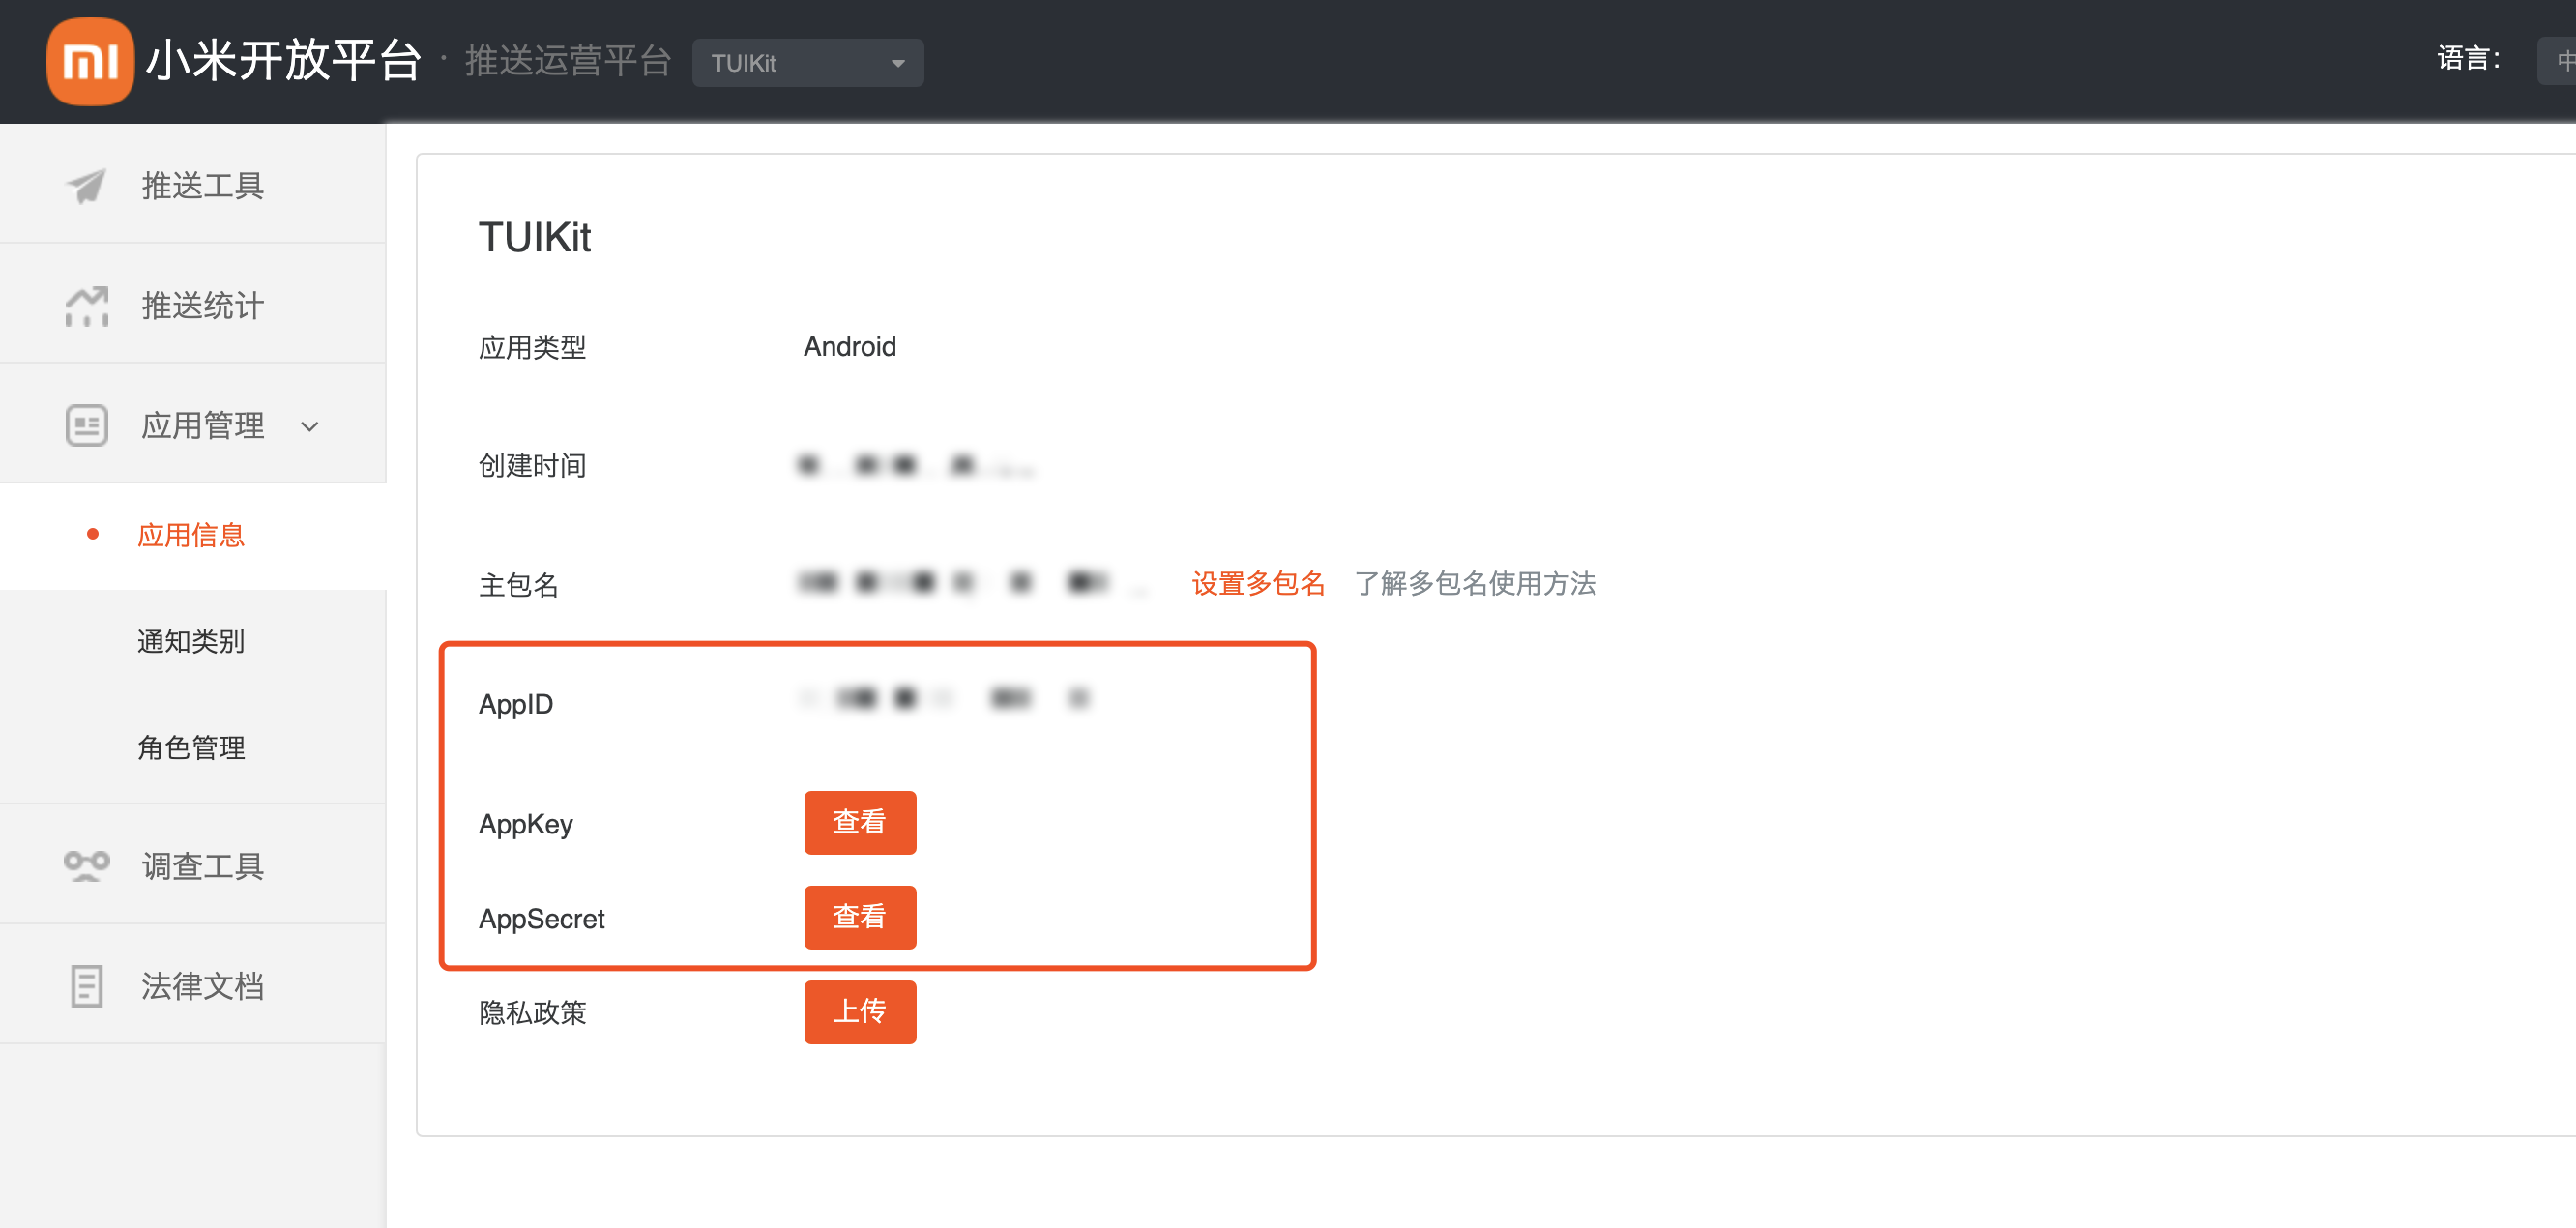
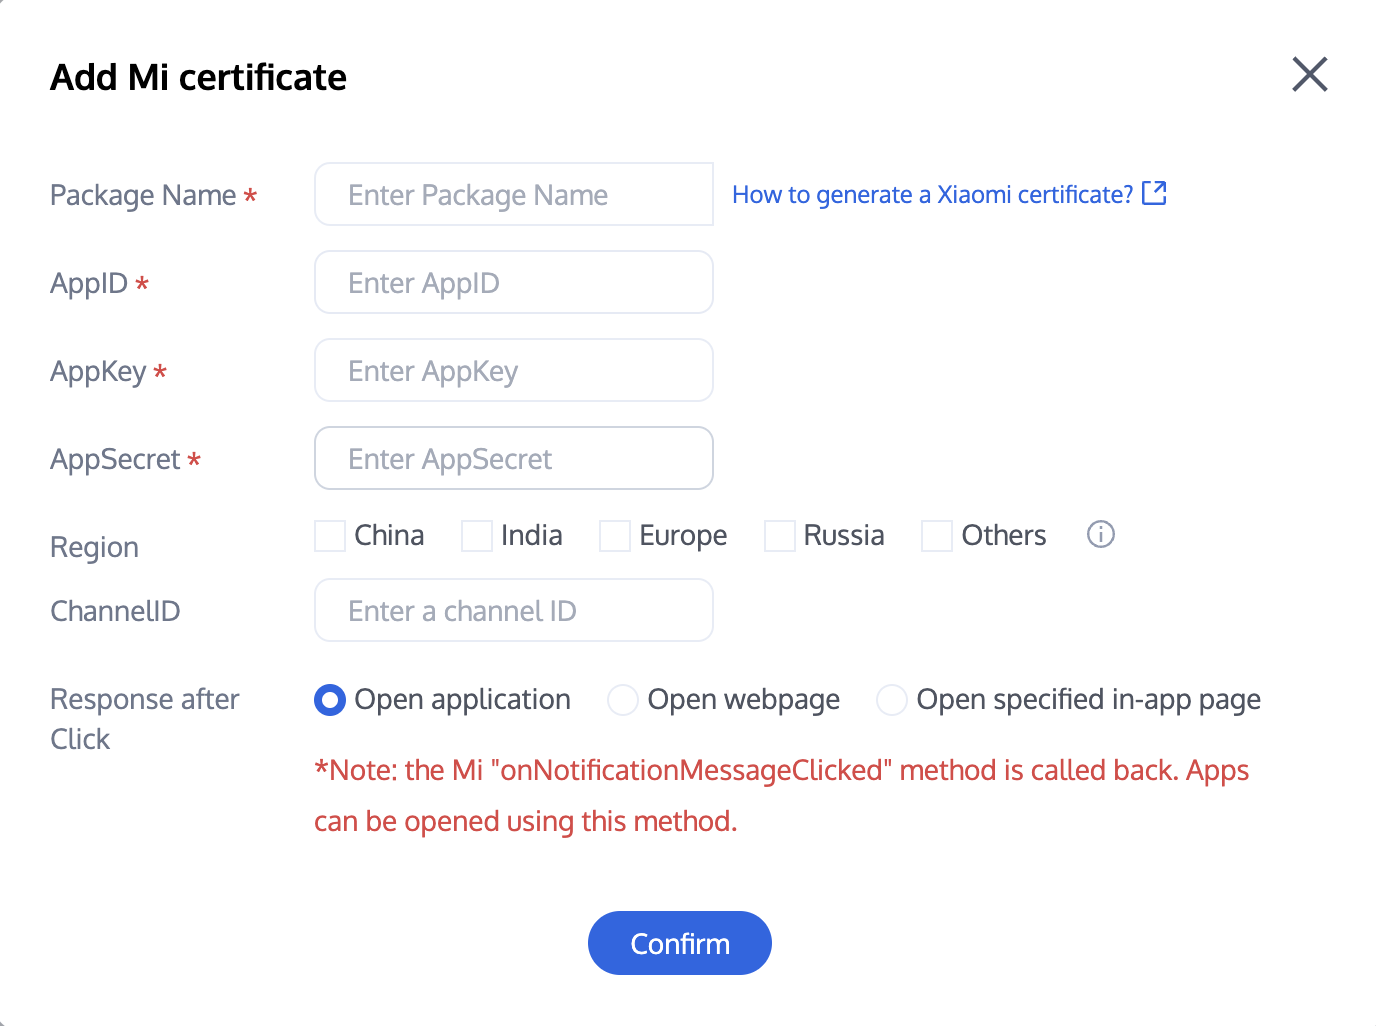
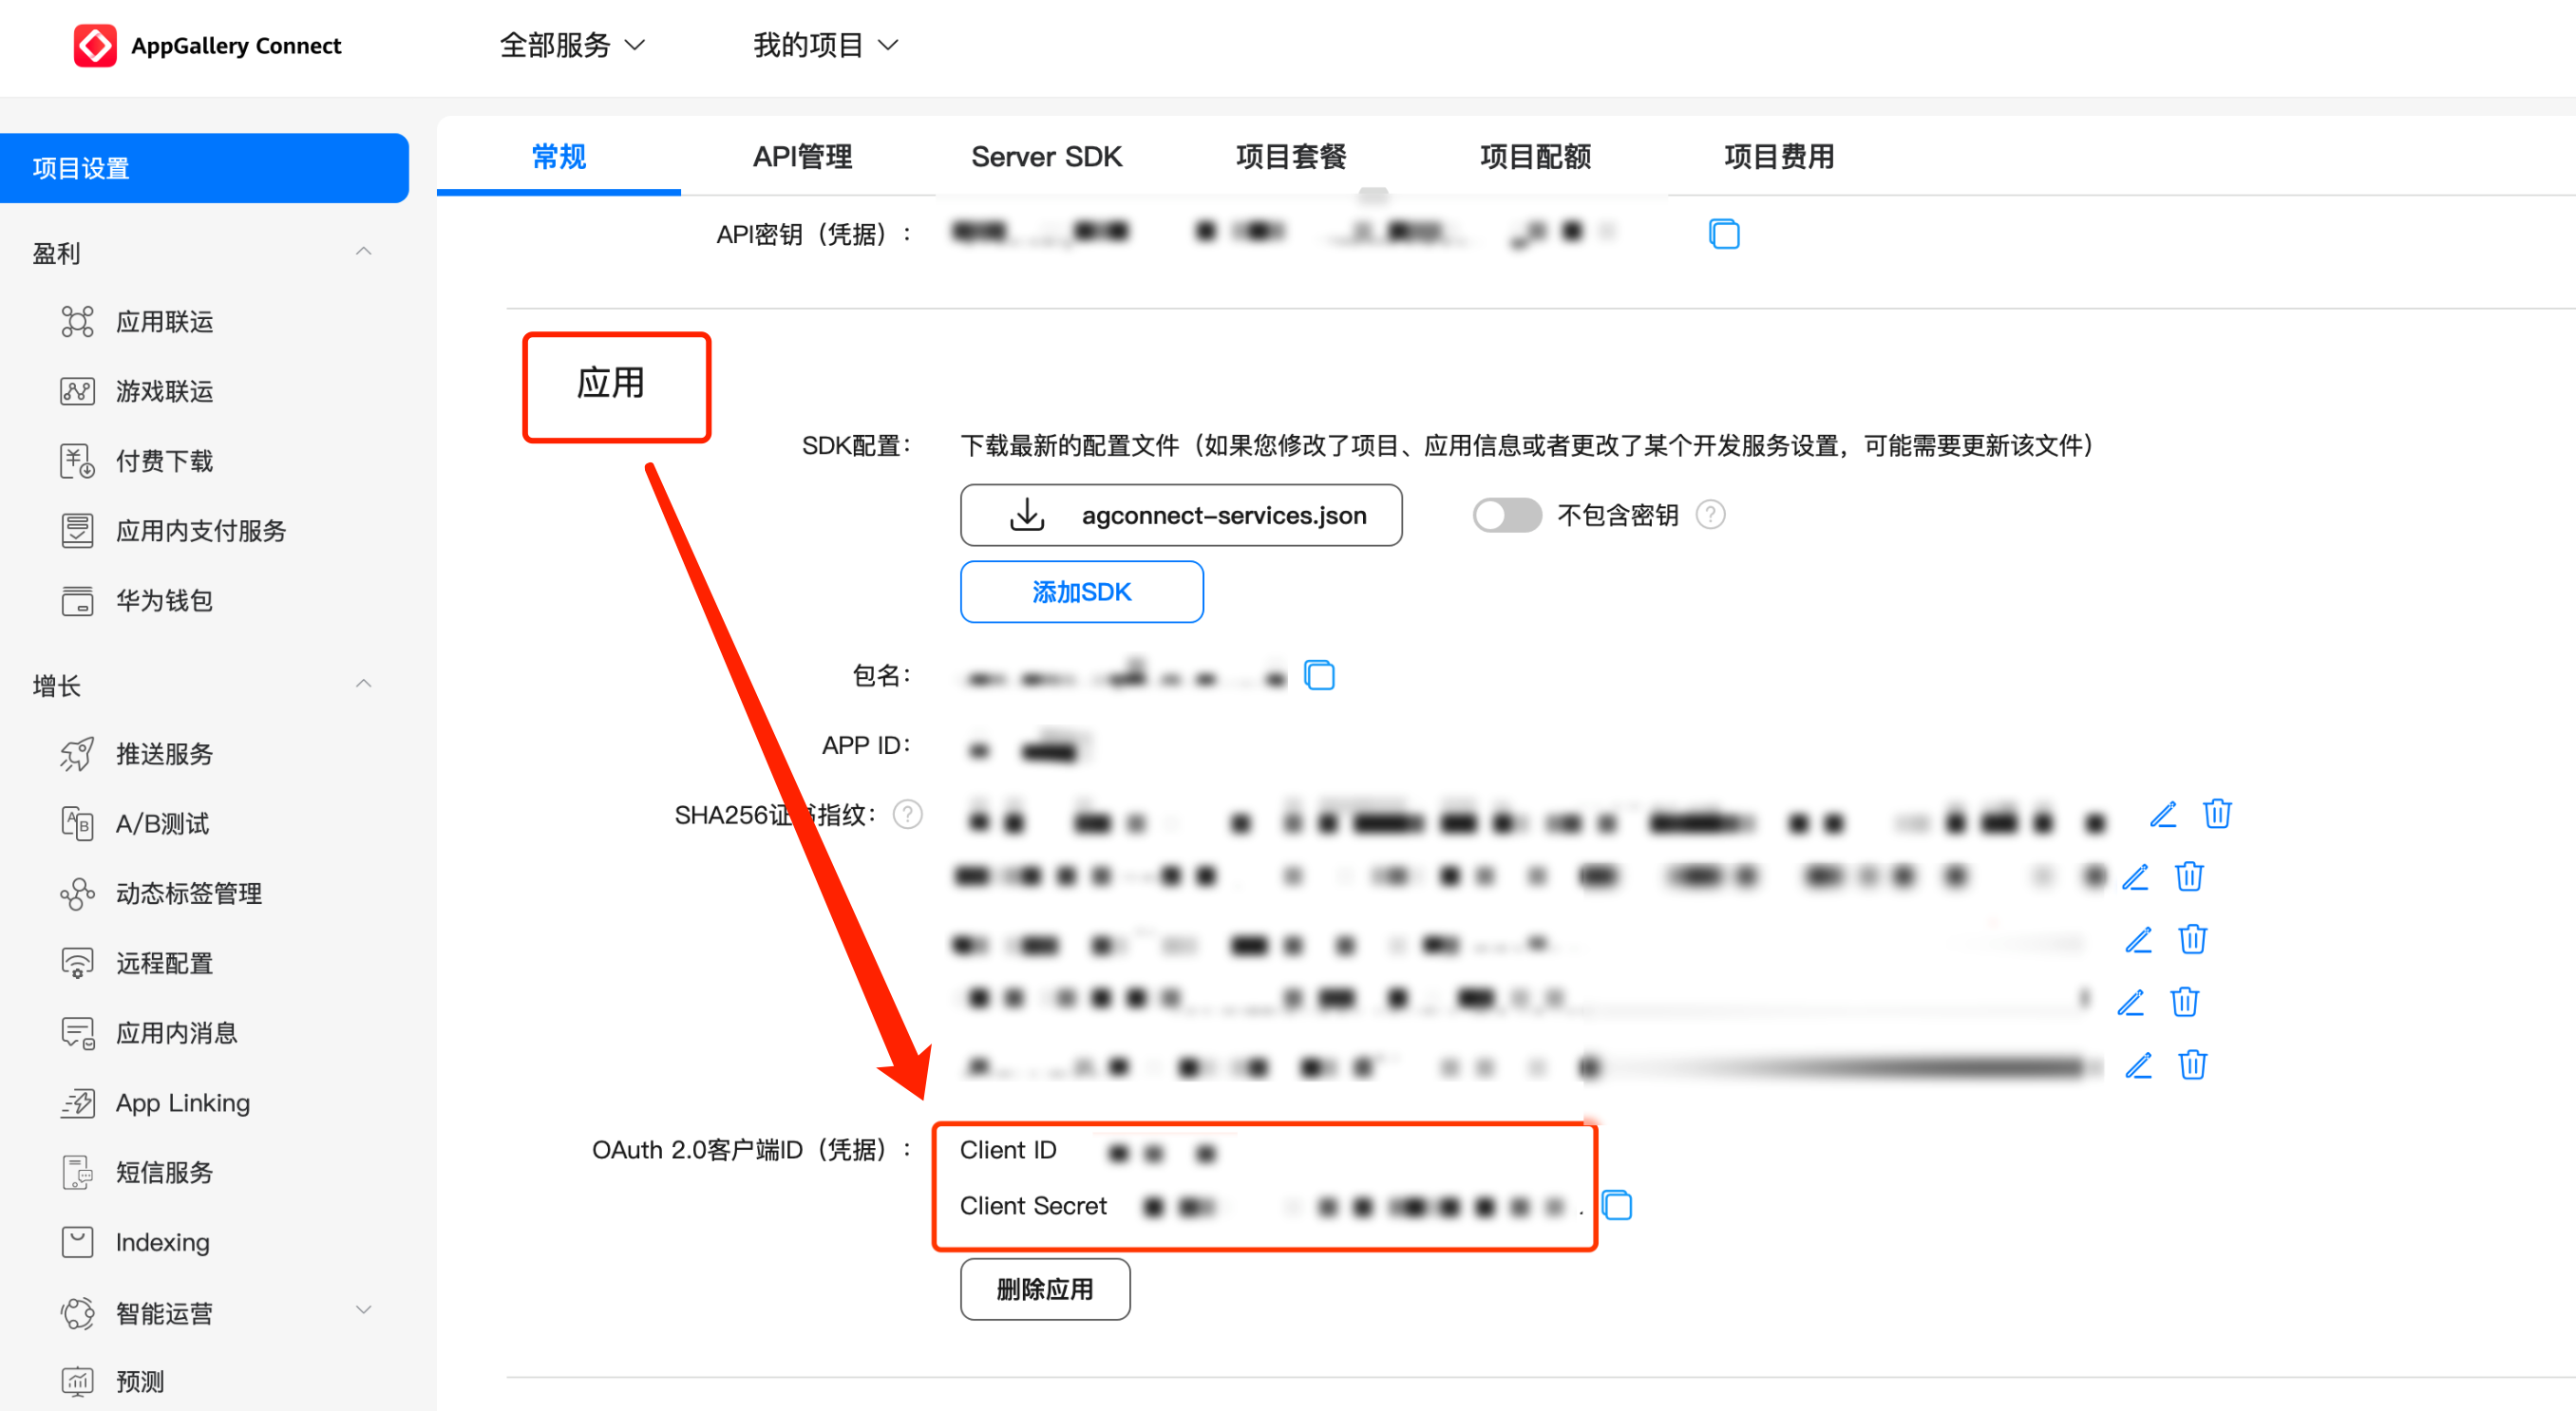
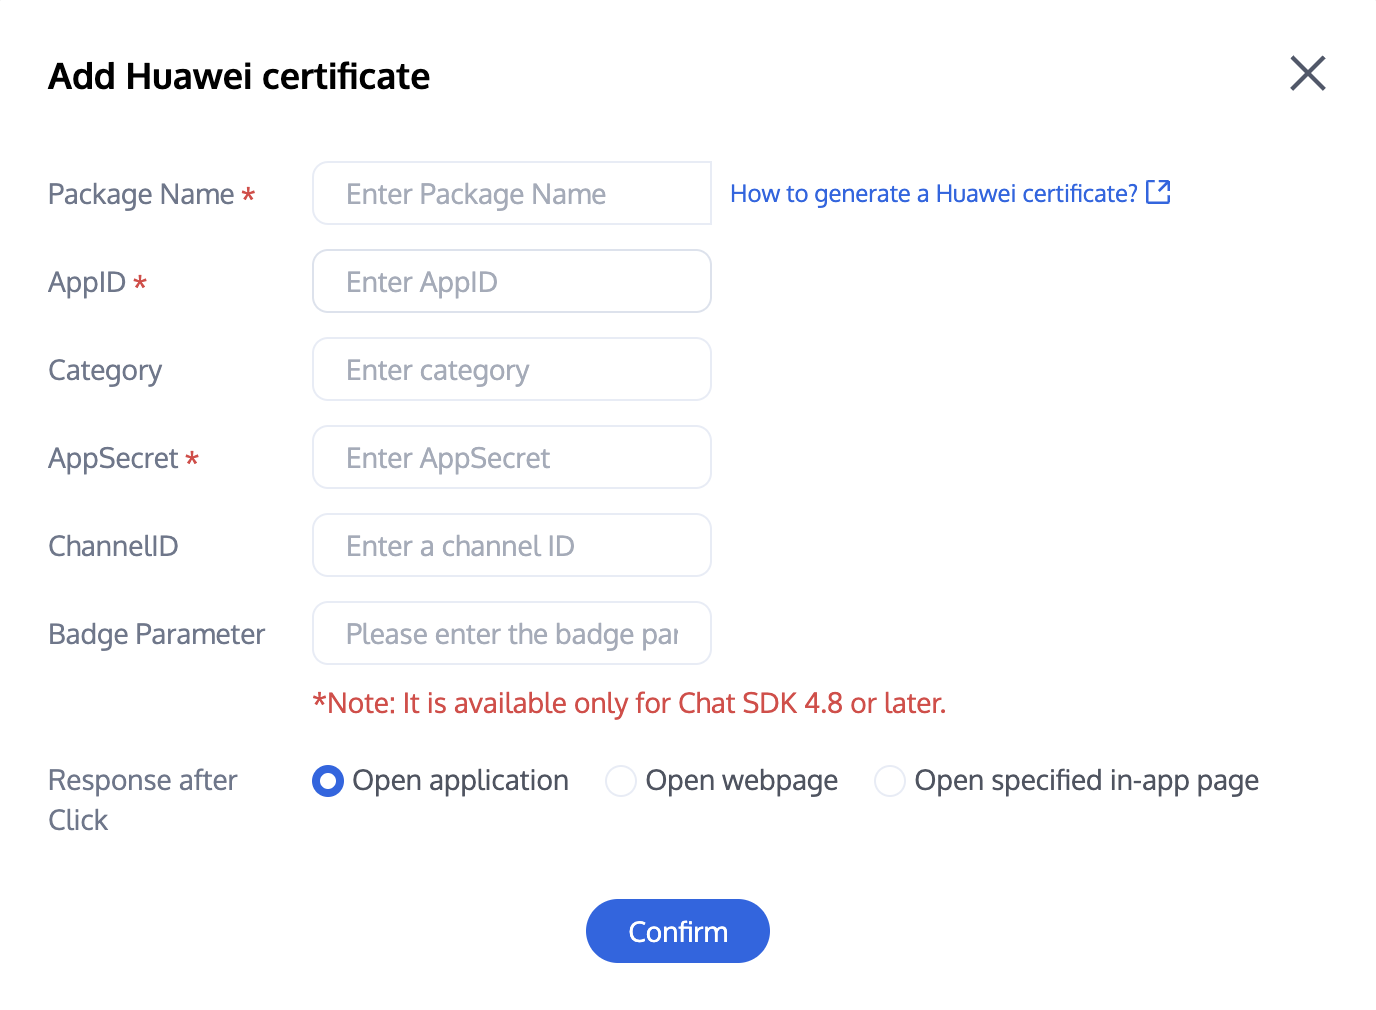
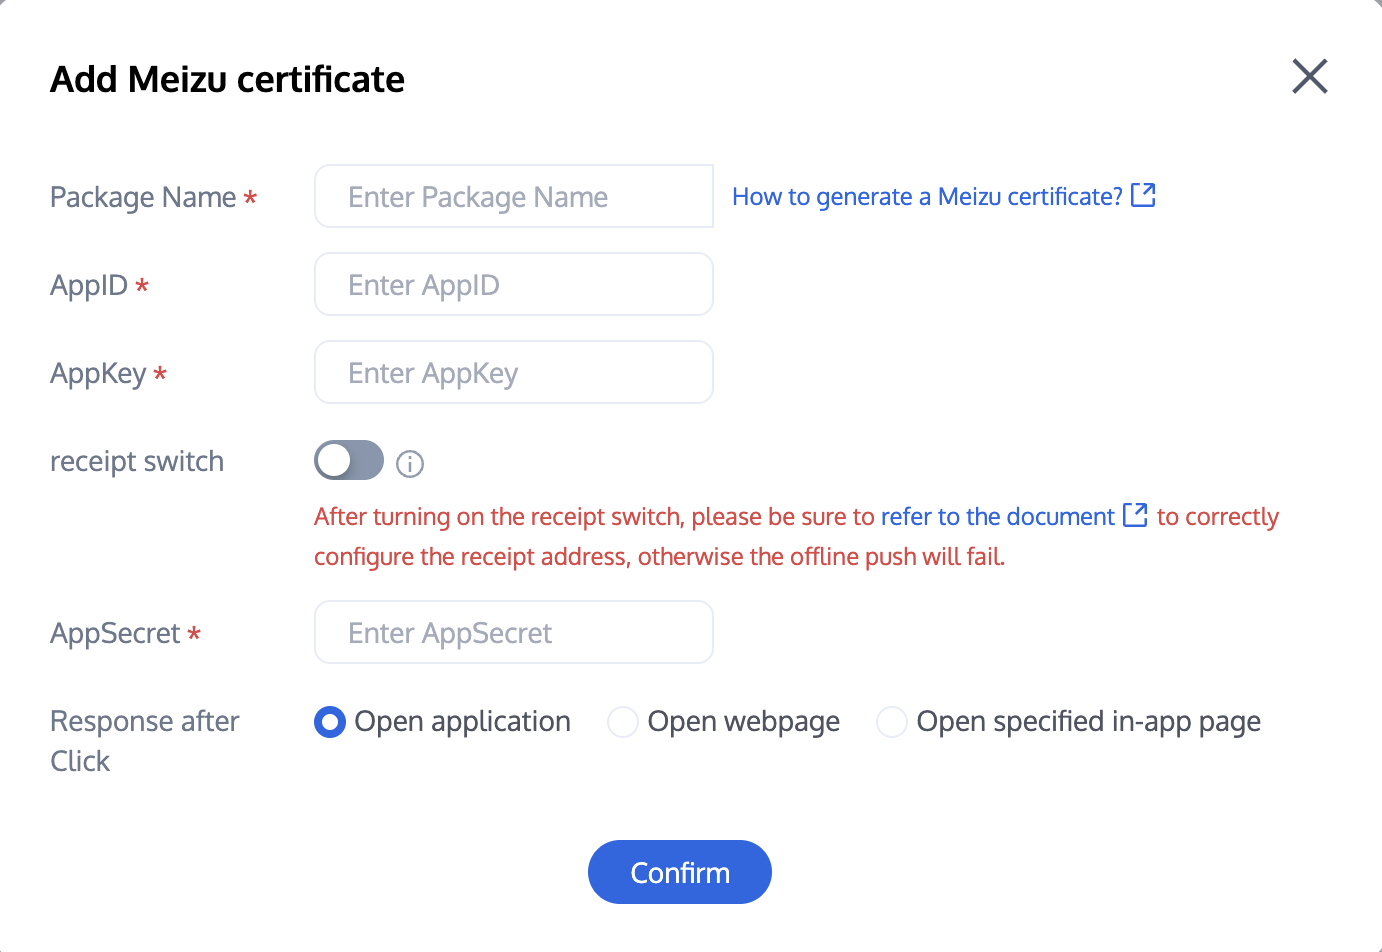
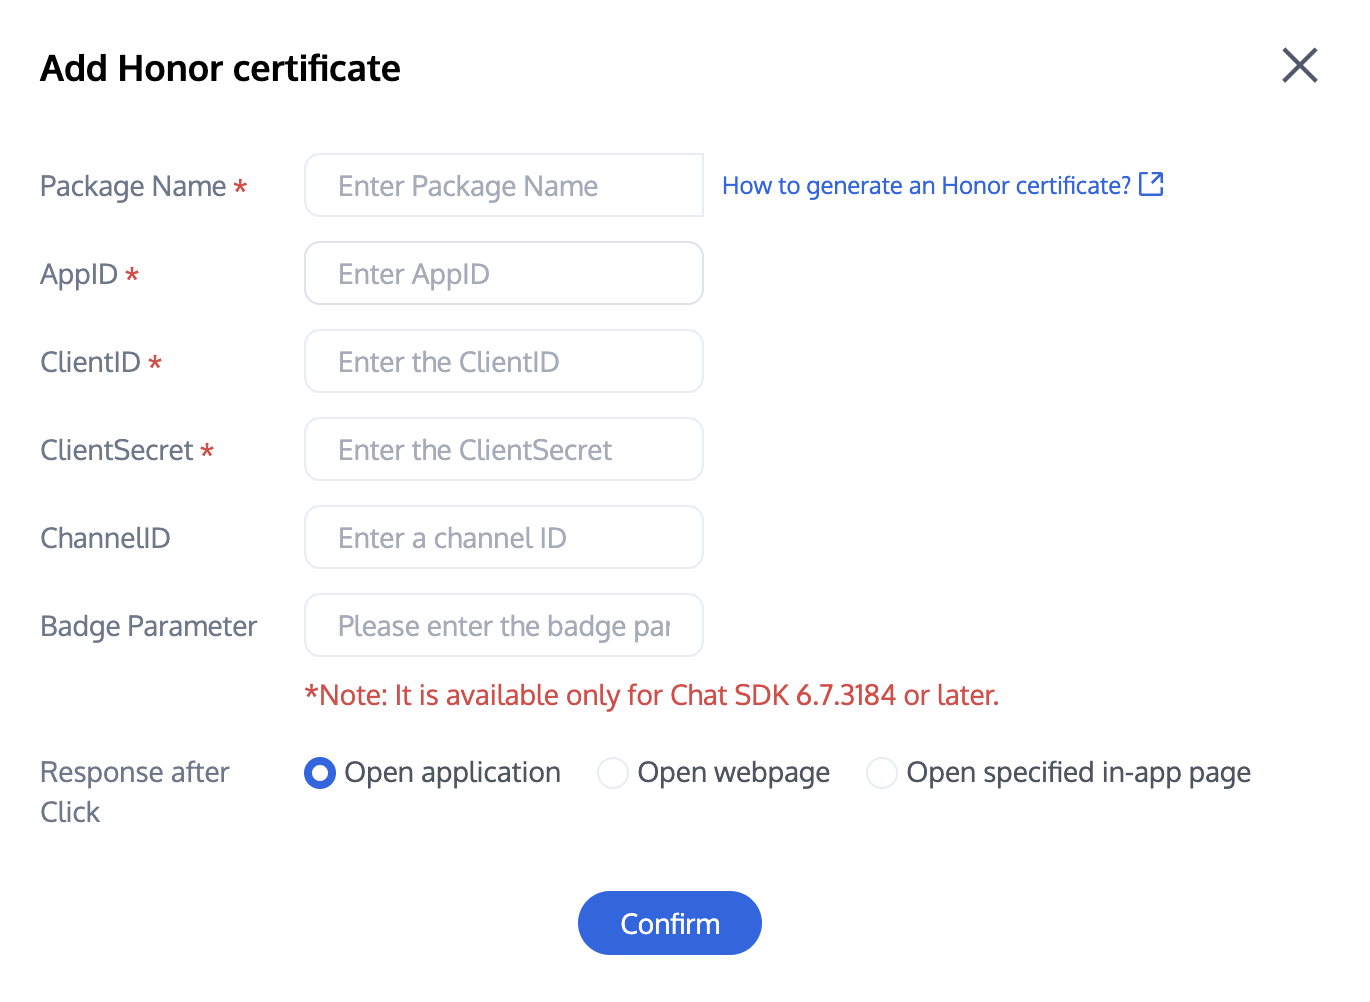
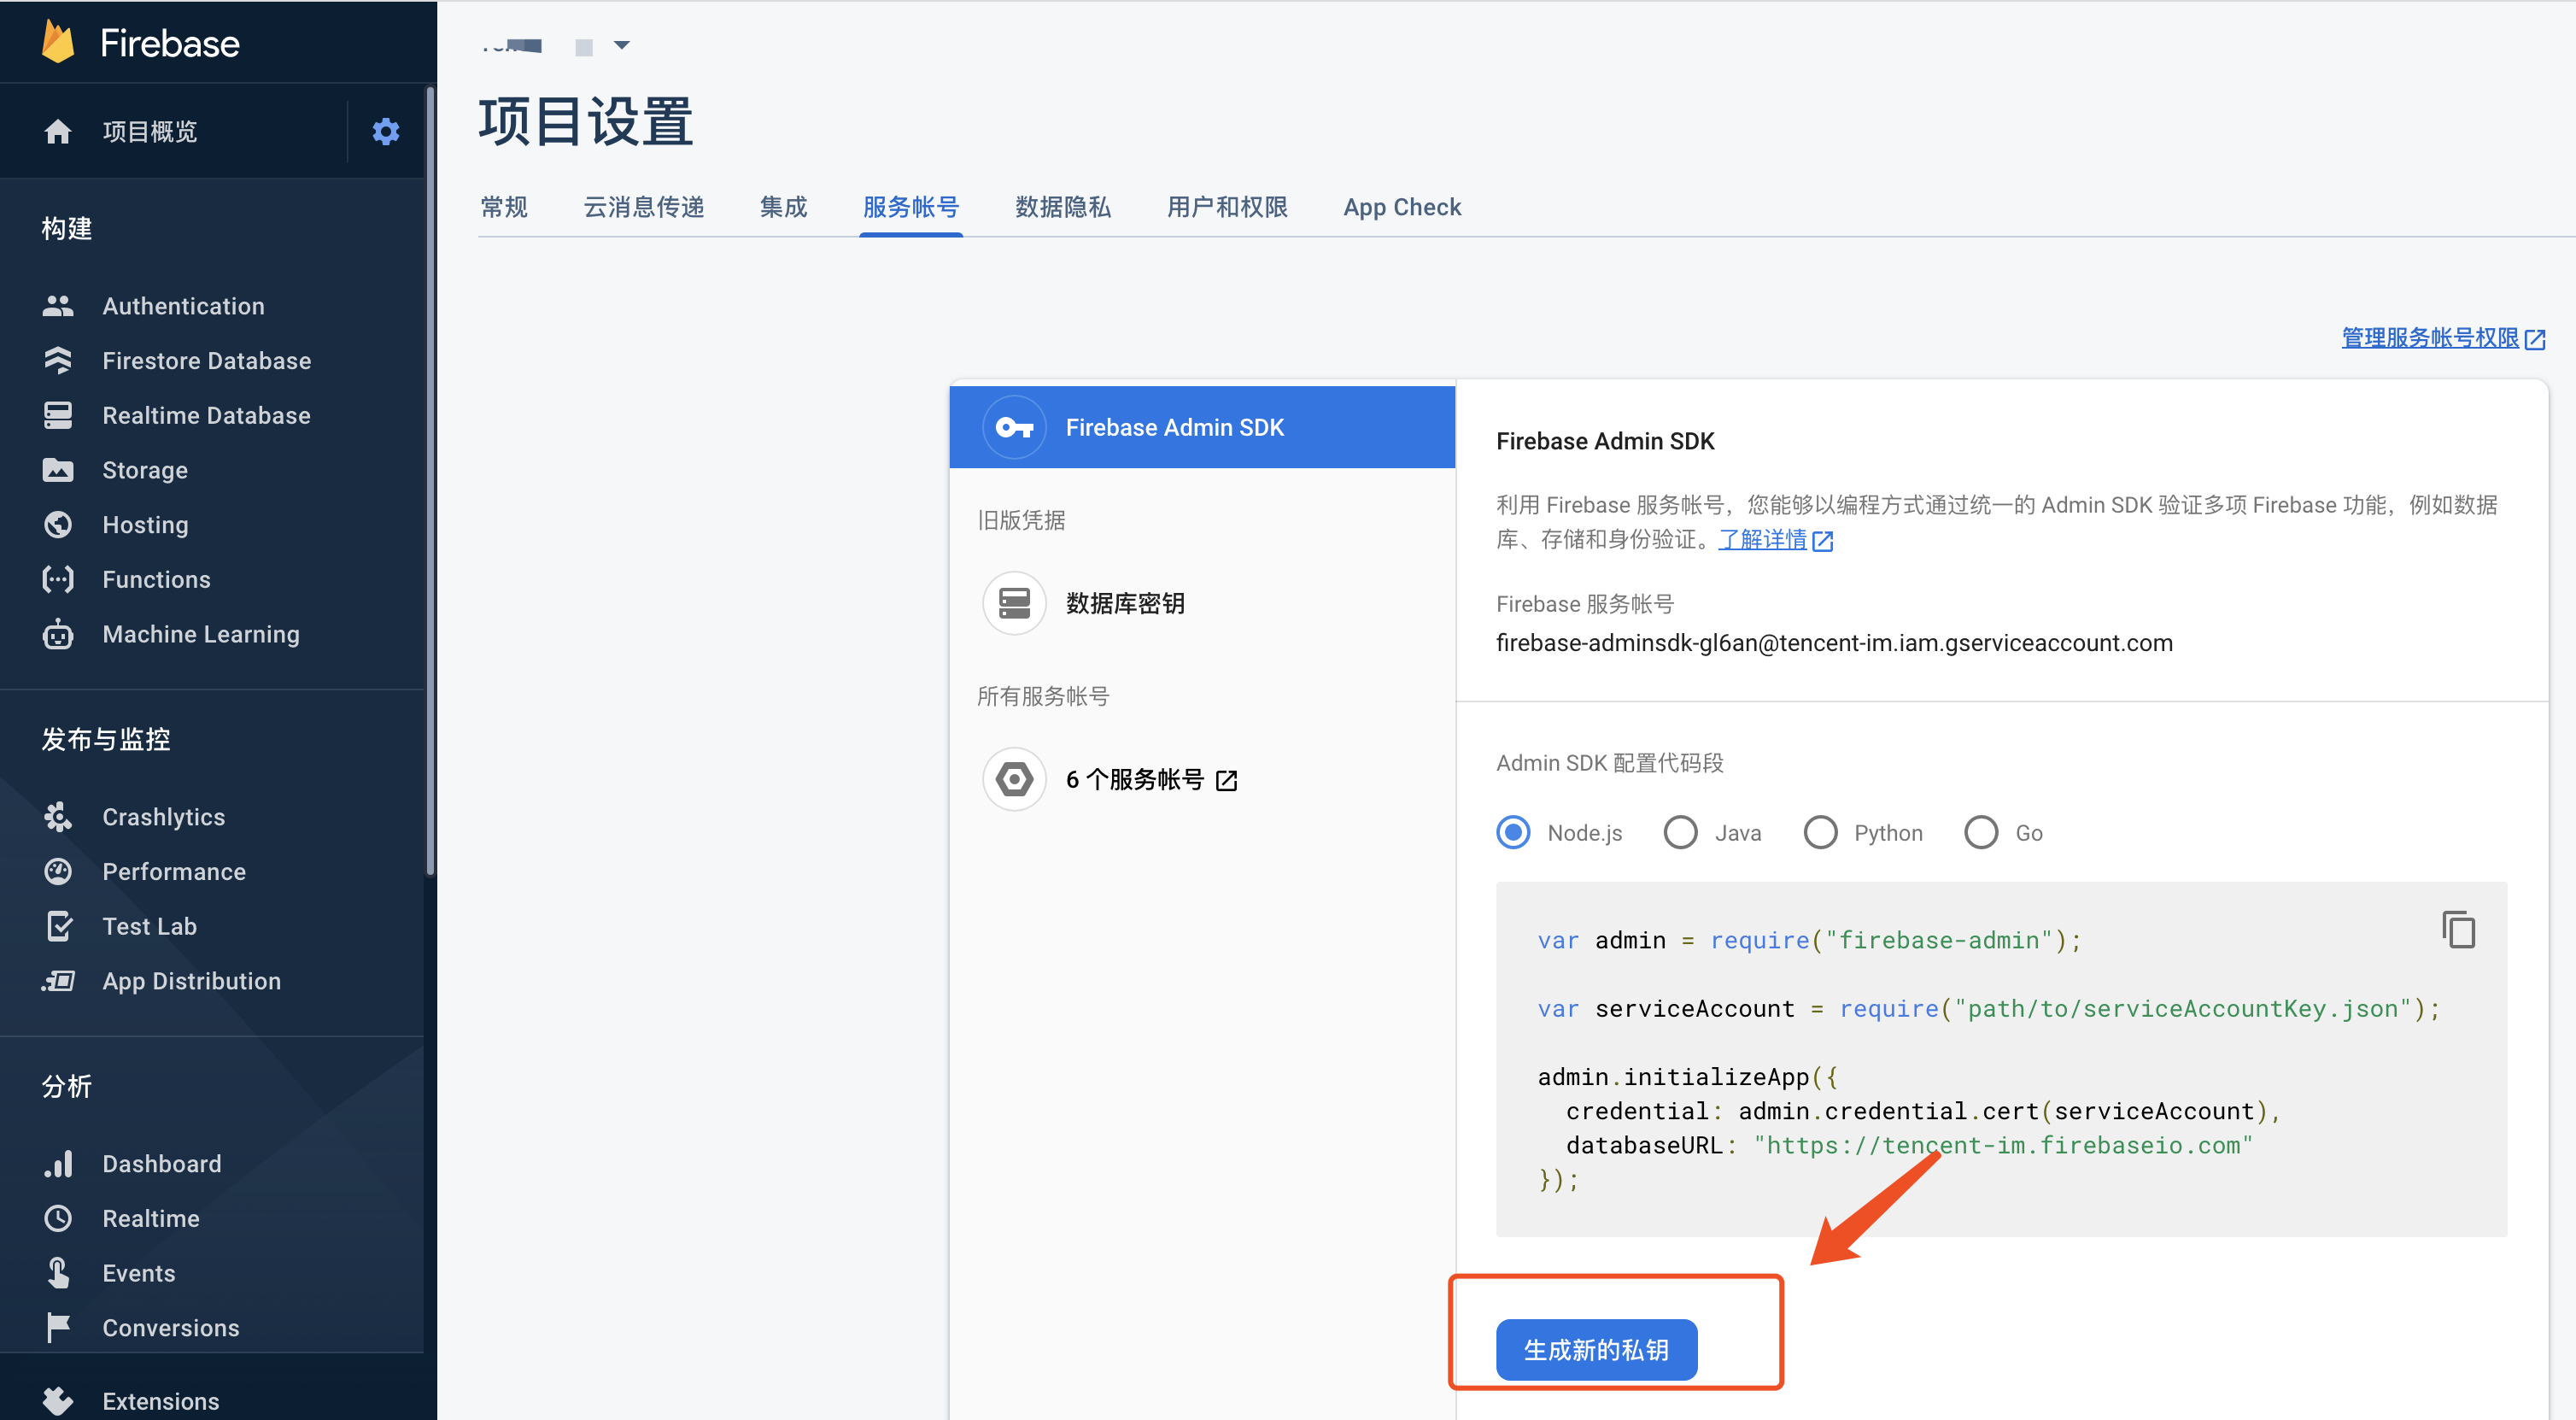
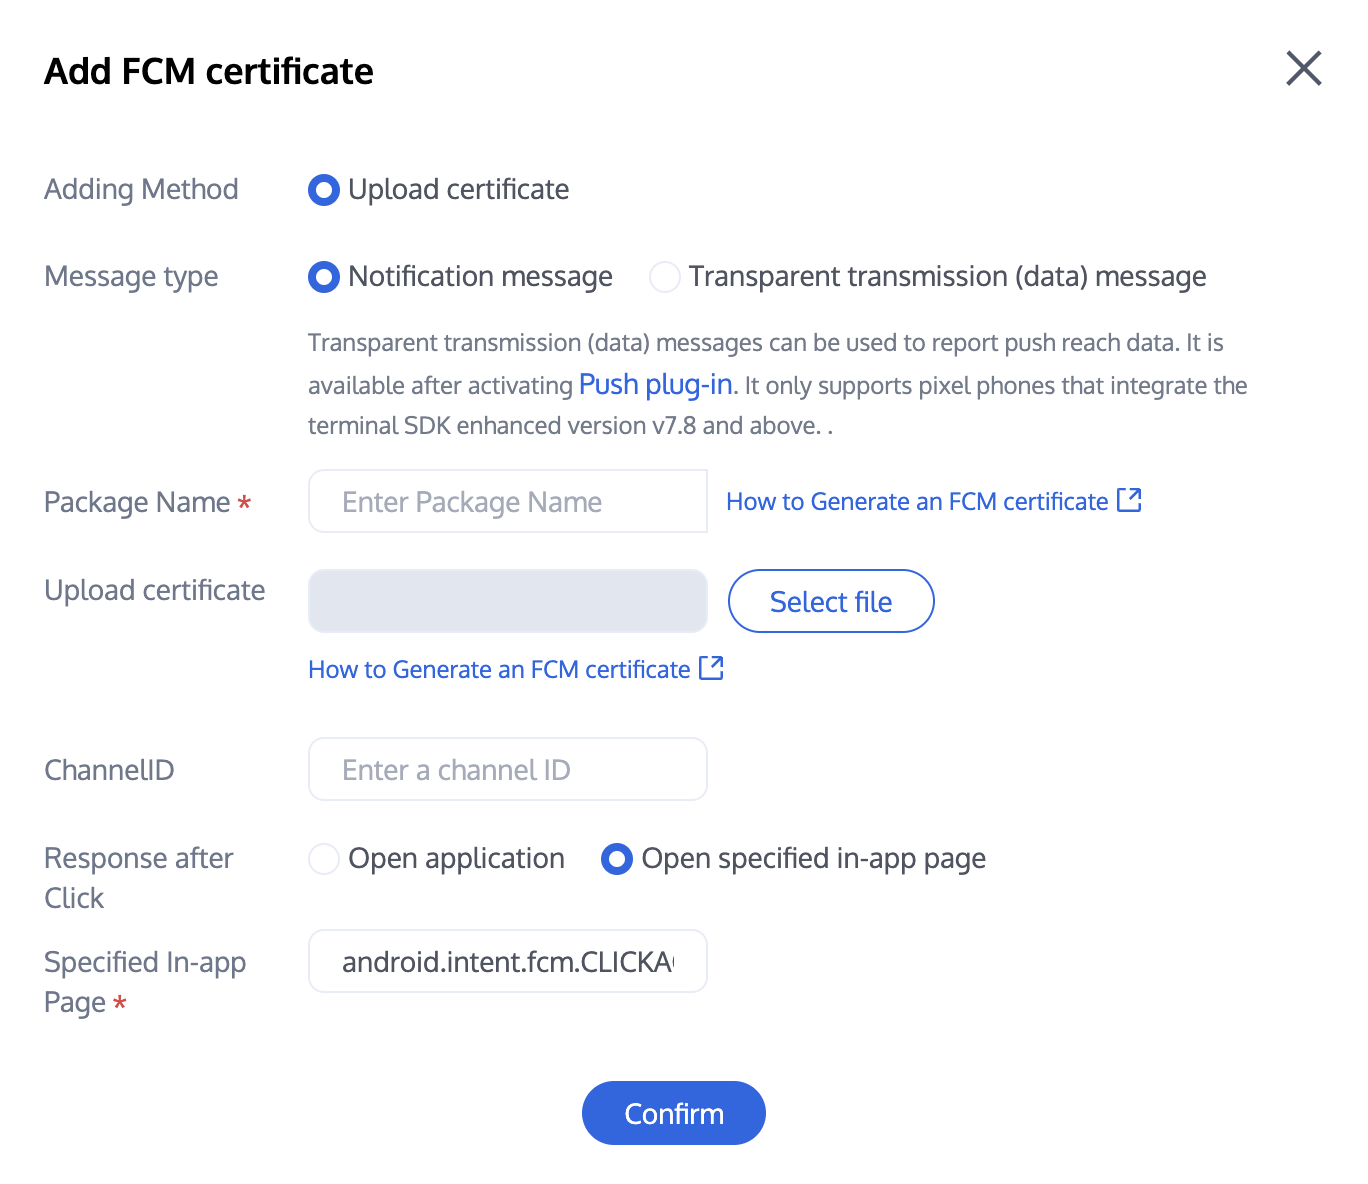
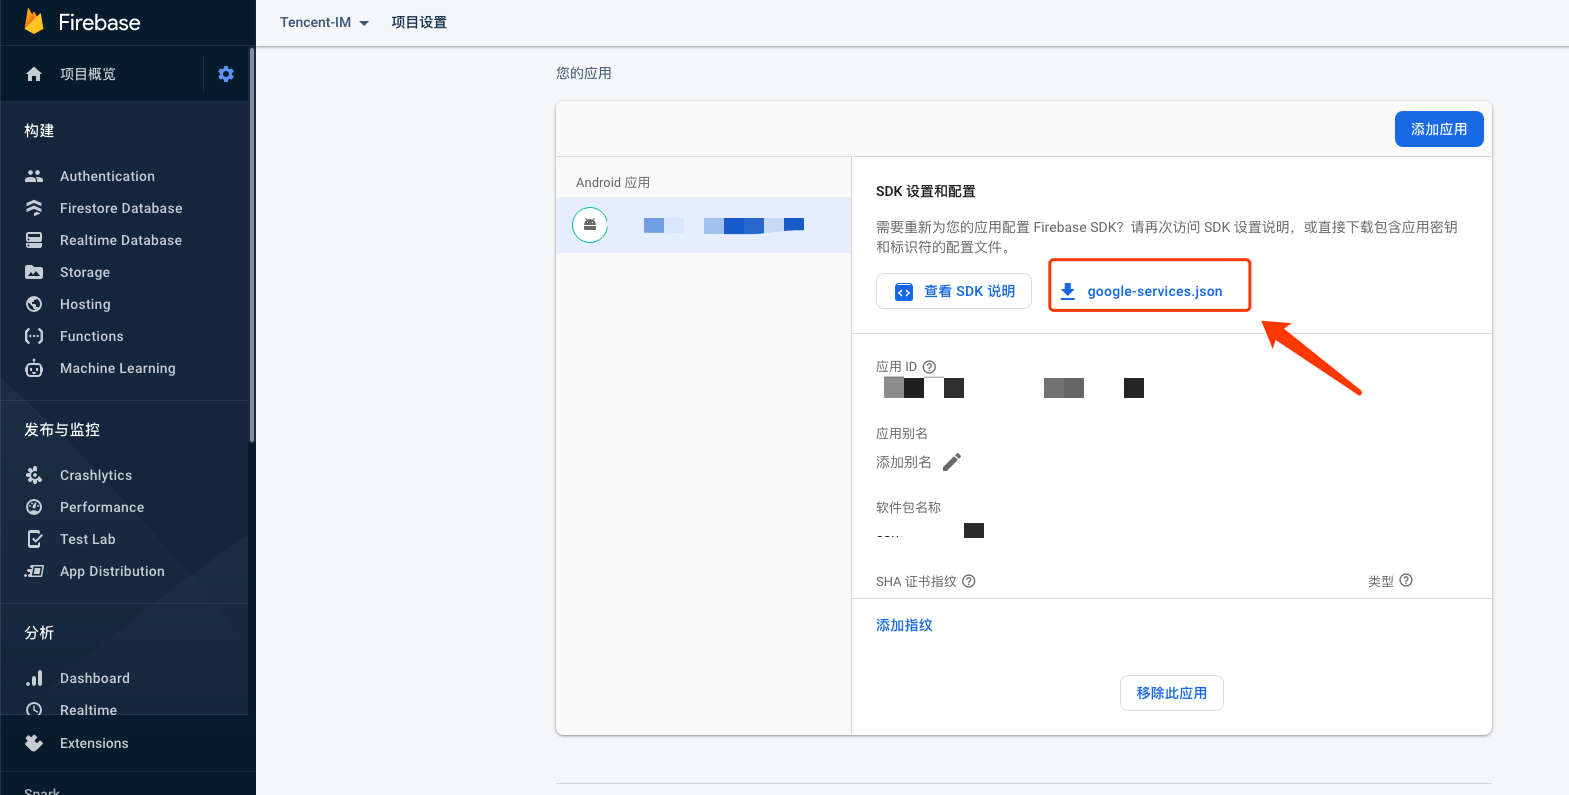
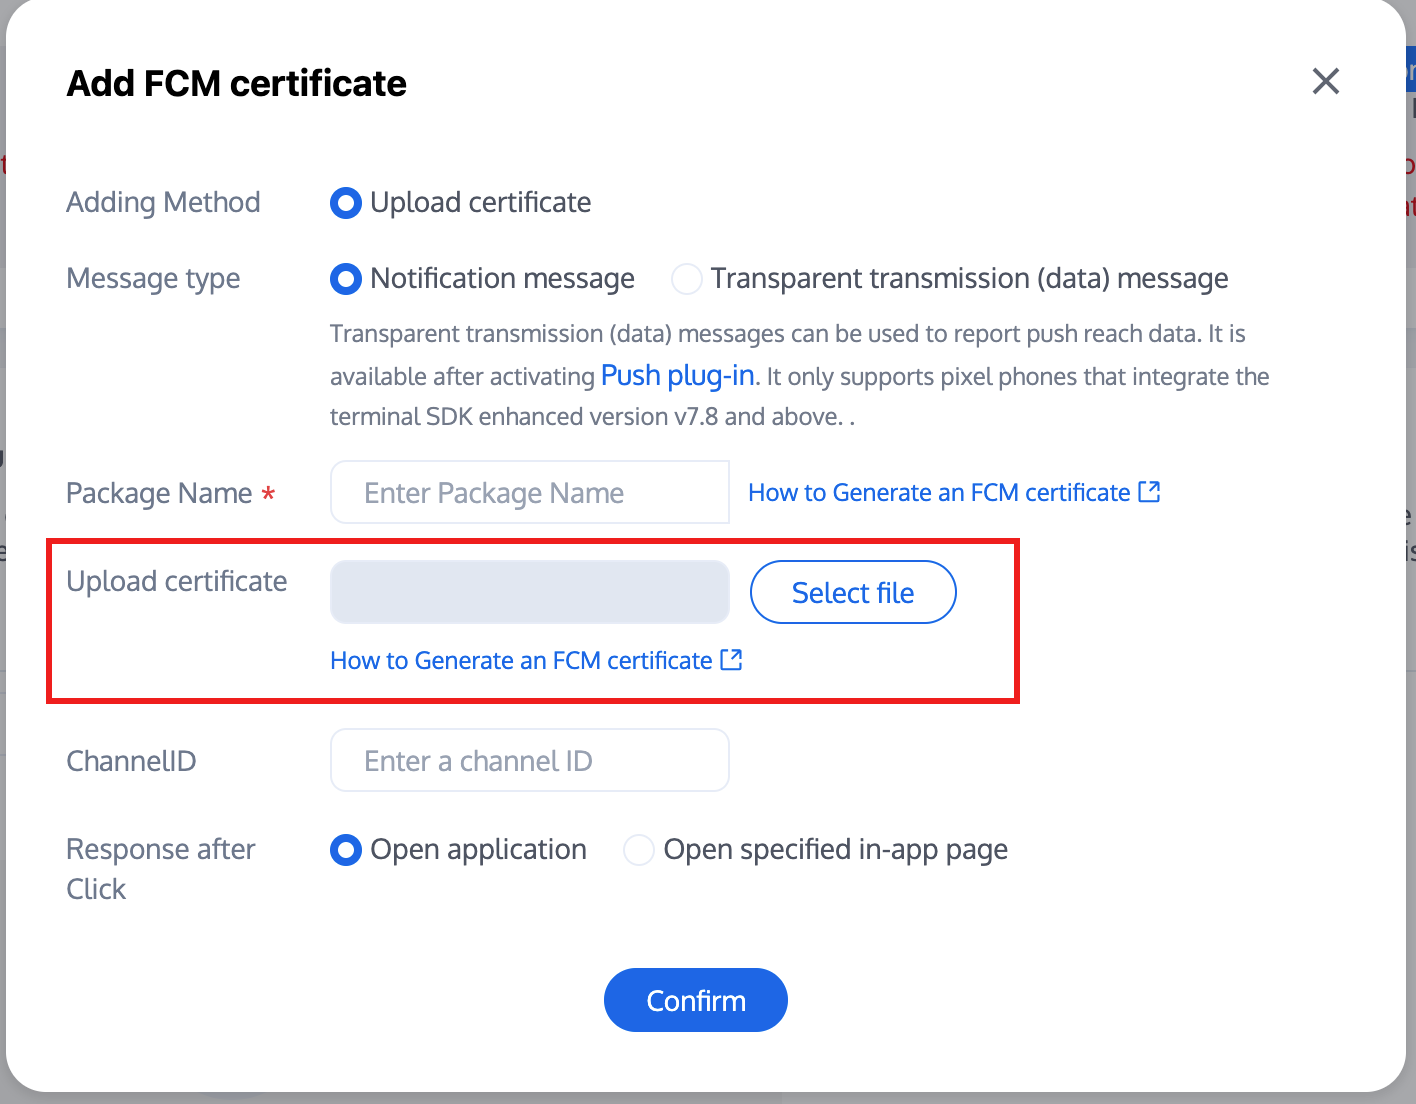
Log in to the Tencent Cloud Chat Console, add the push certificates for each vendor, and configure the AppId, AppKey, AppSecret, and other parameters obtained in step 1 to the push certificates in the Chat console. For action after click, refer to step 3.
Open the specified interface within the app: clicking the notification bar will redirect the interface based on the configured self Definition, see Custom Redirect on Click.
Mi
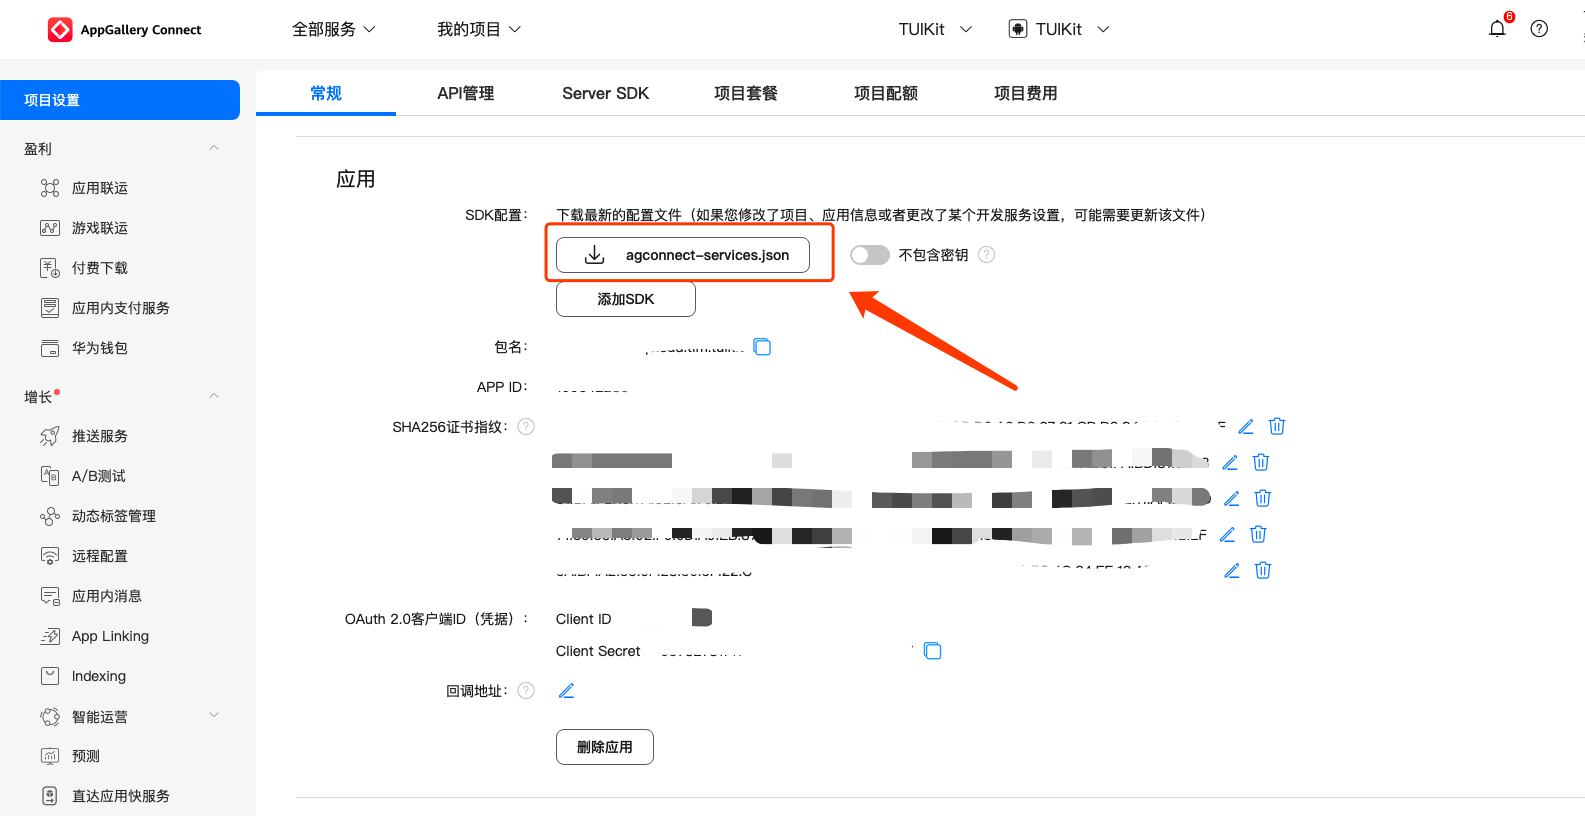
Huawei
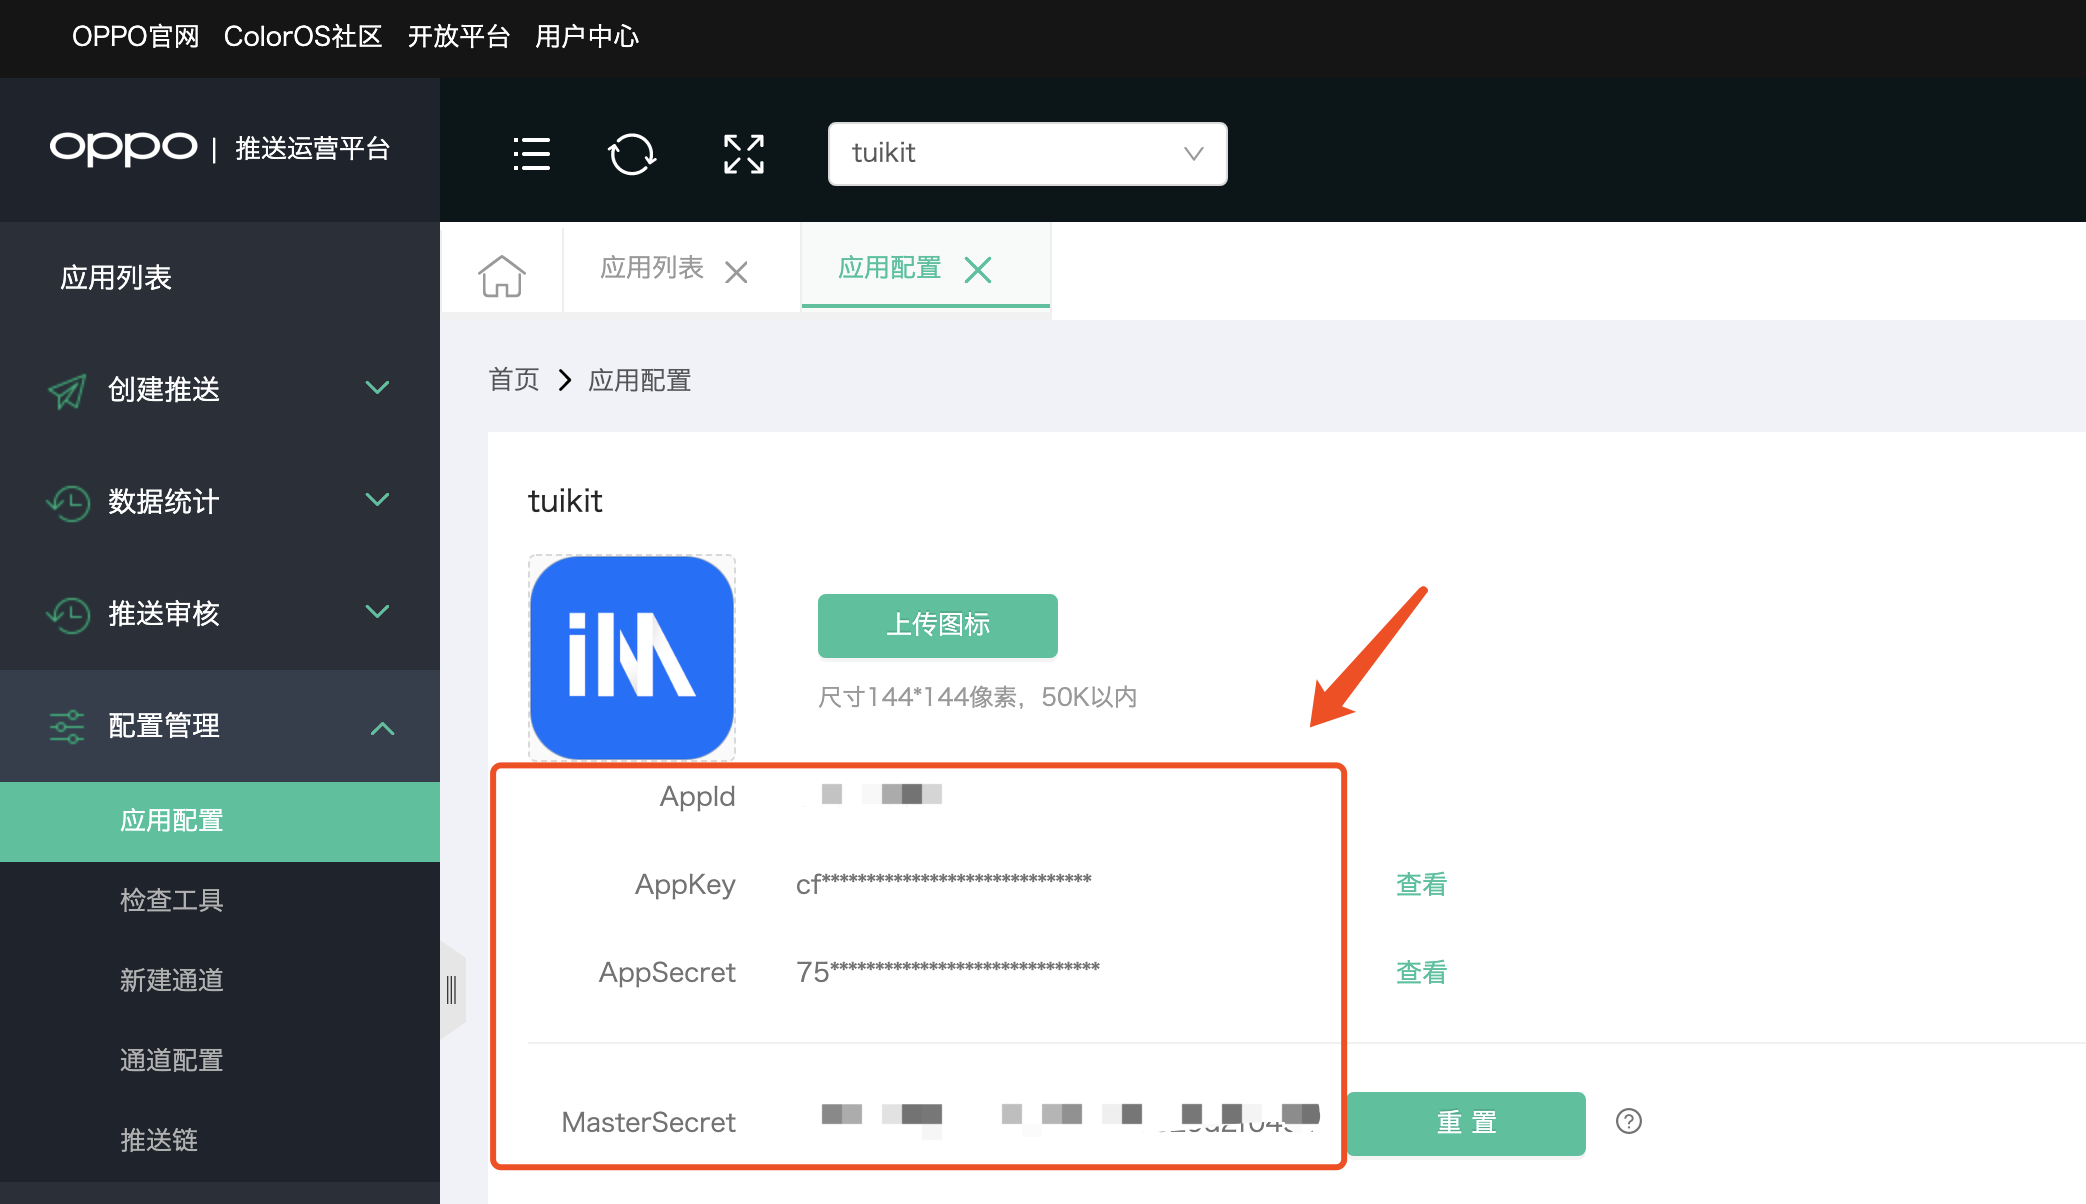
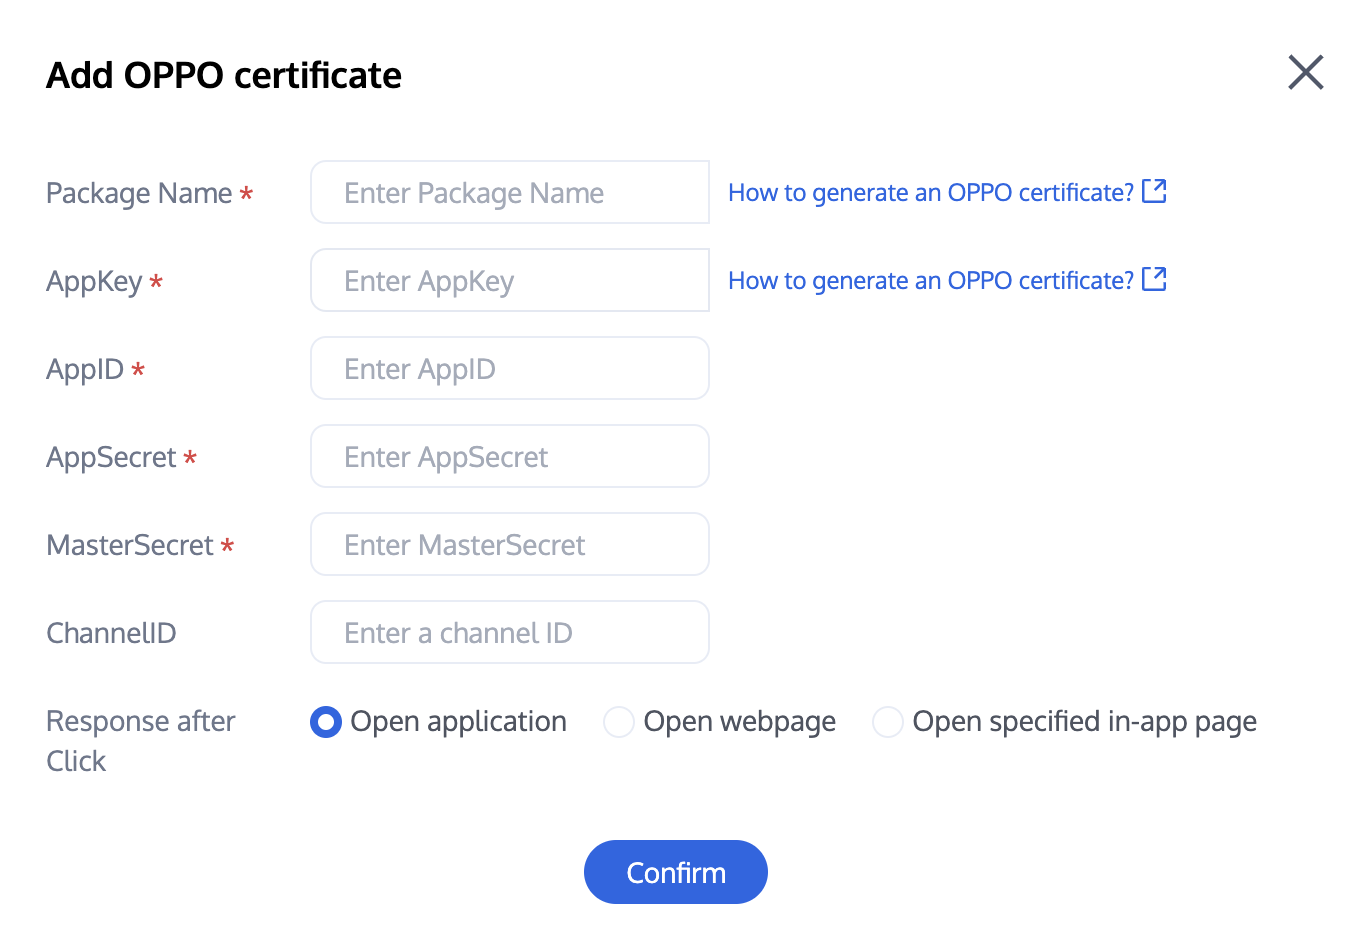
OPPO
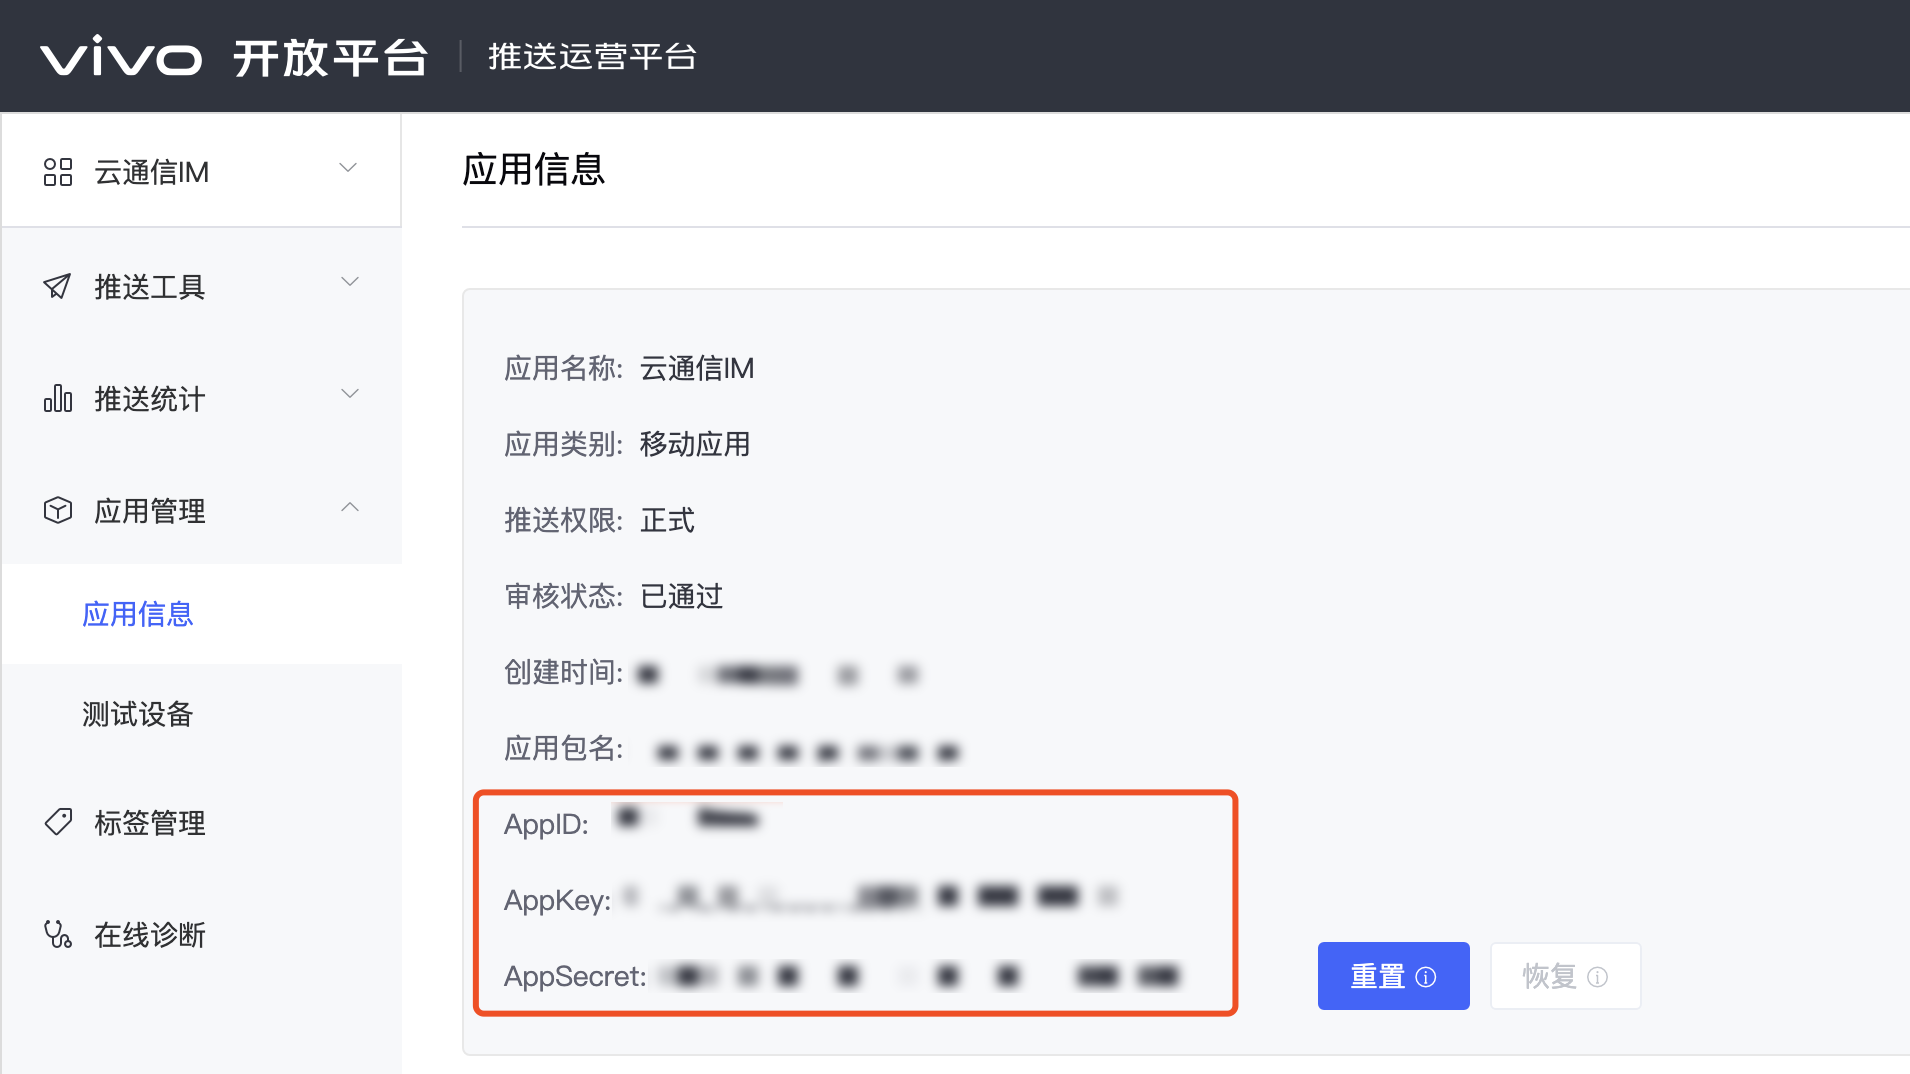
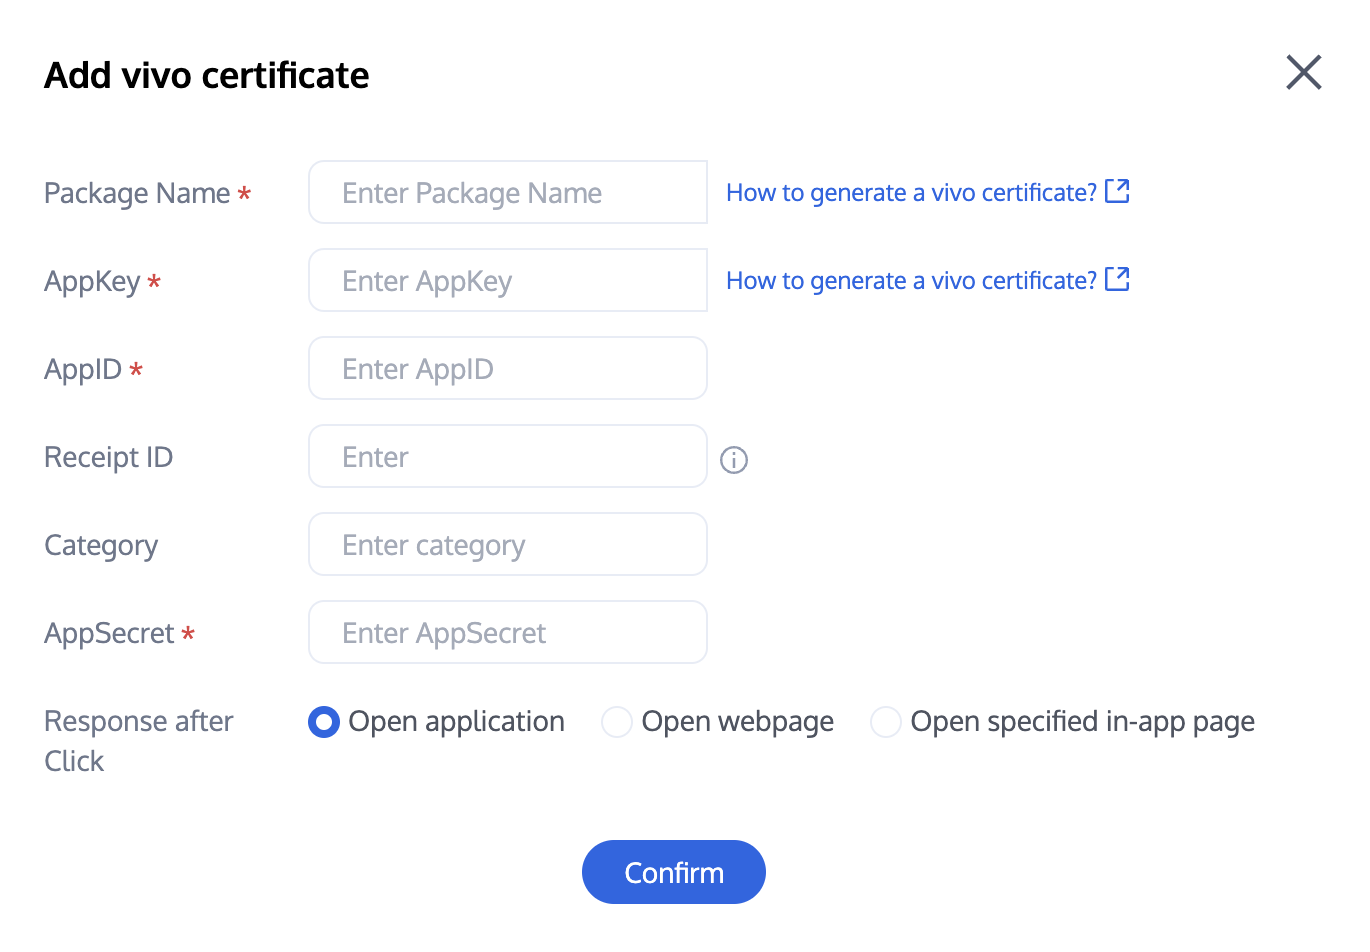
vivo
Meizu
HONOR
Google FCM
Vendor Push Platform
Configuring in the Chat console
Vendor Push Platform
Configuring in the Chat console
Notes:
Client ID corresponds to AppID, Client Secret corresponds to AppSecret.
Vendor Push Platform
Configuring in the Chat console
Vendor Push Platform
Configuring in the Chat console
Vendor Push Platform
Configuring in the Chat console
Vendor Push Platform
Configuring in the Chat console
Vendor Push Platform
Configuring in the Chat console
Note:
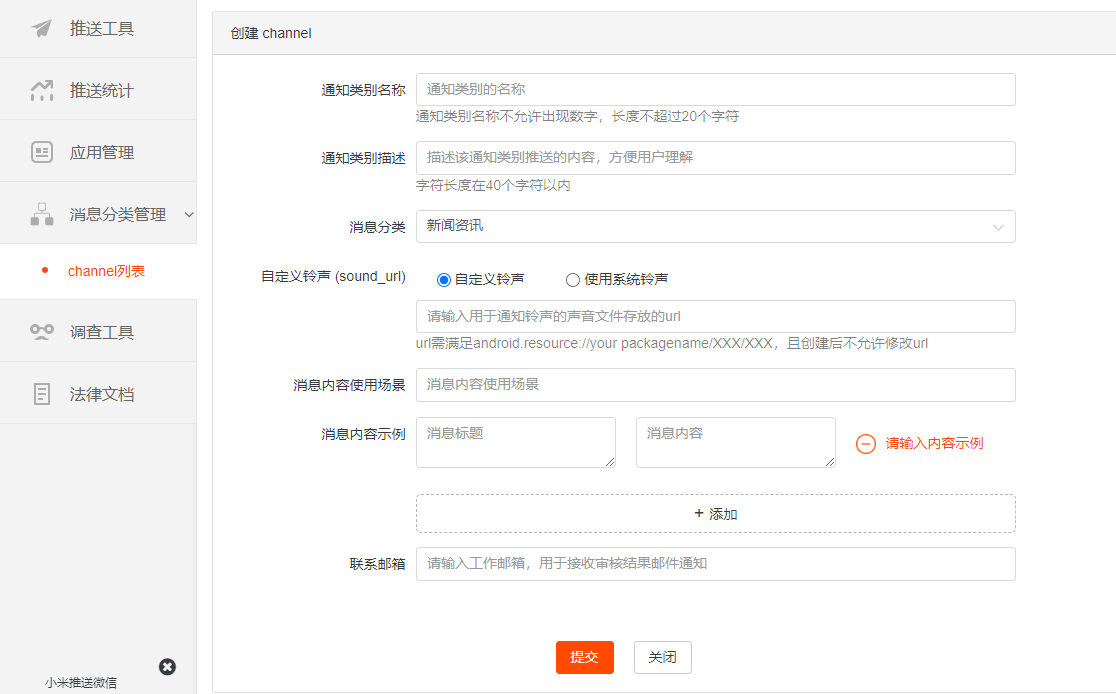
For Xiaomi, if you have configured the ChannelID on the vendor's developer website, you need to configure the same ChannelID in the Chat Console, otherwise the push may fail.
Step 3. Configure the redirected-to page for offline push
Upon receiving an offline push notification, the notification appears in the notification bar as shown in the image; tapping it opens the app and navigates to the configured destination screen. Please configure the target Activity for the notification tap action by referring to the specific configuration documentation provided by each device manufacturer.
Step 4. Set vendor push rules
Application Offline Parameter Configuration
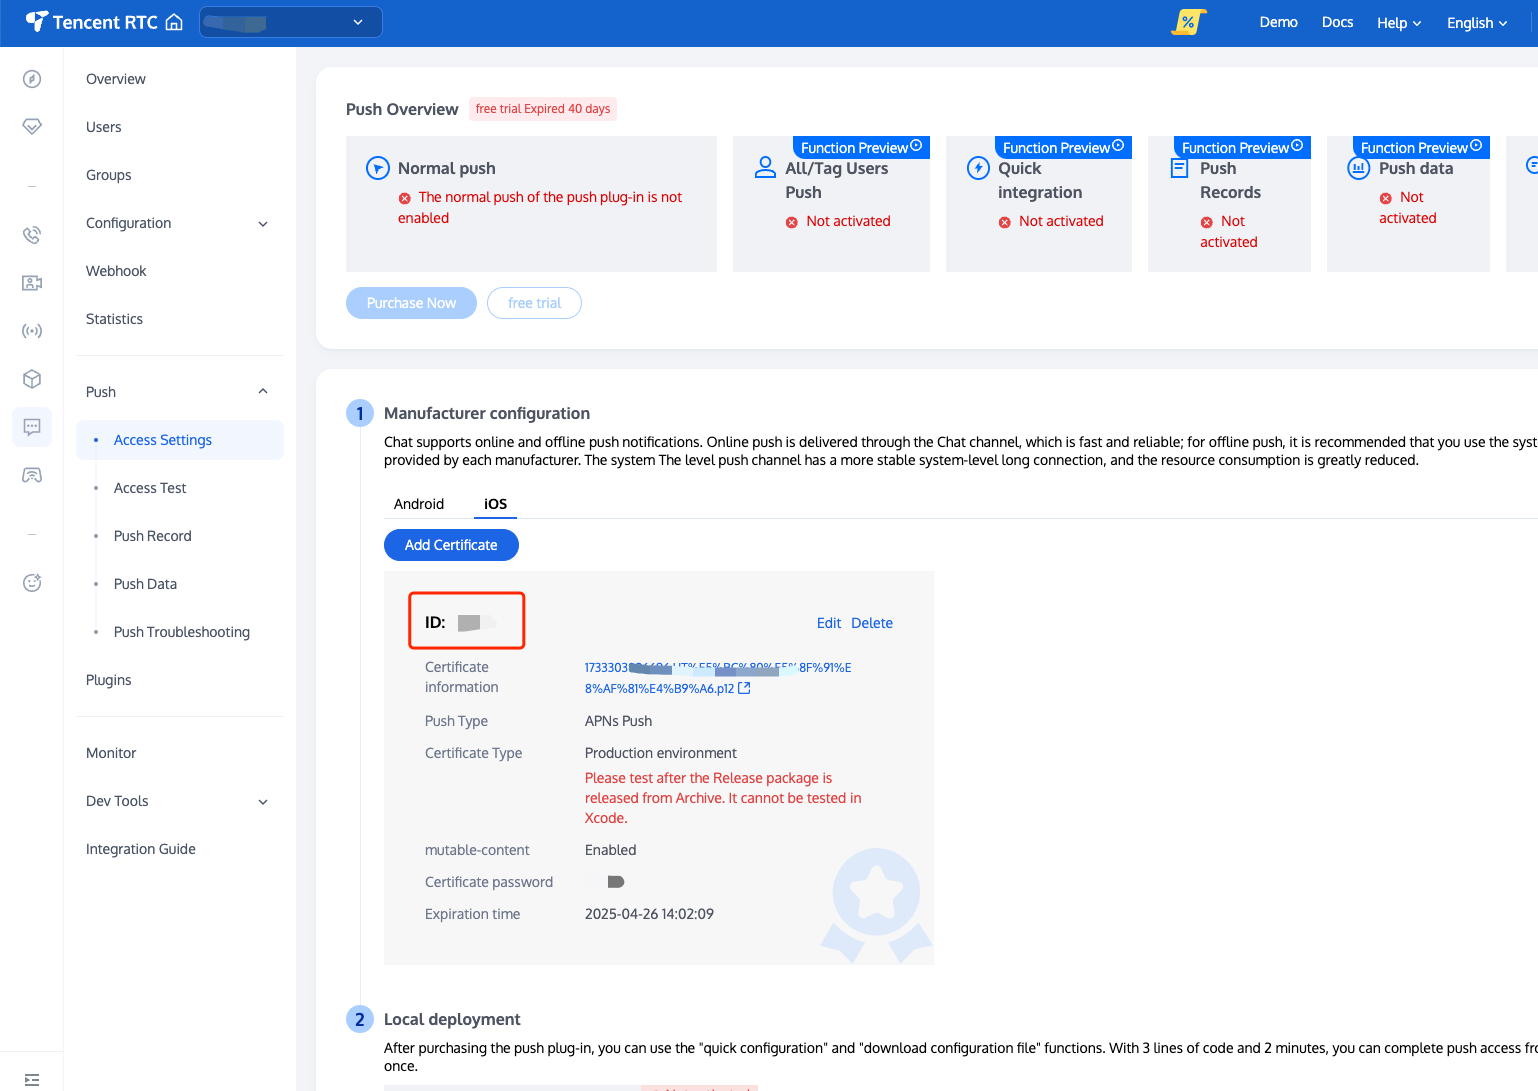
Step 2 After successfully adding the push certificate, the Chat console will assign a certificate ID for the corresponding vendor. Please save it locally. When registering the push service after login, provide the obtained vendor token and the certificate ID to the backend through the API setOfflinePushConfig. Take Xiaomi as an example:
The push certificate ID is as follows:
Save the certificate ID and push parameters locally:
public class PrivateConstants {
/****** Mi offline push parameters start ******/
// Certificate ID generated after uploading a third-party push certificate in the Tencent Cloud console
public static final long XM_PUSH_BUZID = ID of the certificate assigned to your application
// `APPID` and `APPKEY` assigned by the Mi open platform
public static final String XM_PUSH_APPID ="`APPID` of the certificate assigned to your application";
public static final String XM_PUSH_APPKEY ="`APPKEY` of the certificate assigned to your application";
/****** Mi offline push parameters end ******/
}
Manifest File Configuration for Vendor Push Permissions
You need to add the push rules and push inheritance classes for each vendor to the manifest file; please refer to the specific vendor documentation for integration and configuration.
vivo and Honor adaptation
According to the access guidelines of vivo and Honor, APPID and APPKEY need to be added to the manifest file, otherwise, compilation issues may occur:
Method 1
Method 2
android {
...
defaultConfig {
...
manifestPlaceholders = [
"VIVO_APPKEY":"`APPKEY` of the certificate assigned to your application",
"VIVO_APPID":"`APPID` of the certificate assigned to your application"
"HONOR_APPID":"`APPID` of the certificate assigned to your application"
Integrate the vendor-specific push classes; push mechanisms vary by vendor, so please refer to the respective vendor's integration documentation for details.
Report the push certificate and token to the backend
Call the setOfflinePushConfig API to report the push token. Construct the `V2TIMOfflinePushConfig` class, set `businessID` as the certificate ID of the vendor, and report the token obtained after registration of the vendor push service.
If a message newly received needs to be displayed in the phone's notification bar when your app is switched to the background, call the doBackground() API of the IM SDK to sync the app status to the IM backend. When your app is switched back to the foreground, call the doForeground() API of the IM SDK to sync the app status to the IM backend.
// When the app is switched to the background
V2TIMManager.getOfflinePushManager().doBackground(totalCount, new V2TIMCallback(){
Step 7. Set offline push parameters when sending messages
When you call sendMessage to send messages, you can use V2TIMOfflinePushInfo to set offline push parameters. For more information, see the sendMessage() method in ChatProvider:
OfflineMessageContainerBean containerBean = new OfflineMessageContainerBean();
OfflineMessageBean entity = new OfflineMessageBean();
When an offline push message in the notification column is received and clicked, it will automatically redirect to the interface you configured in Step 3. You can retrieve the passed offline push parameters in the onResume() method of the interface startup by calling getIntent().getExtras(), and then customize the redirection. For details, see the handleOfflinePush() method in TUIKitDemo.
private void handleOfflinePush(){
final OfflineMessageBean bean = OfflineMessageDispatcher.parseOfflineMessage(getIntent());
By default, when a message in the FCM notification bar is clicked, the app navigates to the default Launcher screen. In the onResume() method of this screen, call getIntent().getExtras() to retrieve the transparent offline push parameters, then implement custom navigation as needed.
Upon completion of the above configurations, when your app is switched to the background or the process is killed, the messages will be pushed offline and displayed in the notification bar. You can click the message in the notification bar to redirect to the specified app page.
1.1 Log in to the vendor console to create a channel and configure it. The ringtone file needs to be added to the raw directory of your local Android Studio project.
1.2 Send the message specifying the custom ringtone's channel ID. For details, see setAndroidXiaoMiChannelID.
1.1 Create a channel that requires a custom ringtone.
You need to first create a channel with a custom ringtone in the code. The ringtone file needs to be added to the raw directory of your local Android Studio project, and record the name of the channel ID.
1.2 Send the message specifying the custom ringtone's channel ID. For details, see setAndroidFCMChannelID.
FCM custom ringtones or setting channel ID is supported only in Certificate Mode.
FAQs
How do I troubleshoot if I cannot receive offline push messages?
OPPO devices
General reasons for not receiving push notifications on OPPO phones include:
According to the requirements of the official OPPO Push website, ChannelID must be configured on OPPO devices running Android 8.0 or above, otherwise, push notifications cannot be displayed. For the method of configuration, refer to setAndroidOPPOChannelID.
The notification column display feature is disabled by default for OPPO installation application. You need to check the switch status.
Google FCM
If push messages cannot be received, check whether the certificates are successfully uploaded to the Chat console by referring to "Configuring in the Chat console - Google FCM" and verify with the illustration to see if they are added correctly.
Sending messages as Custom Definition Messages
The offline push for custom messages is different from that for normal messages. As we cannot parse the content of custom messages, we cannot determine the push's content. Therefore, by default, there is no offline push. If you need an offline push, you need to set the desc field in offlinePushInfo when using sendMessage, and the desc information will by default be displayed during the push.
Effects of Device Notification Bar Settings
The direct manifestation of offline push is notification column alerts. Thus, like other notifications, it is subject to device notification settings. Take Huawei as an example:
"Settings - Notifications - Lock Screen Notifications - Hide or Do Not Show Notifications" will affect the display of offline push notifications when the screen is locked.
"Settings - Notifications - More Notification Settings - Show Notification Icons (Status Column)" will affect the display of offline push notification icon in the status column.
"Settings - Notifications - Application Notifications Management - Allow Notifications" will directly affect the display of offline push notifications.
"Settings - Notifications - Application Notifications Management - Notification Sound" and "Settings - Notifications - Application Notifications Management - Notification Mute" will affect the offline push notification ringtone.
Completed the integration process but still cannot receive offline push messages
First, verify whether normal push is possible using the Offline Testing Tool in the Chat Console.
If offline push does not work properly and the device status is exceptional, check the parameters in the Chat console and then check the code initialization and registration logic, including the vendor push service registration and Chat offline push configuration.
If offline push does not work properly but the device status is normal, check whether the ChannelID is correct or whether the backend service is working properly.
The offline push feature relies on the vendor's capabilities. Some simple characters may be filtered by the vendor and cannot be passed through and pushed.
If offline push messages are not pushed timely or cannot be received, you need to check the vendor's push restrictions.
How to troubleshoot if the jump interface is unsuccessful?
Click the notification column of an offline push message to redirect to the specified interface. The backend delivers the redirection modes and page parameters that you configure for various vendors in the console to vendor servers based on vendor API rules. When you click the notification column for offline push messages, the system opens and redirects to the corresponding page. The opening of the corresponding page also depends on the manifest file. Only when the configuration in the manifest file is consistent with that in the console, the corresponding page can be opened and redirected properly.
1. First, you need to check whether the configuration in the console and that in the manifest file are correct and consistent with each other. For more information, see the TUIKitDemo configuration. Note that the API modes may vary by vendors.
2. If the system redirects to the configuration page, you need to check whether the parsing of offline messages on the configuration page and the page redirection are proper.
Vendor's push restrictions
1. All vendors in China have adopted message classification mechanisms, and different push policies are assigned for different types of messages. To make the push timely and reliable, you need to set the push message type of your app as the system message or important message with a high priority based on the vendor's rules. Otherwise, offline push messages are affected by the vendor's push message classification and may vary from your expectations.
2. In addition, some vendors set limits on the daily volumes of app push messages. You can check such limits in the vendor's console.
3. If offline push messages are not pushed timely or cannot be received, consider the following:
Huawei: Starting from EMUI 10.0, Huawei Push intelligently categorizes notification messages into two levels: Service and Communication and Information Marketing. Versions earlier than EMUI 10.0 don't categorize notifications but have only one level, so all notifications are displayed through the "default notification" channel, which is equivalent to the Service and Communication level on EMUI 10.0. The daily push volume of Information Marketing messages has been capped based on the app type since January 5, 2023, while the daily push volume of Service and Communication messages is not limited. Additionally, message classification is also related to self-help message classification permission.
If there is no self-help message classification permission, the vendor will perform secondary intelligent message classification on push messages.
If you have applied for the self-help message classification permission and the push message carries the category field, the message will be pushed based on the custom classification. For details, see setAndroidHuaWeiCategory.
vivo: The push service will optimize message classification rules and adjust the quantity limits for different message categories starting April 3, 2023.
Regarding message classification optimization, add a secondary classification category field and configure different push speeds based on different secondary classifications. For the API, see setAndroidVIVOCategory. The default value of category can be configured in the Chat console.
Regarding the adjustment of message quantity limits, system messages can apply for unlimited permissions, with no limit on the number of messages a single user can receive per day per application. The daily push limit for operational messages = the number of active users with notifications enabled * multiplier, with a default multiplier of 2, and 3 for news applications. The daily limit for a single user per application is 2 messages, and 5 for news applications.
OPPO: Push messages are classified into private messages and public messages with different push effects and policies. Private messages are those that a user pays attention to and wants to receive in time. The private message channel permission needs to be applied for via email. The public message channel is subject to a number limit.
Mi: Push messages are classified into "private messages" and "public messages," with the default channel being public messages. The daily push quantity of public messages is capped. Public messages are suitable for pushing hot news, new product promotions, platform announcements, community topics, prize-winning activities, and other content of general interest to users. Private messages are suitable for pushing chat messages, personal order changes, delivery notifications, transaction reminders, IoT system notifications, and other private notifications. The number of private message notifications is not limited. Message classification management requires channel application and integration in the vendor's console.