tencent cloud

Tencent Real-Time Communication

Beauty Effects (Flutter)

ダウンロード
フォーカスモード
フォントサイズ
最終更新日: 2026-06-09 10:10:04
TUILiveKit provides two beauty enhancement options: Basic Beauty (built-in) and Advanced Beauty (requires extra integration and purchase). Select the solution that best meets your requirements.
Basic Beauty
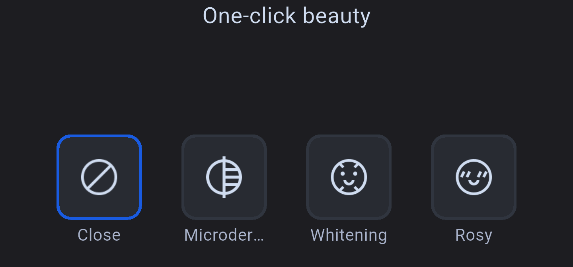
Basic Beauty is integrated by default in TUILiveKit and requires no additional setup. It offers whitening, smoothing, and rosy effects, each with adjustable intensity.
Advanced Beauty
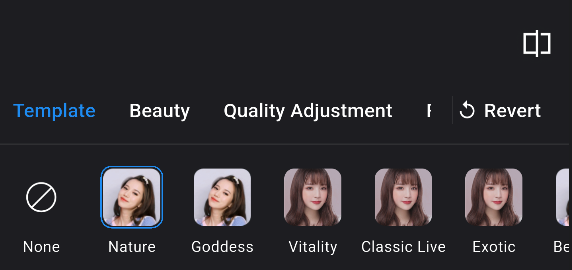
Advanced Beauty uses the Tencent Effects SDK to deliver a wider range of professional beauty features, including V-shaped face, eye distance adjustment, nose slimming, 3D stickers, and more.
Example screenshots of both beauty panels:
Basic Beauty Panel
Advanced Beauty Panel


Advanced Beauty Effects Showcase

V-Face
Eye Distance
Slim Nose
3D Stickers


Prerequisites

See Preparation for steps to integrate the TUILiveKit component.

Component Integration

TUILiveKit includes Basic Beauty by default and requires no additional integration. To use Advanced Beauty, complete the steps below.
Note:
Advanced Beauty requires a separate paid package. For more information, refer to Tencent Effects SDK.

Step 1: Integrate the te_beauty_kit Adapter Module

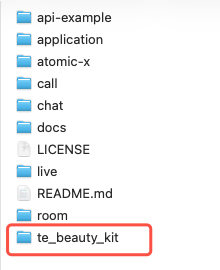
Download the TUIKit_Flutter source code from GitHub. Copy the te_beauty_kit folder into your project at the same directory level as the app folder.


Add the te_beauty_kit dependency to your Flutter project's pubspec.yaml file:
dependencies:
te_beauty_kit:
path: ../te_beauty_kit # Use your actual path
Note:
The following integration steps assume you have purchased a beauty package. To streamline the process, S1-07 is used as an example. After integration, refer to Update Package to switch to your actual package.

Step 2: Integrate Beauty Panel Resources (Required)

Beauty Panel Resources

Beauty panel resources are divided into two main parts:
Panel configuration assets: Includes panel configuration JSON files and related images for displaying beauty features.
Resource
Purpose
assets/beauty_panel/*.json
Panel UI configuration (groups, buttons, sliders)
assets/beauty_panel/panel_icon/
Panel button icon PNGs
Beauty effect assets: Includes filter LUTs, 2D/3D animated stickers, and other materials.
Resource
Purpose
Corresponding Panel Feature
lut/
Filter color lookup tables
Filter Tab
MotionRes/2dMotionRes/
2D animated stickers
big head effects|Sticker Tab
MotionRes/3dMotionRes/
3D model stickers
Sticker Tab
MotionRes/handMotionRes/
Gesture-triggered stickers
Gesture Tab
MotionRes/makeupRes/
Full Makeup Set (lipstick, eyeshadow, blush, etc.)
Makeup Tab
MotionRes/light_makeup/
Light Makeup assets
Light Makeup Tab
MotionRes/segmentMotionRes/
Portrait segmentation (green screen, matting, background blur)
Segmentation Tab

Integrate Beauty Panel Resources

1. To quickly integrate, download TUIKit_Flutter and use the default S1-07 package resources.
2. Integrate panel configuration assets: Copy TUIKit_Flutter/application/assets/beauty_panel to your Flutter project's assets directory.
application/assets/
├── beauty_panel/
│ ├── beauty.json
│ ├── beauty_template.json
│ ├── beauty_template_ios.json
│ ├── beauty_image.json
│ ├── beauty_shape.json
│ ├── beauty_makeup.json
│ ├── beauty_body.json
│ ├── light_makeup.json
│ ├── makeup.json
│ ├── motion_2d.json
│ ├── motion_3d.json
│ ├── motion_gesture.json
│ ├── segmentation.json
│ ├── lut.json
│ └── panel_icon/
Add these assets to your Flutter project's pubspec.yaml:
flutter:
assets:
- assets/beauty_panel/
- assets/beauty_panel/panel_icon/beauty/
- assets/beauty_panel/panel_icon/beauty/beauty_smooth/
- assets/beauty_panel/panel_icon/beauty/eyes_makeup/
- assets/beauty_panel/panel_icon/beauty/kouhong/
- assets/beauty_panel/panel_icon/beauty/liti/
- assets/beauty_panel/panel_icon/beauty/saihong/
- assets/beauty_panel/panel_icon/beauty_body/
- assets/beauty_panel/panel_icon/beauty_template/
- assets/beauty_panel/panel_icon/light_makeup_icon/
- assets/beauty_panel/panel_icon/lut_icon/
- assets/beauty_panel/panel_icon/motions_icon/
3. Integrate beauty effect assets. Android and iOS require separate integration:
Android
iOS
Copy the lut and MotionRes directories from TUIKit_Flutter/application/android/app/src/main/assets to your Android app's assets directory:
android/app/src/main/assets/
├── lut/
│ ├── baixi_lf.png
│ ├── dongjing_lf.png
│ ├── moren_lf.png
│ ├── xindong_lf.png
│ └── ziran_lf.png
└── MotionRes/
├── 2dMotionRes/
├── 3dMotionRes/
├── handMotionRes/
├── ganMotionRes/
├── makeupRes/
├── light_makeup/
└── segmentMotionRes/
Copy the TUIKit_Flutter/application/ios/xmagic directory to your iOS project root:
ios/
└── xmagic/
├── lut.bundle/
├── 2dMotionRes.bundle/
├── 3dMotionRes.bundle/
├── makeupMotionRes.bundle/
├── ganMotionRes.bundle/
├── handMotionRes.bundle/
├── lightMakeupRes.bundle/
└── segmentMotionRes.bundle/
Drag the xmagic/ directory into your Xcode project, select Create folder references (blue folder), do not use group, and ensure Target Membership is enabled for your main app target.
4.
Package and panel JSON mapping table
: Import all JSON files that correspond to your selected BeautyLevel. Missing files will result in missing or blank tabs.
Package
(BeautyLevel)
Panel JSON files to import (full set)
A1_00
beauty_template, beauty, lut
A1_01
beauty_template, beauty, beauty_image, beauty_base_shape, lut
A1_02
beauty_template, beauty, beauty_image, beauty_base_shape, lut, motion_2d
A1_03
beauty_template, beauty, beauty_image, beauty_general_shape, lut, motion_2d
A1_04
beauty_template, beauty, beauty_image, beauty_general_shape, lut
A1_05
beauty_template, beauty, beauty_image, beauty_general_shape, lut, motion_2d, segmentation
A1_06
beauty_template, beauty, beauty_image, beauty_general_shape, lut, motion_2d, makeup
S1_00
beauty_template, beauty, beauty_image, beauty_shape, beauty_makeup, lut
S1_01
beauty_template, beauty, beauty_image, beauty_shape, beauty_makeup, lut, motion_2d, motion_3d, makeup, light_makeup
S1_02
beauty_template, beauty, beauty_image, beauty_shape, beauty_makeup, lut, motion_2d, motion_3d, motion_gesture, makeup, light_makeup
S1_03
beauty_template, beauty, beauty_image, beauty_shape, beauty_makeup, lut, motion_2d, motion_3d, makeup, light_makeup, segmentation
S1_04
beauty_template, beauty, beauty_image, beauty_shape, beauty_makeup, lut, motion_2d, motion_3d, motion_gesture, makeup, light_makeup, segmentation
S1_05
beauty_template, beauty, beauty_image, beauty_shape, beauty_makeup, lut, beauty_body, motion_2d, motion_3d, makeup, light_makeup, segmentation
S1_06
beauty_template, beauty, beauty_image, beauty_shape, beauty_makeup, lut, beauty_body, motion_2d, motion_3d, motion_gesture, makeup, light_makeup, segmentation
S1_07
beauty_template, beauty, beauty_image, beauty_shape, beauty_makeup, lut, beauty_body, motion_2d, motion_3d, motion_gesture, makeup, light_makeup, segmentation

Step 3: Project Configuration

1. Add the following configuration to your Flutter project's pubspec.yaml:
# pubspec.yaml

# Root-level configuration
EffectPlayer:
sub_spec: 'NoXMagic'
TencentEffect:
te_sub_spec: 'S1-07'
Note:
1. EffectPlayer.sub_spec: Options are Default and NoXMagic. If you use both Tencent Effects Player and Tencent Effects Beauty libraries, you may encounter a compilation conflict with the xmagic library. To resolve this, set NoXMagic to compile only one copy of the xmagic library. TUILiveKit includes the gift component live_uikit_gift by default, which uses Tencent Effects Player.
2. TencentEffect.te_sub_spec: Set your package type here. For more options, see Step 2, Item 4.
iOS Platform: If EffectPlayer.sub_spec is set to NoXMagic, comment out YTCommonXMagic in your iOS app's Podfile. Tencent Effects Beauty will import this library by default.
# Comment out YTCommonXMagic library
# pod 'YTCommonXMagic', :podspec => 'https://mediacloud-76607.gzc.vod.tencent-cloud.com/MediaX/iOS/podspec/release/YTCommonXMagic_1.3.1/YTCommonXMagic.podspec'
Android Platform: Ensure your root settings.gradle file's dependencyResolutionManagement includes the Tencent Maven repository. The tebeautykit module's Tencent Effects SDK dependency is fetched from this source:
dependencyResolutionManagement {
repositoriesMode.set(RepositoriesMode.FAIL_ON_PROJECT_REPOS)
repositories {
google()
mavenCentral()
// Add Tencent Maven repository
maven { url 'https://mirrors.tencent.com/repository/maven/thirdparty' }
}
}
2. Register the beauty processor in the native layer for Android and iOS:
Android
iOS
package com.tencent.application

import android.os.Bundle
import android.os.PersistableBundle
import io.flutter.embedding.android.FlutterActivity
// Import related files
import com.tencent.trtcplugin.TRTCPlugin
import com.tencent.effect.tencent_effect_flutter.XmagicProcesserFactory

class MainActivity: FlutterActivity() {
override fun onCreate(savedInstanceState: Bundle?) {
super.onCreate(savedInstanceState)
// Register beauty processor
TRTCPlugin.setBeautyProcesserFactory(XmagicProcesserFactory())
}
}

import Flutter
import UIKit
// Import related files
import tencent_effect_flutter
import tencent_rtc_sdk

@main
@objc class AppDelegate: FlutterAppDelegate {
override func application(
_ application: UIApplication,
didFinishLaunchingWithOptions launchOptions: [UIApplication.LaunchOptionsKey: Any]?
) -> Bool {
GeneratedPluginRegistrant.register(with: self)
// Register beauty processor
let instance = XmagicProcesserFactory()
TencentRTCCloud.setBeautyProcesserFactory(factory: instance)
return super.application(application, didFinishLaunchingWithOptions: launchOptions)
}
}

Step 4: Authentication and Initialization

1. Configure localization for the te_beauty_kit module in main.dart:
//
// main.dart
//

// Import files
import 'package:te_beauty_kit/te_beauty_kit.dart';

// Your app's main class
class XXX extends StatelessWidget {
const XXX({super.key});

@override
Widget build(BuildContext context) {
return MaterialApp(
......
localizationsDelegates: [
...LiveKitLocalizations.localizationsDelegates,
// Add localization delegates for te_beauty_kit module
...TEBeautyKitLocalizations.localizationsDelegates,
],
......
);
}
}
2. On app launch or login, set the License authentication and beauty package type:
// Import files
import 'package:te_beauty_kit/te_beauty_kit.dart';

// Initialize Tencent Beauty
TUIBeautyKit.instance.init("YOUR_LICENSE_URL", "YOUR_LICENSE_KEY", BeautyLevel.S1_07);
BeautyLevel options (correspond to the Tencent Effects SDK packages you have purchased):
A1_00 A1_01 A1_02 A1_03 A1_04 A1_05 A1_06
S1_00 S1_01 S1_02 S1_03 S1_04 S1_05 S1_06 S1_07

Update Package

1. Confirm your purchased package type and contact Tencent Effects SDK support to obtain the relevant beauty panel resources (including panel configuration assets and beauty effect assets).
2. Refer to Integrate Beauty Panel Resources to update your panel configuration assets and beauty effect assets.
3. See Project Configuration to change the package type in your TencentEffect/te_sub_spec configuration.
4. Refer to Authentication and Initialization Step 2 to update the package type used for authentication.

Verification

After completing the above steps, launch your app, open the live preview page, click the beauty button, and verify that the beauty panel appears as expected.

FAQs

What should I do if License authentication fails?

Check that your LicenseUrl and LicenseKey are bound to the correct package, confirm that the selected BeautyLevel matches the License, and make sure your application's applicationId matches the package name used when applying for the License.

Is dynamic package switching supported?

No, package selection must be finalized at compile time to download the appropriate dependency libraries.

ヘルプとサポート

この記事はお役に立ちましたか?

フィードバック