Cold Backup Migration
ダウンロード
フォーカスモード
フォントサイズ
This document describes how to migrate data from other cloud providers or self-built SQL Server databases to TencentDB for SQL Server via the SQL Server console.
Scenarios
Cold backup migration restores data from backup files (in .bak, .tar, or .zip format). It is suitable for scenarios where you migrate data from other cloud providers or self-built SQL Server databases to TencentDB for SQL Server, and your business allows downtime for backup.
TencentDB for SQL Server allows you to migrate data to it using COS files or by uploading files locally.
Note:
When backup/recovery is performed using .zip or .tar files, ensure that the extracted files are in the same directory level as the original .zip or .tar files. If the extracted files are placed in a subdirectory, they cannot be parsed.
The backup and recovery feature used in this document supports the migration scenario where full or incremental logs from multiple databases are backed up into a single .bak file.
Trigger Migration
Only the following migration, creation, and modification operations are supported. Other triggers cannot be migrated and will be automatically deleted after migration.
CREATE_TABLE, ALTER_TABLE, DROP_TABLE
CREATE_VIEW, ALTER_VIEW, DROP_VIEW
CREATE_PROCEDURE, ALTER_PROCEDURE, DROP_PROCEDURE
CREATE_FUNCTION, ALTER_FUNCTION, DROP_FUNCTION
CREATE_INDEX, ALTER_INDEX, DROP_INDEX
CREATE_STATISTICS, DROP_STATISTICS, UPDATE_STATISTICS
CREATE_SYNONYM, DROP_SYNONYM
CREATE_TYPE, DROP_TYPE
DDL_TABLE_EVENTS, DDL_VIEW_EVENTS, and other DDL event groups
Other non-security-sensitive DDL events
COS Original File Links
During cold backup migration, if the backup download permission is set to "Downloadable only via private network", the generated backup link cannot be used for backup/recovery operations (because the link contains the x-cos-security-token parameter). In this case, you must remove the VPC and IP address restrictions on the download permission to use the cold backup migration feature. Go to Download Configuration, change the download permission to "Downloadable via both public and private networks", regenerate the backup link, and then use the new link to upload the backup file.
Note
Before migration, ensure that the SQL Server version of the target instance is not lower than that of the source instance.
The database to be migrated must not have a duplicate name with TencentDB for SQL Server.
If the backup file is large, we recommend using the "Download file from COS" method. This involves first uploading the file to COS and then using the COS link for restoration. For instructions on uploading backup files to COS and obtaining the COS link, see Upload Backup to COS.
Full backup file + log file recovery: The target instance and source instance do not need to be the same version; the target instance version only needs to be higher.
Full backup file + differential backup recovery: The target instance and source instance must be the same version.
Note that the file extensions for .bak, .tar, and .zip files are case-sensitive. Only lowercase extensions are supported; uppercase extensions are not supported.
Operation Steps
1. Log in to the TencentDB for SQL Server console. On the instance list page, click the Instance ID to go to the instance management page.
2. On the instance management page, select the Backup and Restoration tab and click Create Task.

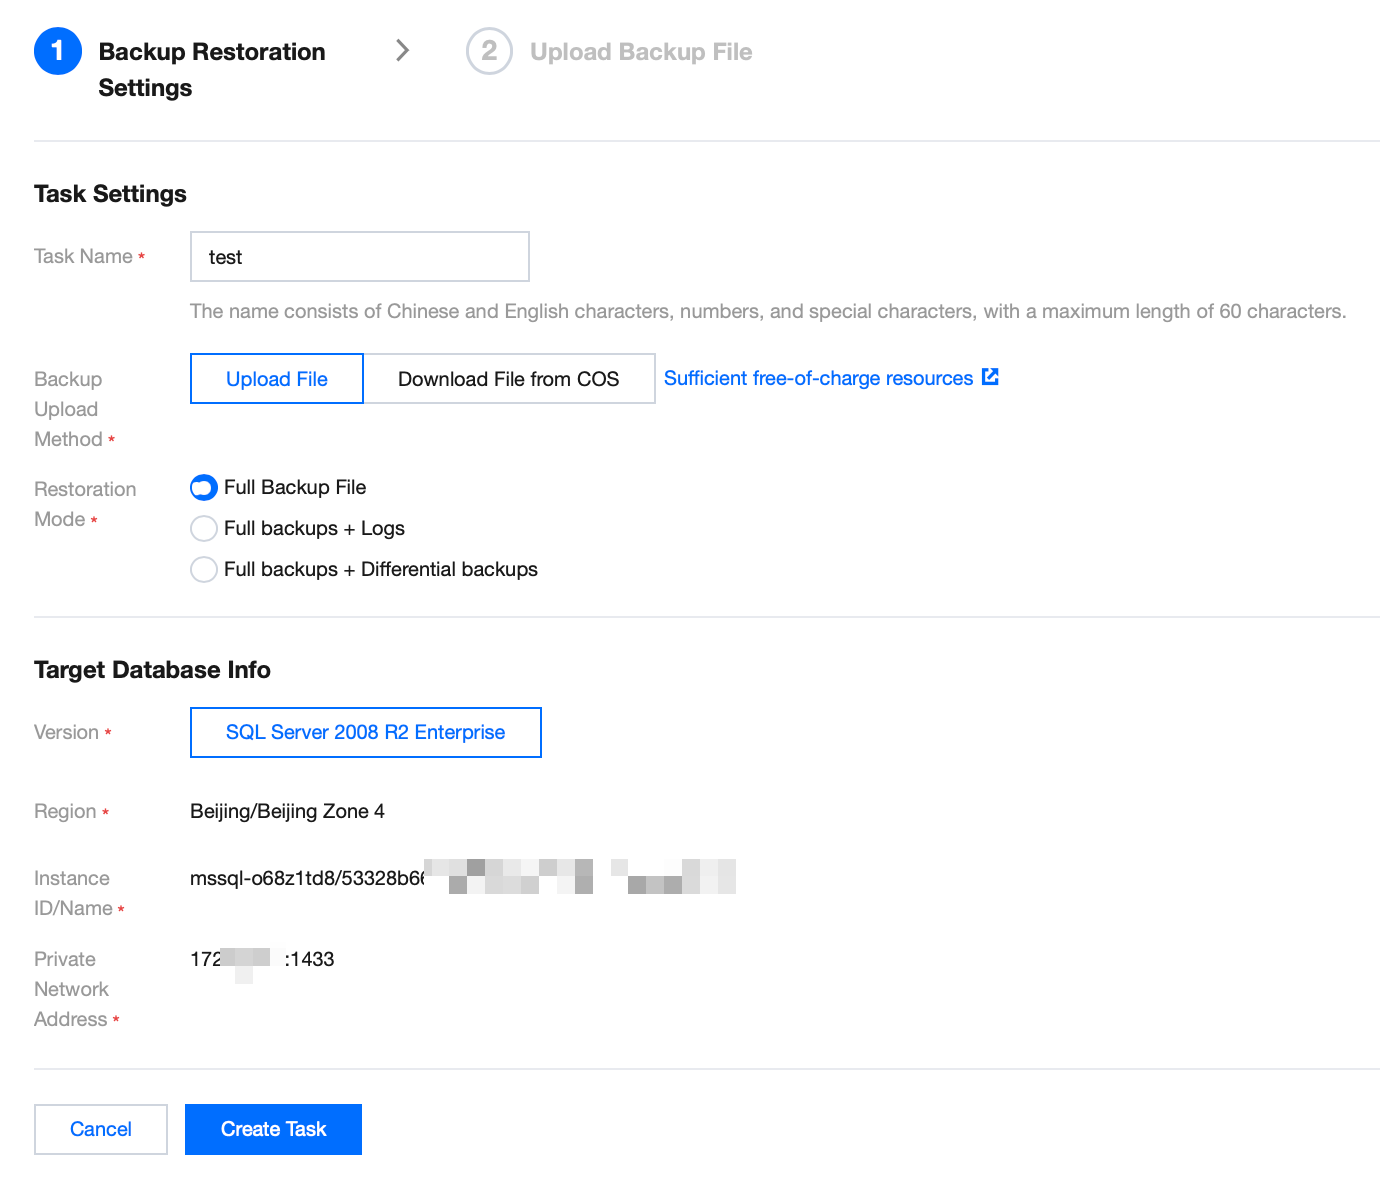
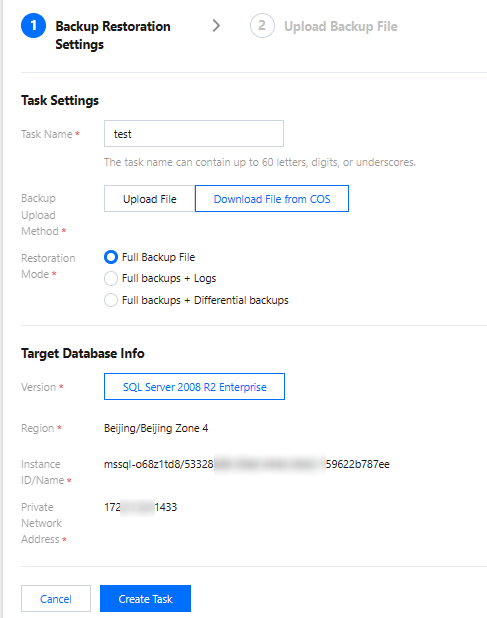
3. On the Create Backup/Recovery Project page, complete the Backup Restoration Settings and click Create Task.
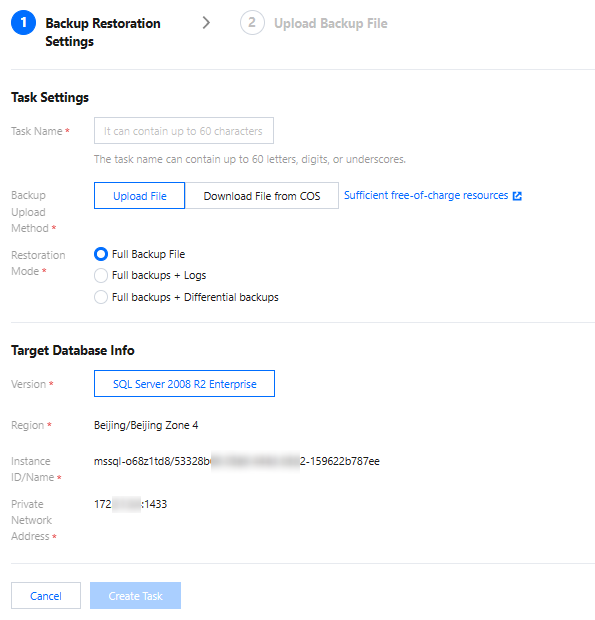
Parameter | Description |
Task Name | Consists of letters, numbers, and underscores, with a maximum length of 60 characters. |
Backup upload method | Supports directly uploading files locally and downloading files from COS. |
Recovery Method | Supports full backup files, full backup files + log files, and full backup files + differential backups. |
Note:
To cancel the creation of a backup/recovery task, click Cancel. After cancellation, the task record will not be retained in the backup/recovery task list.
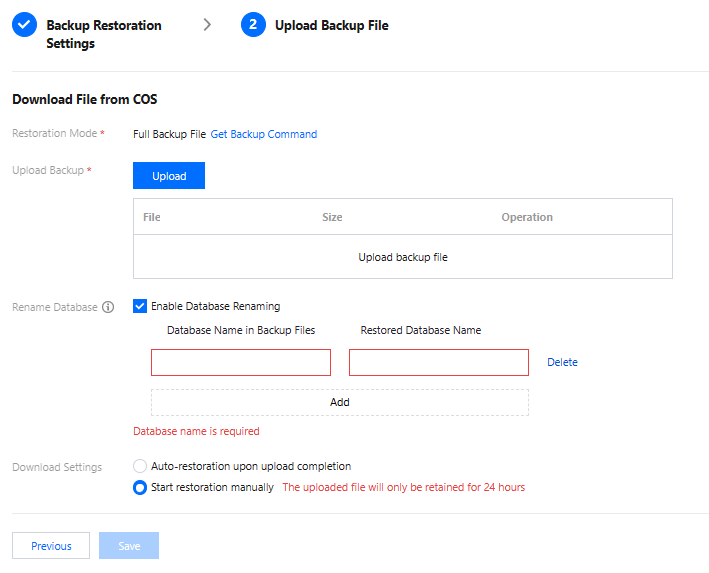
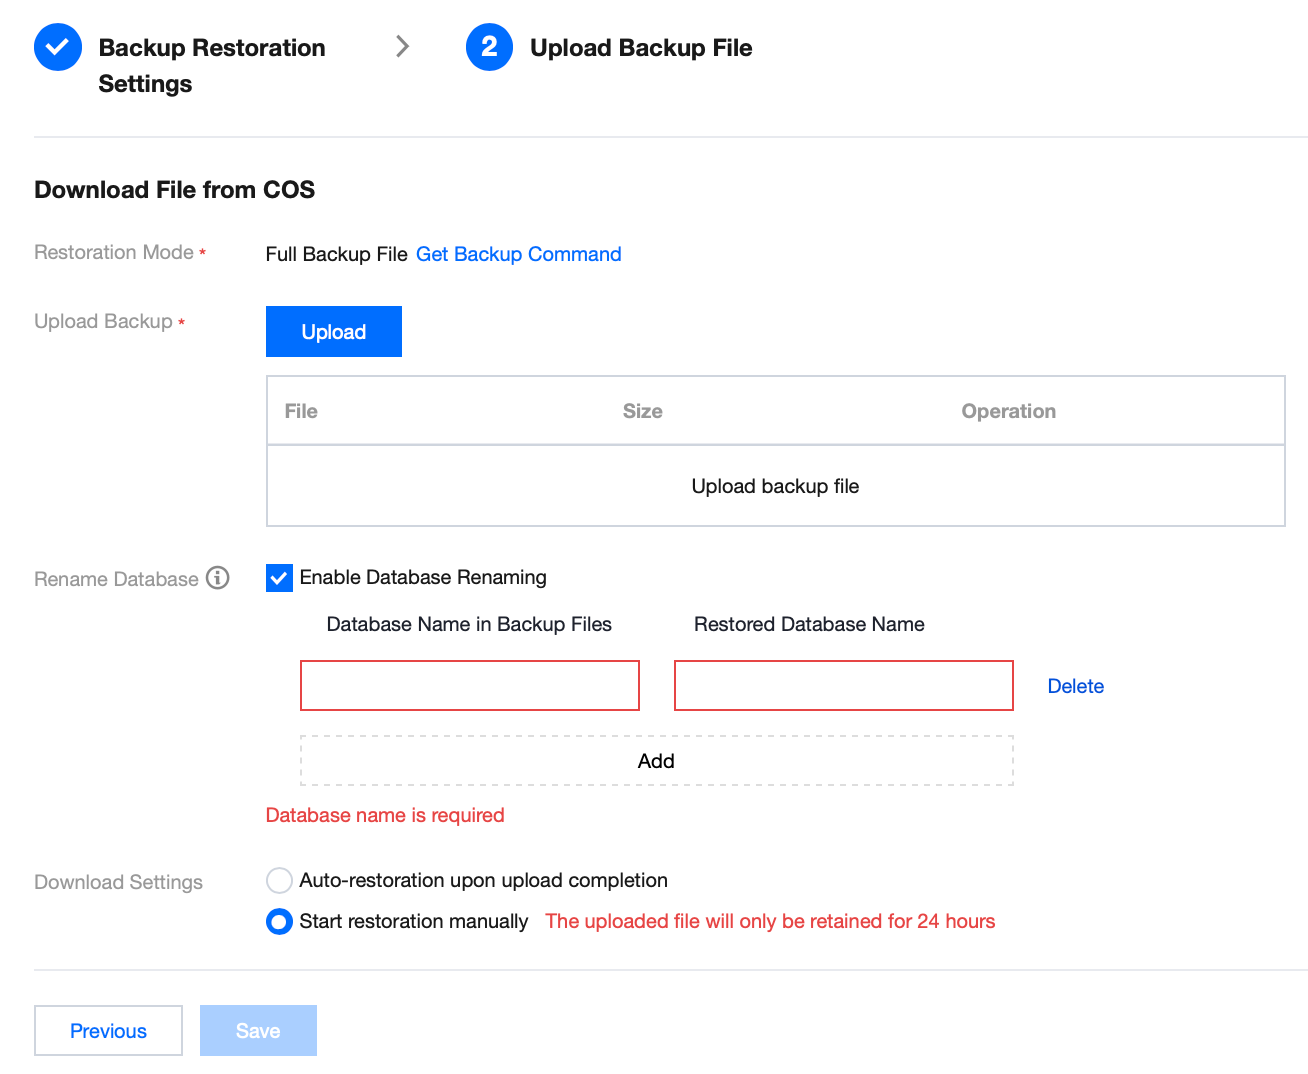
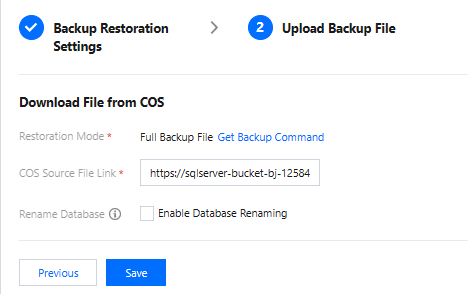
4. On the Create Backup/Recovery Project page, complete the Upload Backup file and click Save.
Based on the backup upload method selected in Step 3, the operations are divided into the following two scenarios. You can refer to the corresponding operations.
Note:
If the backup file is large, we recommend using the "Download file from COS" method. This involves first uploading the file to COS and then using the COS link for restoration. For instructions on uploading backup files to COS and obtaining the COS link, see Upload Backup to COS.
Parameter | Description |
Restoration Mode | When restoration is performed using full backup files + log files or full backup files + differential backups, file names must meet specific requirements. Click to obtain the backup command to generate a corresponding command, which produces backup files that comply with the file naming conventions. Full backup file recovery: You cannot use backup names that consist of a full backup + differential backup, or a full backup + a complete backup with log files. Full backup file + differential backup recovery: Full backup file name requirement: dbname_localtime_1full1_1noreconvery1.bak Differential backup file name requirement: dbname_localtime_1diff1_1noreconvery1.bak Last differential backup file name requirement: dbname_localtime_1diff1_1reconvery1.bak Full backup file + log file recovery: Full backup file name requirement: dbname_localtime_2full2_2noreconvery2.bak Log file name requirement: dbname_localtime_2log2_2noreconvery2.bak Last log file name requirement: dbname_localtime_2log2_2reconvery2.bak. |
Upload Backup | Click Upload to import the backup file from your local machine. |
Rename Database | Optional operation. After it is enabled, the original database name in the backup file is reset. After the database is restored to the cloud, it is assigned a new database name. You need to enter the original database name before backup/recovery and name the new database after restoration. Note: Up to 5 databases can be renamed. If the source database contains databases that have not been renamed, the names of those unrenamed databases remain unchanged after the backup/recovery task is completed. |
Download Settings | Supports automatic recovery after upload and manual initiation of recovery tasks.
Automatic recovery after upload: Click Save to start the recovery task.
Manual initiation of recovery tasks: Click Save, then manually start the task on the backup/recovery page. Uploaded backup files are retained for only 24 hours. |
Note:
On the backup file upload page, you can click Previous to review and edit the backup/recovery settings.
After returning to the backup/recovery settings page, if no changes are needed, click Next to proceed with the backup file upload. To cancel the task, click Cancel.
After returning to the backup/recovery settings page, if you need to edit the task name, backup upload method, or recovery method, click Edit. Clicking Edit clears the content on the backup file upload page from the previous Step 2. After completing the edits, click Create Task to go to the next step and reconfigure the settings.
Parameter | Description |
Recovery Method | When restoration is performed using full backup files + log files or full backup files + differential backups, file names must meet specific requirements. Click to obtain the backup command to generate a corresponding command, which produces backup files that comply with the file naming conventions. Full backup file recovery: You cannot use backup names that consist of a full backup + differential backup, or a full backup + a complete backup with log files. Full backup file + differential backup recovery: Full backup file name requirement: dbname_localtime_1full1_1noreconvery1.bak Differential backup file name requirement: dbname_localtime_1diff1_1noreconvery1.bak Last differential backup file name requirement: dbname_localtime_1diff1_1reconvery1.bak Full backup file + log file recovery: Full backup file name requirement: dbname_localtime_2full2_2noreconvery2.bak Log file name requirement: dbname_localtime_2log2_2noreconvery2.bak Last log file name requirement: dbname_localtime_2log2_2reconvery2.bak. |
COS Source File Link | Paste the link to the original backup file on COS. Note: When downloading files from COS, note the permissions for the COS original file link. The following two types of permissions are supported: Public read permission: You can directly copy the COS download link. Private read permission: Download the file using a pre-signed URL provided by COS. For details, refer to Pre-signed URL Download. Note that the file extensions for .bak, .tar, and .zip files are case-sensitive. Only lowercase extensions are supported; uppercase extensions are not supported. |
Rename database | Optional operation. After it is enabled, the original database name in the backup file is reset. After the database is restored to the cloud, it is assigned a new database name. You need to enter the original database name before backup/recovery and name the new database after restoration. Note: Up to 5 databases can be renamed. If the source database contains databases that have not been renamed, the names of those unrenamed databases remain unchanged after the backup/recovery task is completed. |
Note:
On the backup file upload page, you can click Previous to review and edit the backup/recovery settings.
After returning to the backup/recovery settings page, if no changes are needed, click Next to proceed with the backup file upload. To cancel the task, click Cancel.

After returning to the backup/recovery settings page, if you need to edit the task name, backup upload method, or recovery method, click Edit. Clicking Edit clears the content on the backup file upload page from the previous Step 2. After completing the edits, click Create Task to go to the next step and reconfigure the settings.
5. On the backup/recovery task list, view the backup/recovery tasks.
Full backup file recovery: The recovery task ends automatically after it is started.
Full backup file + differential backup, full backup file + log file: After the full backup recovery is completed, the recovery task supports continuing to upload differential backup files/log files as subtasks. When a subtask is selected as "Last Recovery" and successfully completed, the entire backup/recovery task ends automatically.
Use Cases
TencentDB for SQL Server supports cross-account backup/recovery. This means you can obtain a backup file download link from an instance under Account A and perform data recovery on Account B. The following section describes the considerations and procedures for cross-account backup/recovery.
Note:
After obtaining a backup file download link from an instance under Account A, you can perform backup/recovery on Account B. Account A and Account B must be in the same region.
This backup/recovery method currently supports backup files in .bak, .tar, and .zip formats.
Note that the file extensions for .bak, .tar, and .zip files are case-sensitive. Only lowercase extensions are supported; uppercase extensions are not supported.
For a backup file link obtained from the console, note that cross-region, cross-account backup/recovery is supported only for backup files in single-database format.
Currently, you need to decode the downloaded backup link. For details, see the decoding instructions.
Operation Steps
1. Log in to the TencentDB for SQL Server console using Account A. On the instance list page, click the Instance ID to go to the instance management page.
2. On the instance management page, click Backup Management. In the data backup list, locate the target single-database backup file and click View Details in its Operation column.
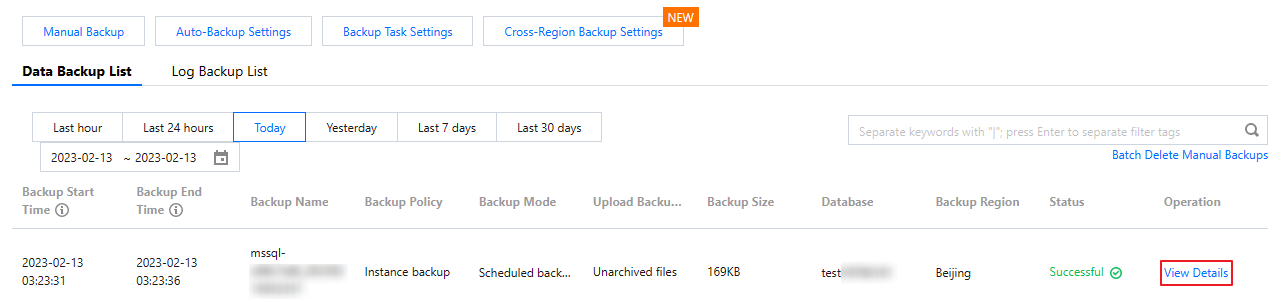
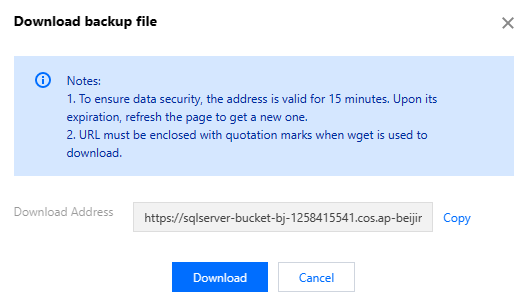
3. In the pop-up window, click Download and then copy the download address link.
4. Click here. On the redirected page, decode the copied link.
Note
:You only need to decode the first part of the download link.
Example: Assume a download link is:
https://sqlserver-bucket-bj-1258415541.cos.ap-beijing.myqcloud.com/1312368346%2fsqlserver%2fmssql-8e5hjaiq%2fbackup%2fautoed_instance_58013012_AdventureWorksDW2012_2022_12_29023915.bak?**********
You only need to select the address portion up to .bak? for decoding. After transcoding, combine it with the latter part to obtain the link for cross-account backup/recovery.
For the example link above, the address portion to be decoded is:
https://sqlserver-bucket-bj-1258415541.cos.ap-beijing.myqcloud.com/1312368346%2fsqlserver%2fmssql-8e5hjaiq%2fbackup%2fautoed_instance_58013012_AdventureWorksDW2012_2022_12_29023915.bak?
After online decoding, it becomes:
https://sqlserver-bucket-bj-1258415541.cos.ap-beijing.myqcloud.com/1312368346/sqlserver/mssql-8e5hjaiq/backup/autoed_instance_58013012_AdventureWorksDW2012_2022_12_29023915.bak?
The final link for cross-account backup/recovery is:
https://sqlserver-bucket-bj-1258415541.cos.ap-beijing.myqcloud.com/1312368346/sqlserver/mssql-8e5hjaiq/backup/autoed_instance_58013012_AdventureWorksDW2012_2022_12_29023915.bak?**********5. Copy the link for cross-account backup/recovery. Log in to the TencentDB for SQL Server console using Account B. On the instance list page, click the Instance ID to go to the instance management page.
6. On the instance management page, choose Backup and Restoration > Create.

7. In the window, complete the following configurations and click Create Task.
Parameter | Description |
Task Name | Enter a task name. The task name must consist of letters, numbers, and underscores, with a maximum length of 60 characters. |
Backup Upload Method | Select Download File from COS. |
Restoration Mode | Select the full backup file. |
8. In the backup file upload window, paste the link and click Save.
9. Go to the Backup and Restoration page, locate the backup task you just created, and click Start in its Operation column.
10. On the backup/recovery list, the cross-account backup/recovery operation is complete when you see that the migration task status shows Migration Successful.
Related APIs
API | Description |
This API is used to create a backup import task. | |
This API is used to modify a backup import task. | |
This API (StartBackupMigration) is used to start a backup import task. | |
This API (DescribeBackupMigration) is used to create an incremental backup import task. | |
This API (DeleteBackupMigration) is used to delete a backup import task. | |
This API (DescribeUploadBackupInfo) is used to query backup upload permissions. | |
This API (CreateIncrementalMigration) is used to create an incremental backup import task. | |
This API (ModifyIncrementalMigration) is used to modify an incremental backup import task. | |
This API (StartIncrementalMigration) is used to start an incremental backup import task. | |
This API (DescribeIncrementalMigration) is used to query incremental backup import tasks. | |
This API (DescribeBackupCommand) is used to query the command for creating backups in a standardized format. | |
This API (DescribeBackupUploadSize) is used to query the size of uploaded backup files. | |
This API (DescribeUploadIncrementalInfo) is used to query incremental backup upload permissions. | |
This API (DeleteIncrementalMigration) is used to delete an incremental backup import task. |
フィードバック