Using DTS to Synchronize TDSQL Boundless Data
ダウンロード
フォーカスモード
フォントサイズ
Use the DTS synchronization feature to perform real-time synchronization of TDSQL Boundless data to the target database (supports MySQL, TDSQL-C MySQL), applicable to scenarios such as multi-active across cloud and on-premises, cross-region disaster recovery, cross-border synchronization, and real-time data warehousing.
Feature Limits
When using Binlog to subscribe to TDSQL Boundless data changes, note the following relevant restrictions and currently unsupported scenarios.
Note:
Enabling or disabling Binlog is performed smoothly, requiring no instance restart and causing no impact on business read/write operations. The process is typically completed within 1 to 2 minutes.
Enabling or disabling Binlog is supported only for Provisioned resource instances, not for Serverless instances.
The Binlog feature is officially supported starting from kernel version V21.2.0. After Binlog is enabled, DDL operations on FUNCTIONs, PROCEDUREs, and TRIGGERs are not currently recorded to Binlog. If changes are made to these objects, you must manually synchronize them to downstream through other means. The feature limitations for historical kernel versions are as follows:
Kernel version earlier than V21.0.0: DDL operations on VIEWs are not recorded to Binlog.
Kernel version earlier than V20.0.0: After Binlog is enabled, the
CREATE TABLE ... AS SELECT ... syntax is automatically disabled. To restore it, contact technical support to disable the synchronization feature and restart the instance.HBase compatibility mode is not supported; only MySQL compatibility mode is supported.
Enabling Binlog is not currently supported for instances with cold data archiving enabled. Furthermore, the Binlog service and cold data archiving are mutually exclusive, and only one of them can be enabled.
Enabling Binlog is not currently supported for instances with database table recycle bin enabled. Furthermore, the Binlog service and the table recycle bin are mutually exclusive, and only one of them can be enabled.
Standalone download of Binlog files is not currently supported. You can subscribe to logs via the MySQL Binlog Dump protocol or CKafka. For details, refer to Real-time Data Capture from TDSQL Boundless via DTS.
Binlog logs are retained for 7 days by default. Binlog logs that exceed the retention period are automatically cleaned up and cannot be recovered.
Enabling or disabling Binlog is supported only for instances that are running.
Step 1: Enable Binlog (TDSQL Boundless Side)
1. Follow the procedures described in Managing Binlog to enable Binlog for the instance.
After successful activation, you will receive the IP address and port for Binlog CDC. Please keep it secure as it will be used to create data subscription tasks later.
2. Create a dedicated user for data synchronization and grant
REPLICATION SLAVE and REPLICATION CLIENT privileges.2.1 Log in to the TDSQL Boundless console, navigate to the Instance List, and select the ID of an instance for which Binlog is enabled.
2.2 Go to the Account Management page, click Create Account, and create a user for data synchronization.
2.3 In the row of the target account, click Modify Permissions in the Operation column to grant the
REPLICATION SLAVE and REPLICATION CLIENT permissions.
Step 2: Create a data synchronization task (DTS end)
1. Log in to the Data Sync Purchase Page, select the appropriate configuration, and click Buy Now.
Configuration Item | Description |
Service Type | Select Data Sync. |
Source Instance Type | Select TDSQL Boundless. |
Target Instance Type | Select the database type to be synchronized based on business needs. Currently supported target instance types include MySQL and TDSQL-C MySQL. |
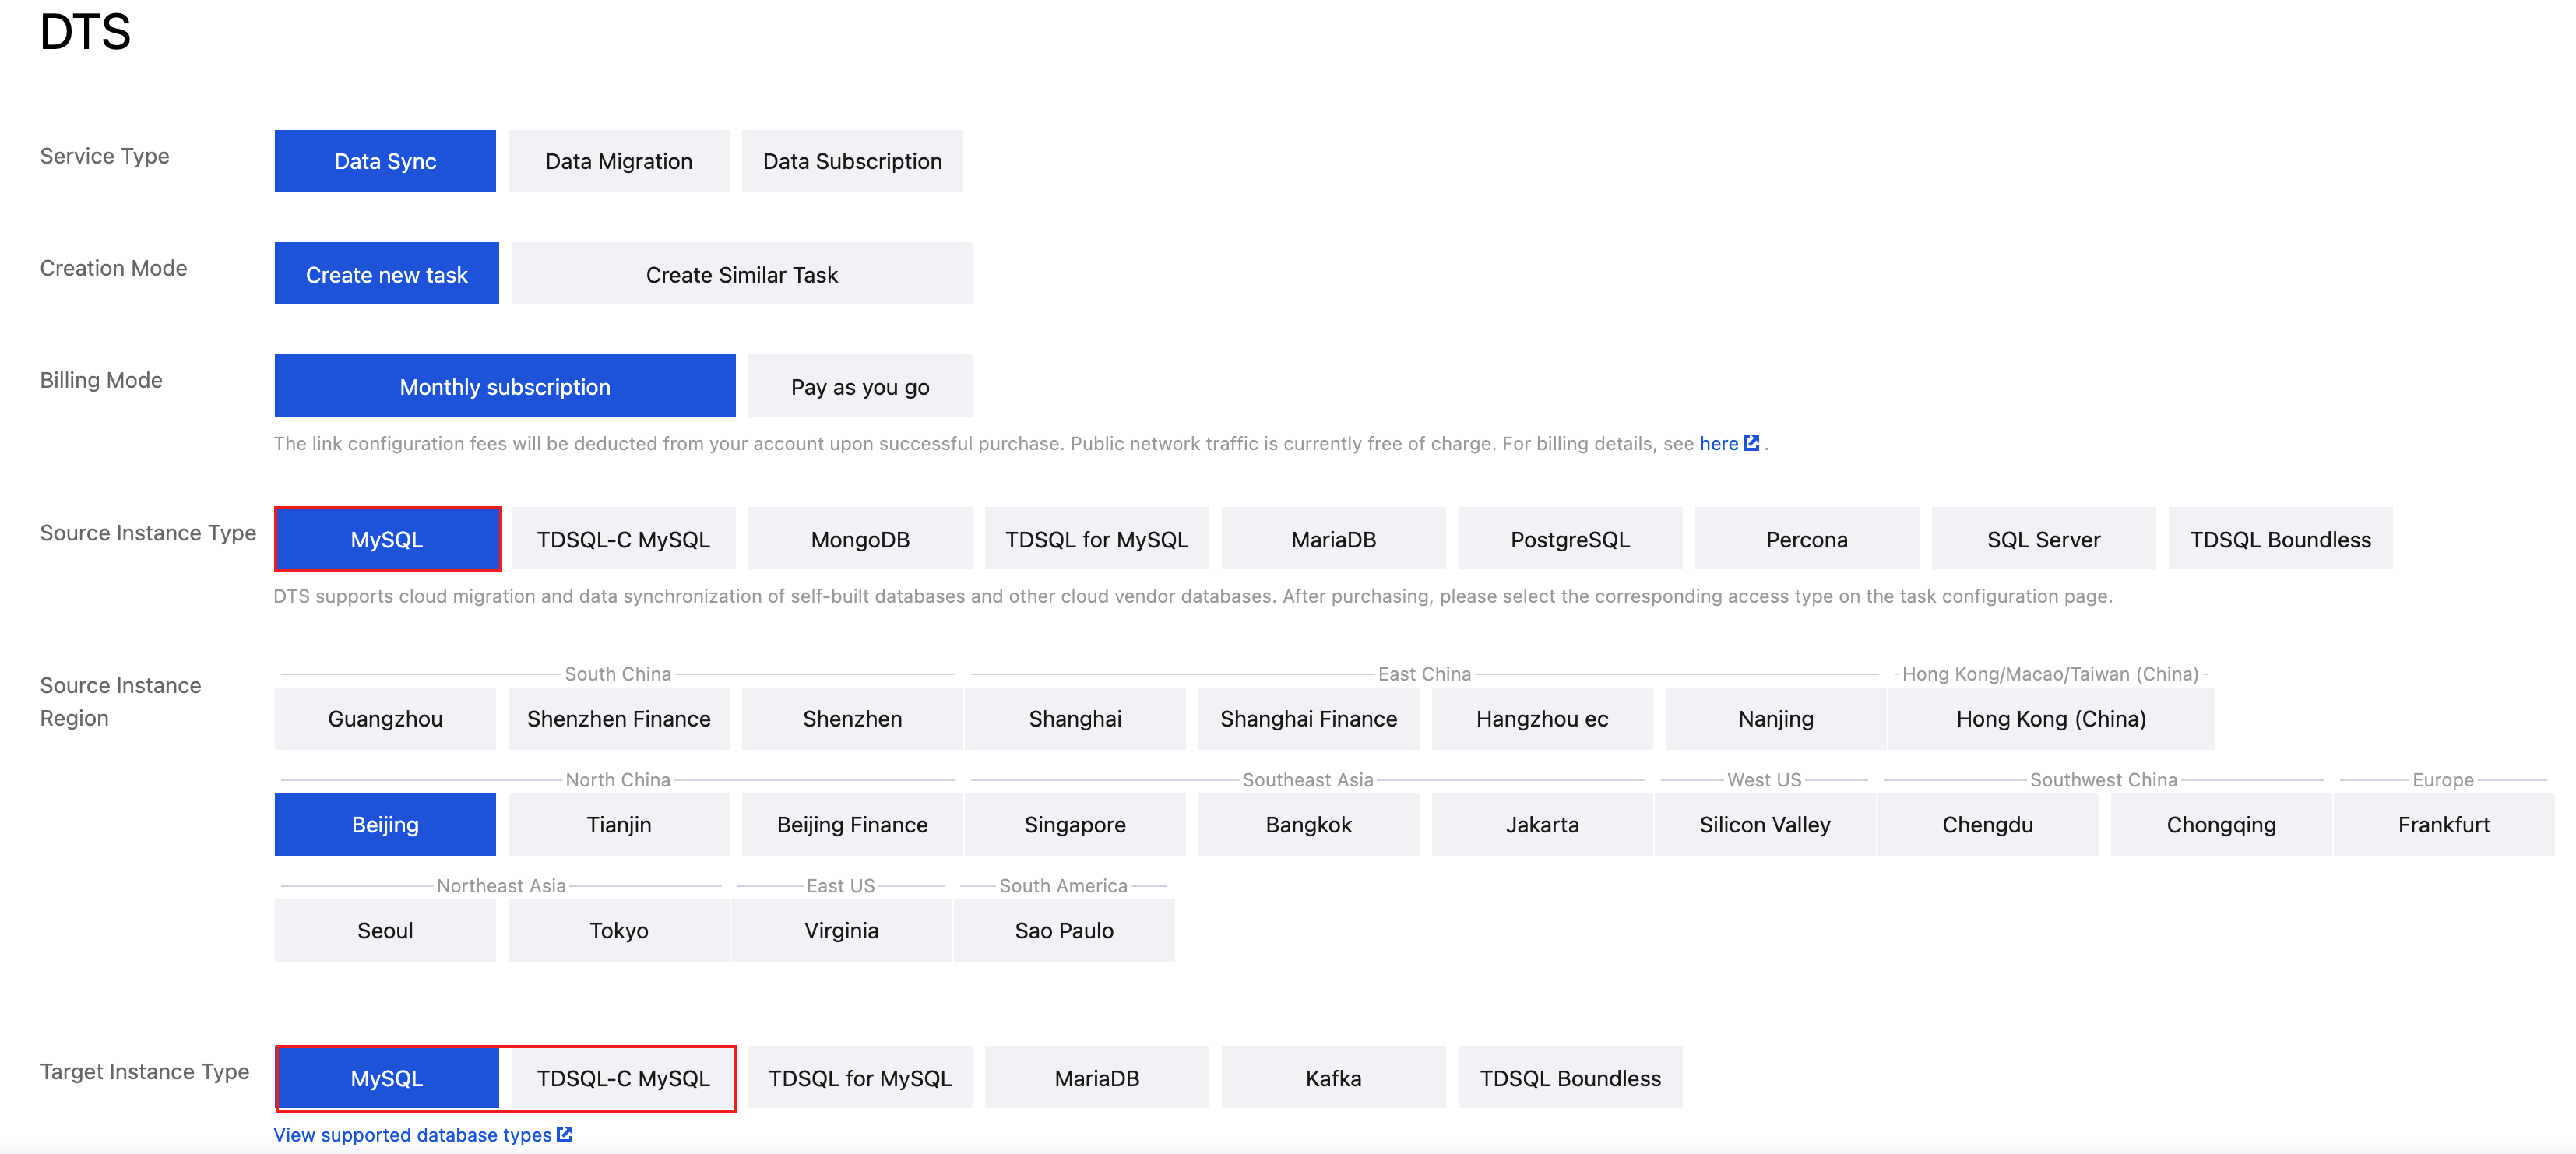
2. After a successful purchase, you are returned to the Data Sync List, where you can view the newly created data sync task.
3. In the data synchronization list, click Configure in the Operation column to go to the synchronization task configuration page.

4. On the synchronization task configuration page, configure the source database access type, host address, port, account, and password; configure the target database access type, host address, port, account, and password. After testing connectivity, click Next.
Module | Configuration Item | Description |
Task Configuration | Task Name | DTS automatically generates a task name. It is recommended that users modify it to a meaningful name to facilitate task identification. |
| Running Mode | Immediate execution: The task will be started immediately once the pre-check passes. Scheduled execution: Set a start time for the task execution. After the pre-check passes, the task is not started immediately, but is started at the scheduled time. |
Source Database Settings | Source Instance Type | Select TDSQL Boundless. |
| Account | In the first step, the created data synchronization user with REPLICATION SLAVE and REPLICATION CLIENT privileges. |
| Password | |
Target Database Settings | - | Depending on the target database type, for detailed configurations, see: MySQL: See Sync from TDSQL Boundless to MySQL. TDSQL-C MySQL: See Sync from TDSQL Boundless to TDSQL-C MySQL. |
5. On the page of setting synchronization options and synchronization objects, set the data initialization, data synchronization, and synchronization object options. After the settings are completed, click Save and Next.
Depending on the target database type, for detailed configurations, see:
MySQL: See Sync from TDSQL Boundless to MySQL.
TDSQL-C MySQL: See Sync from TDSQL Boundless to TDSQL-C MySQL.
Note:
Do not select the
_tdsql_recycle_bin_ for the source database objects, as this may cause the synchronization task to fail.The system does not currently support generating Binlog for FUNCTION, PROCEDURE, and TRIGGER operations. Therefore, do not select PROCEDURE and FUNCTION for advanced migration objects.
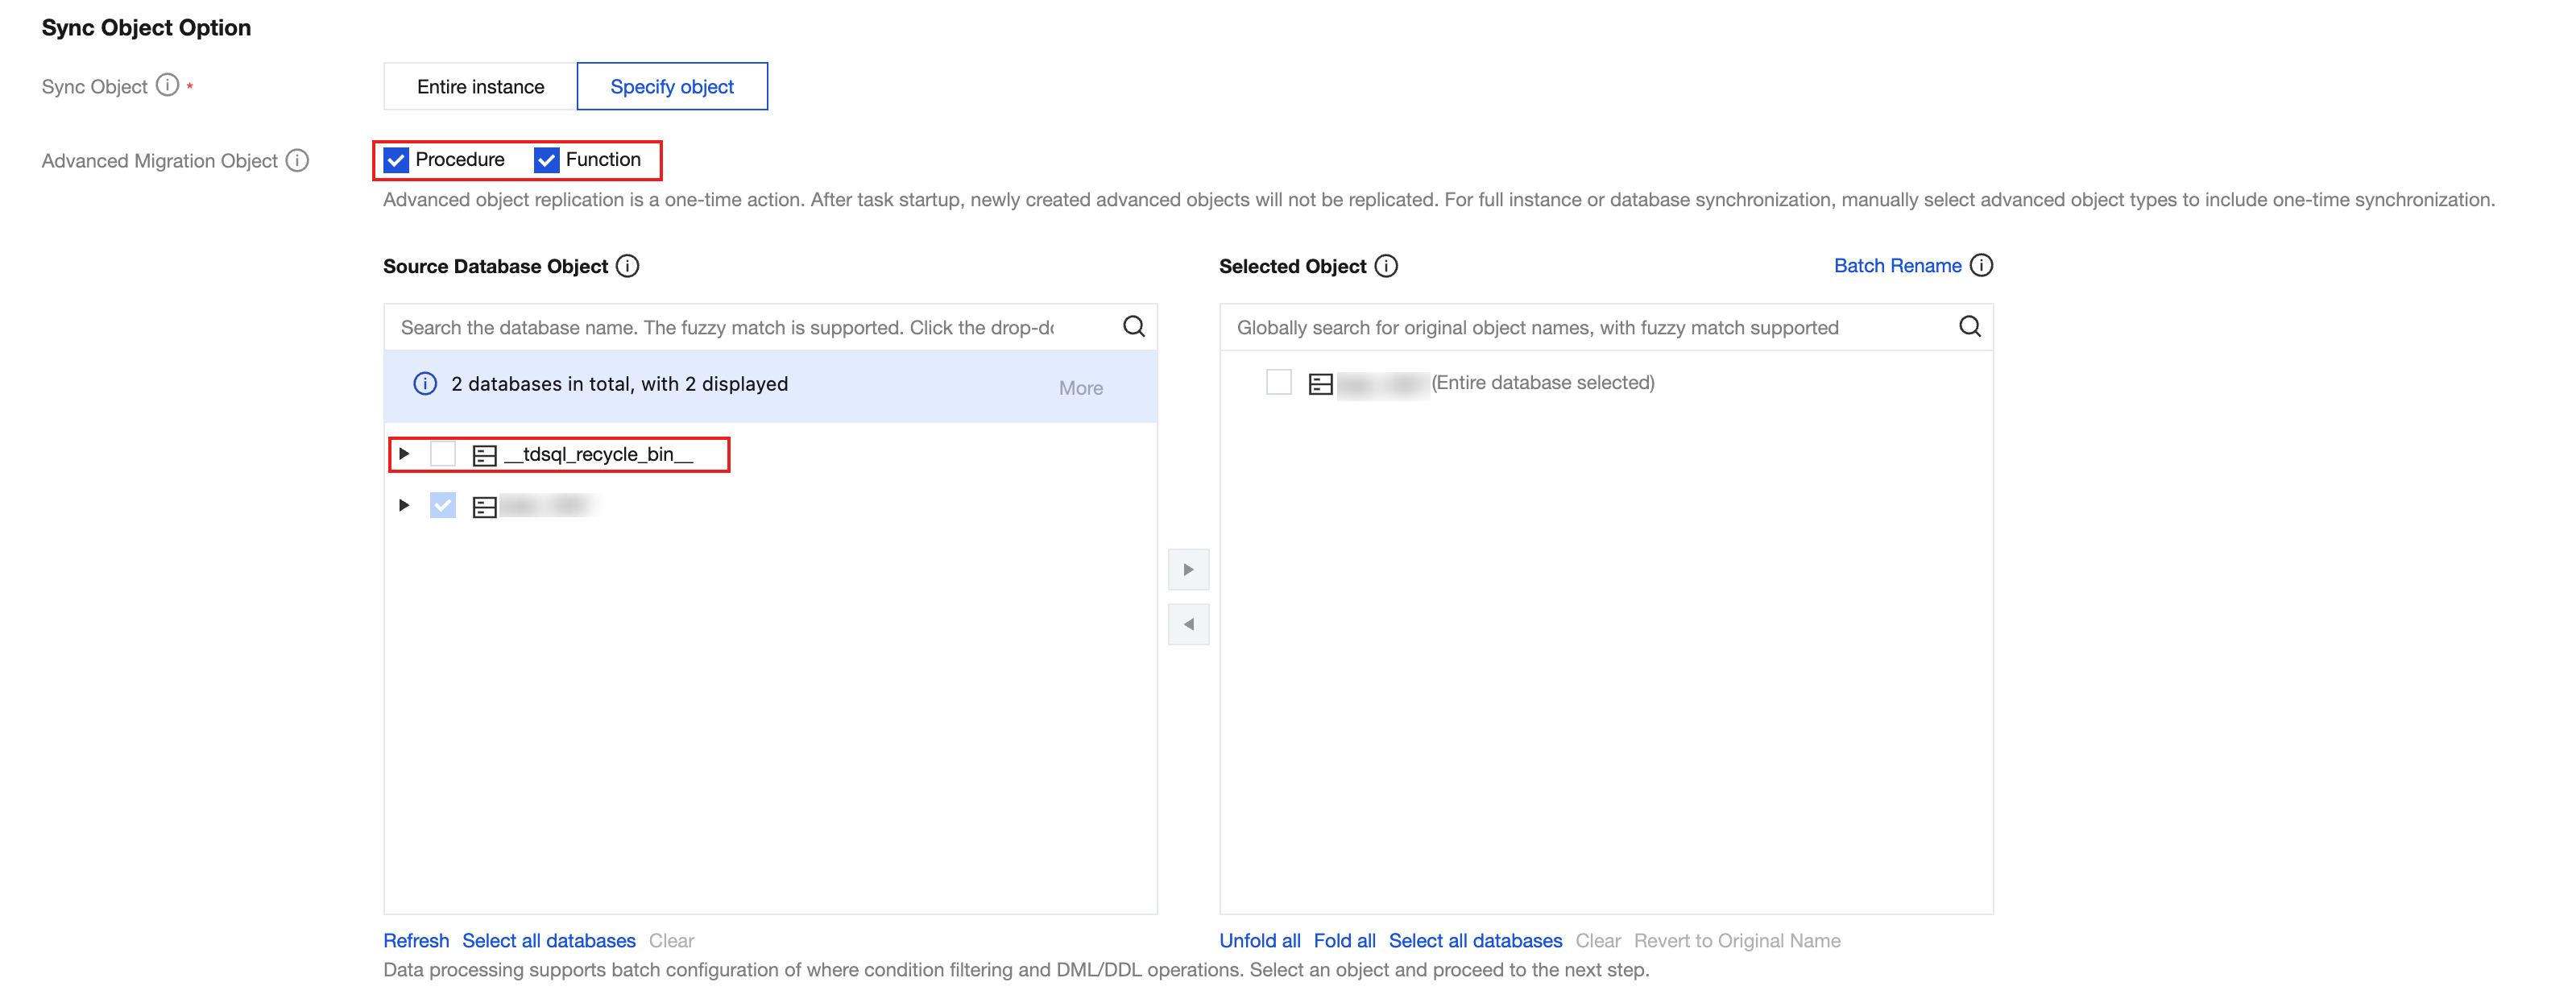
6. On the task validation page, after the validation is completed and all check items are passed, click Start Task.
If the validation task fails, you can view the specific check items and failure reasons, fix the issues according to the prompts on the page, and then restart the validation task.
7. Return to the data synchronization task list, and the task will enter the Running status.

8. (Optional) To view the overall synchronization progress, see Task Management. If task exceptions or errors are encountered, see Error Handling.
9. If you need to receive alarms for abnormal data sync task metrics, see Configure Data Sync Metric Alarms to configure them.
フィードバック