É possível criar um listener TCP para uma instância do CLB, no intuito de encaminhar solicitações TCP do cliente. O TCP é adequado para cenários com altos requisitos de confiabilidade e precisão de dados, mas requisitos relativamente baixos de velocidade de transferência, como transferência de arquivos, mensagens de e-mail e login remoto. Para listeners TCP, o servidor de back-end pode obter diretamente o IP real do cliente.
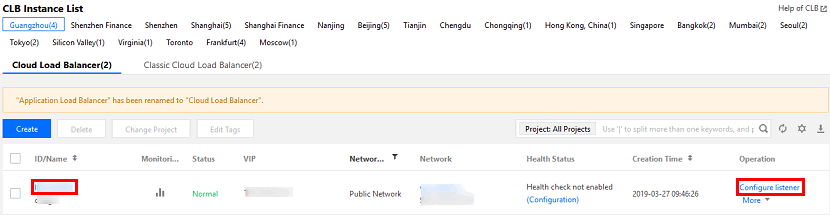
2. Selecione Instance Management (Gerenciamento de instâncias) na barra lateral esquerda.
3. Na lista de instâncias, clique no ID da instância a ser configurada para acessar a sua página de detalhes.
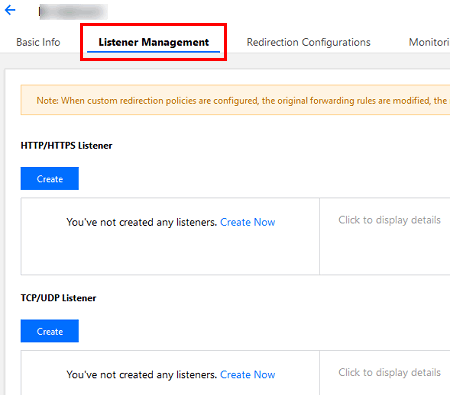
4. Clique na guia Listener Management (Gerenciamento de listener) ou clique em Configure Listener (Configurar listener) na coluna "Operation (Operação)".
5. A página "Listener Management (Gerenciamento de listener)" é conforme mostrado abaixo:
Etapa 2. Configure um listener
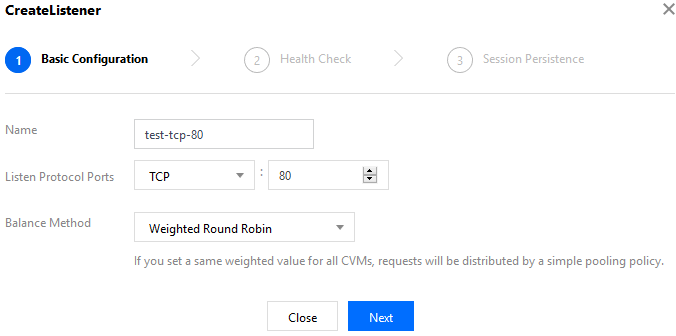
Clique em Create (Criar) em TCP/UDP/TCP SSL Listener (Listener TCP/UDP/TCP SSL) e configure um listener TCP na janela pop-up.
1. Configurações básicas
Item de configuração
Descrição
Exemplo
Nome
Nome do listener
test-tcp-80
Protocolo do listener e porta de escuta
Protocolo do listener e porta de escuta.
Protocolo do listener: o CLB aceita vários protocolos, incluindo TCP, UDP, HTTP e HTTPS. O TCP é usado neste exemplo.
Porta de escuta: uma porta usada para receber solicitações e encaminhá-las para o servidor de back-end. Intervalo de portas: 1 a 65535.
A porta do listener deve ser exclusiva na mesma instância do CLB.
TCP:80
Método de balanceamento
Para listeners TCP, o CLB aceita dois algoritmos de programação: round-robin ponderado (WRR, na sigla em inglês) e conexões mínimas ponderadas (WLC, na sigla em inglês).
WRR: as solicitações são entregues sequencialmente a diferentes servidores de back-end, de acordo com seus pesos. A programação é feita com base na quantidade de conexões novas, em que servidores com pesos mais altos passarão por mais pesquisas (ou seja, uma probabilidade maior), já servidores com o mesmo peso processam a mesma quantidade de conexões.
WLC: as cargas de servidores são estimadas de acordo com a quantidade de conexões ativas com eles. A programação é feita com base nas cargas e nos pesos do servidor. Se seus pesos forem os mesmos, os servidores com menos conexões ativas passarão por mais pesquisas (ou seja, uma probabilidade maior).
WRR
A configuração específica do listener TCP criado é mostrada abaixo:
2. Verificação de integridade
Item de configuração
Descrição
Exemplo
Status da verificação de integridade
A verificação de integridade pode ser ativada ou desativada. Em listeners TCP, as instâncias do CLB enviam pacotes SYN para a porta do servidor especificada, no intuito de realizar verificações de integridade.
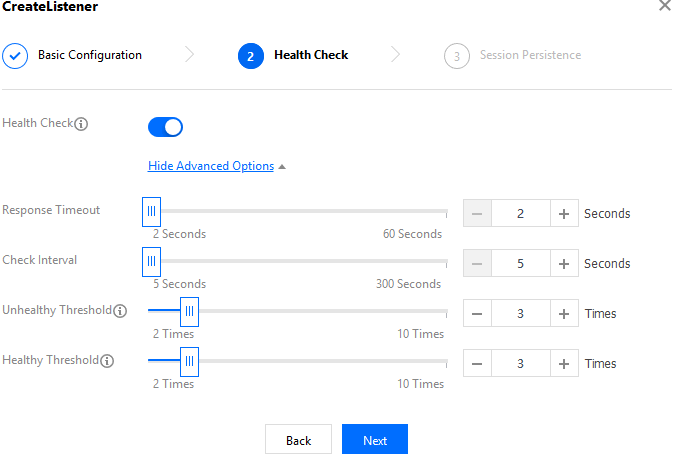
Ativada
Tempo limite de resposta
Tempo limite máximo de resposta para verificações de integridade.
Se um servidor de back-end não responder corretamente dentro do tempo limite, ele é considerado anormal.
Intervalo de valores: 2 a 60 s. Valor padrão: 2 s.
2 s
Intervalo de verificações
Intervalo entre duas verificações de integridade.
Intervalo de valores: 5 a 300 s. Valor padrão: 5 s.
5 s
Limite não íntegro
Se os resultados da verificação de integridade recebidos n vezes (n é o número inserido) seguidas forem falhas, a instância será considerada não íntegra e o status exibido no console será Abnormal (Anormal).
Intervalo de valores: 2 a 10. Valor padrão: 3.
3 vezes
Limite íntegro
Se os resultados da verificação de integridade recebidos n vezes (n é o número inserido) seguidas forem sucessos, a instância será considerada íntegra e o status exibido no console será Healthy (Íntegro).
Intervalo de valores: 2 a 10. Valor padrão: 3.
3 vezes
A configuração específica da verificação de integridade é mostrada abaixo:
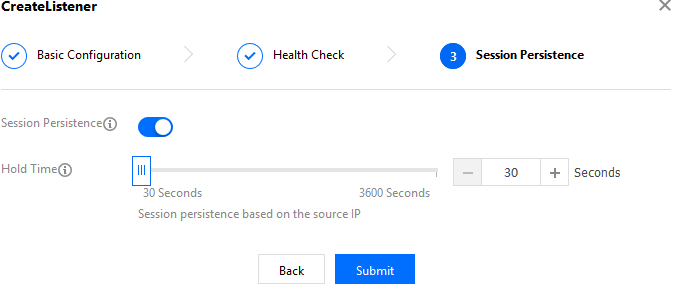
3. Persistência de sessão
Item de configuração
Descrição
Exemplo
Status de persistência de sessão
A persistência de sessão pode ser ativada ou desativada.
Se a persistência de sessão estiver ativada, o listener do CLB entregará as solicitações de acesso do mesmo cliente para o mesmo servidor de back-end.
A persistência de sessão TCP é implementada com base nos endereços IP do cliente, ou seja, as solicitações de acesso do mesmo endereço IP são encaminhadas para o mesmo servidor de back-end.
A persistência de sessão pode ser ativada para a programação de WRR, mas não para a programação de WLC.
Ativada
Tempo de persistência de sessão
O tempo de persistência de sessão.
Se não houver nenhuma solicitação nova na conexão dentro do tempo de persistência de sessão, a sessão será interrompida automaticamente.
Intervalo de valores: 30 a 3.600 s.
30 s
A configuração específica da persistência de sessão é mostrada abaixo:
Etapa 3. Vincule um servidor de back-end
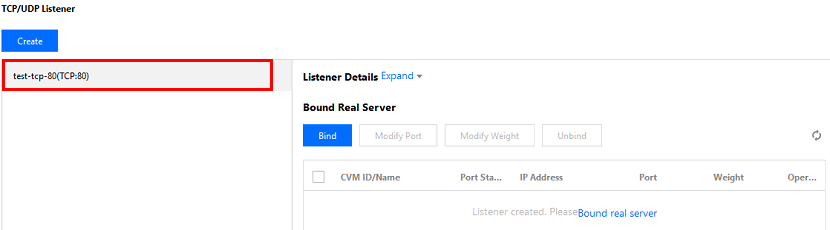
1. Na página "Listener Management (Gerenciamento de listener)", clique no listener criado TCP:80 para exibir os servidores de back-end vinculados à direita do listener.
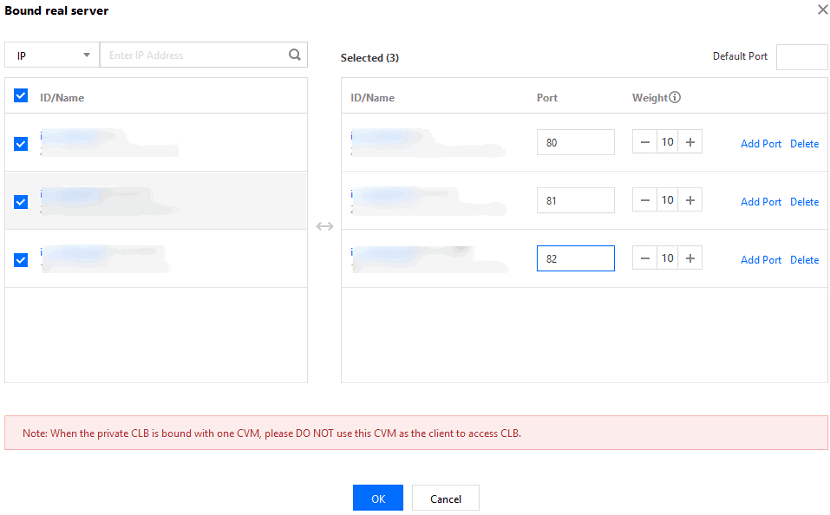
2. Clique em Bind (Vincular) e selecione o servidor de back-end a ser vinculado e configure a porta e o peso do servidor na janela pop-up.
2.1 Adicionar porta: na caixa "Selected (Selecionada)" à direita, clique em Add Port (Adicionar porta) para adicionar várias portas à mesma instância do CVM, como as portas 80, 81 e 82.
2.2 Porta padrão: insira a "Default Port (Porta padrão)" e, em seguida, selecione a instância do CVM. A porta de cada instância do CVM é a porta padrão.
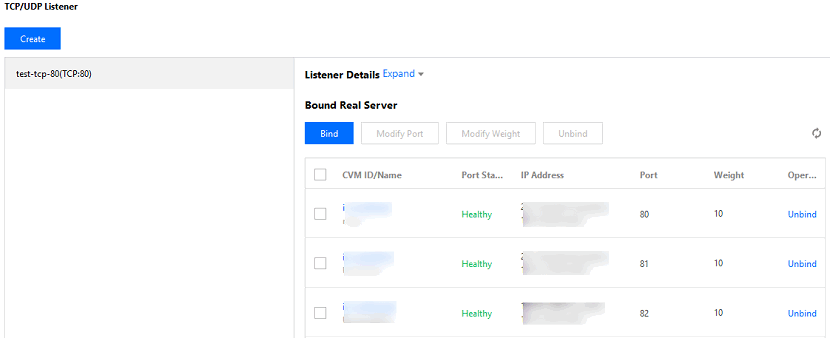
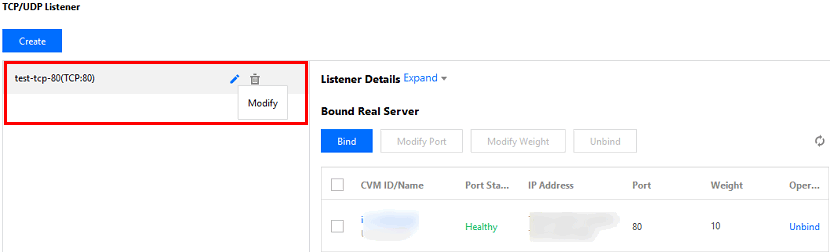
Após a conclusão dessas três etapas, a regra do listener TCP terá sido configurada conforme mostrado abaixo:
Caso precise modificar ou excluir um listener criado, clique no listener na página "Listener Management (Gerenciamento de listener)" e selecione Modify (Modificar) ou Delete (Excluir).