3. Obtain the SDK and License: Contact us to obtain the latest SDK and the Basic Edition License.
Security Mode Description and Selection
Identity Verification (App SDK) provides three security-level modes. You need to select an appropriate mode based on your business security requirements.
Security Mode
SdkVersion Parameter
Security Level
Capability Description
Scenarios
Required Files
Basic Edition
BASIC
(or not set)
Standard
ID verification + liveness detection + Face Comparison
General business scenarios, standard security requirements
ekycLicense.license
(Basic Authorization)
Enhanced Edition
(Enhance Mode)
ENHANCE
High
ID verification + liveness detection + Face Comparison + device risk control
Scenarios with higher security requirements, such as financial account opening and critical account verification
ekycLicense.license (Basic Authorization)
+ turing.lic (Risk Control Authorization)
Plus Edition
(Plus Mode)
PLUS
Extremely high
ID verification + liveness detection + Face Comparison + device risk control + AI Face Shield
Scenarios with extremely high security requirements, such as high-value transactions and sensitive information changes
ekycLicense.license (Basic Authorization)
+ turing.lic (Risk Control Authorization)
SDK Version and Mode Support Matrix
SDK version
Basic Edition
(BASIC)
Enhanced Edition
(ENHANCE)
Plus Edition
(PLUS)
1.0.0.x
Supported
Not supported.
Not supported.
1.0.1.x and above
Supported
Supported
Supported
Important note: To use the Enhanced or Plus edition, ensure that the SDK version is 1.0.1.x or above. The 1.0.1.x version interface is fully compatible with the 1.0.0.x version and can be directly overwritten for upgrade.
Overall Architecture Diagram
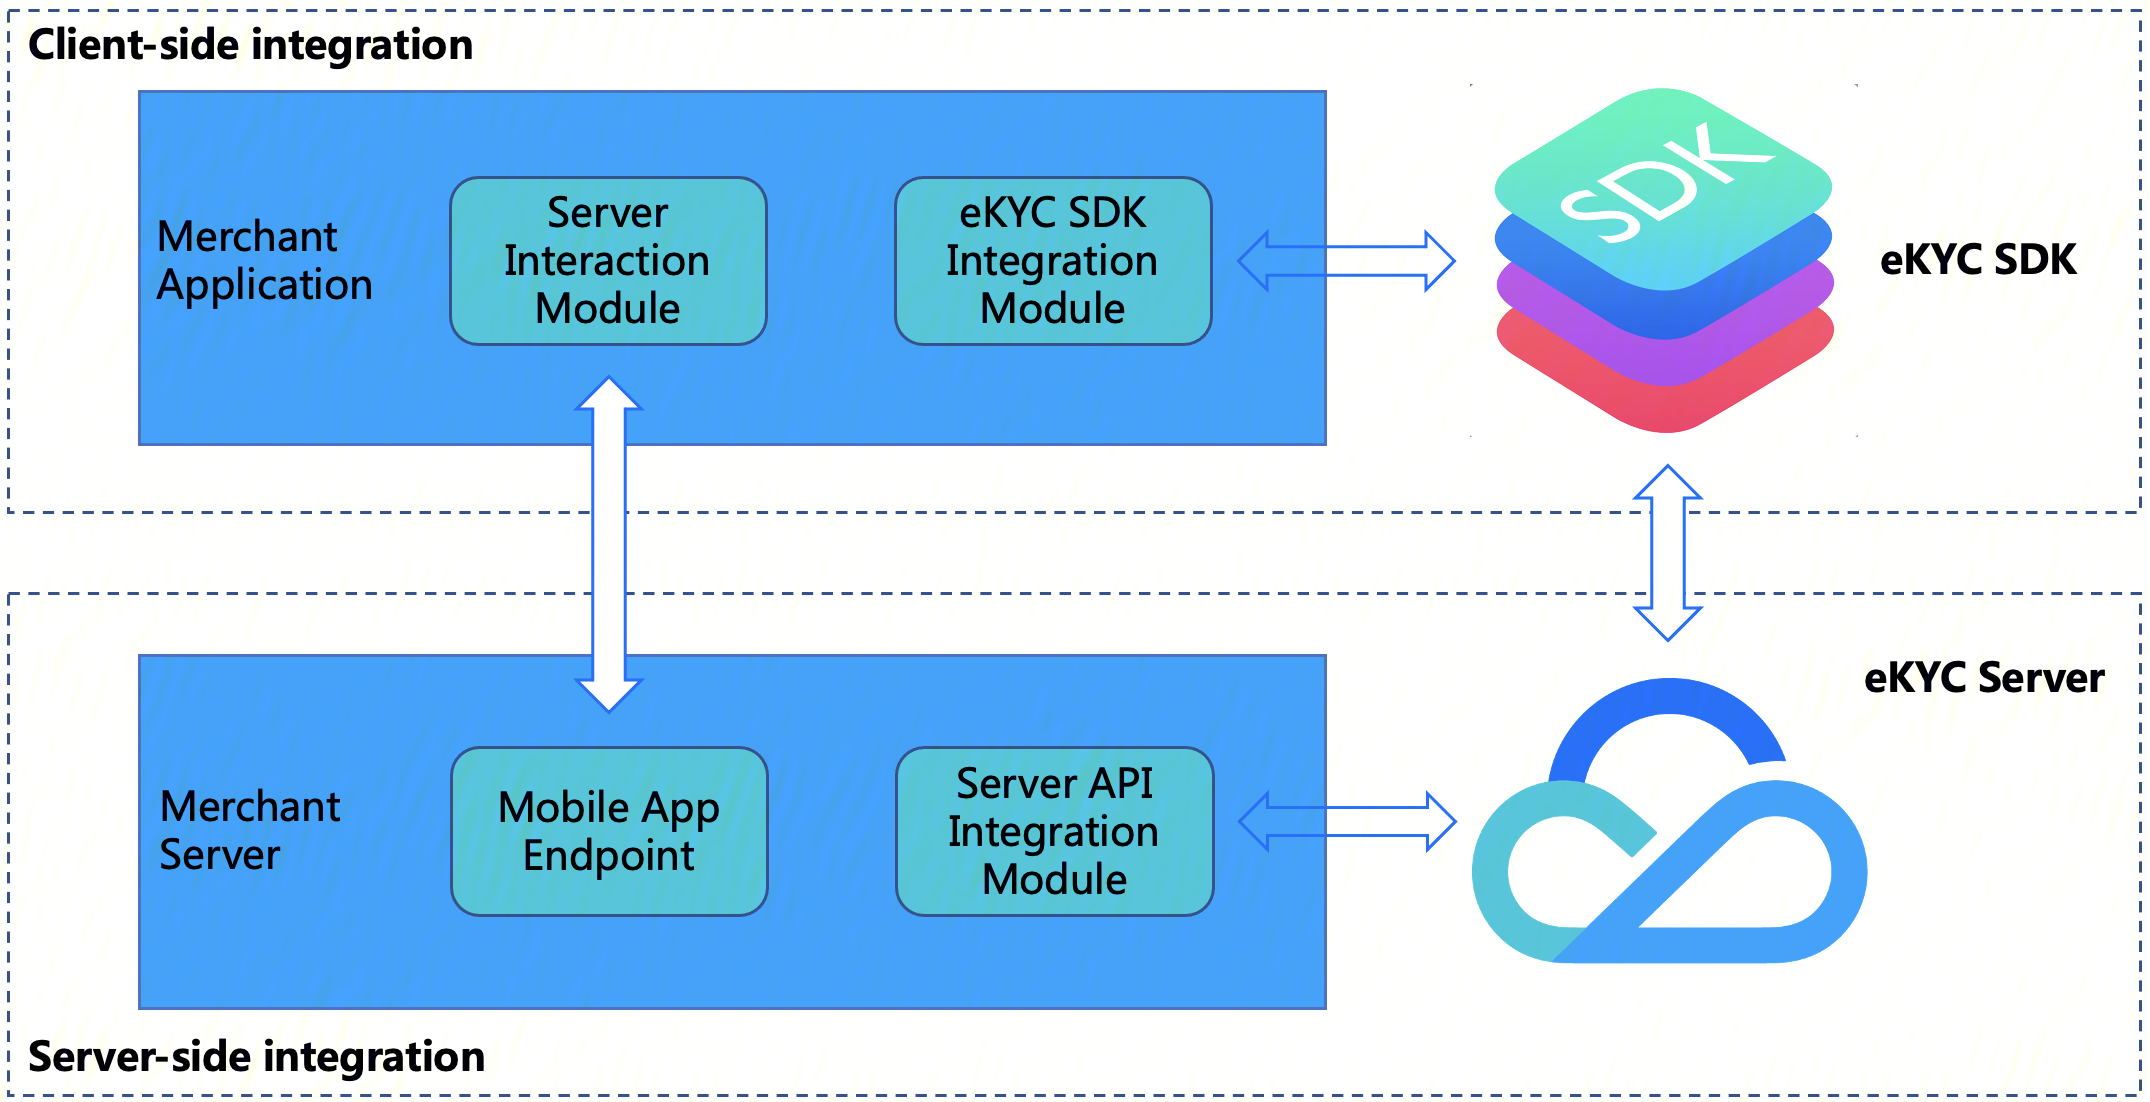
The following figure shows the architecture diagram for Tencent Cloud eKYC product's Identity Verification(App SDK) integration:
SDK integration includes two parts:
A. Client-side integration: Integrate the SDK into the client's end business App.
B. Server-side integration: In your (merchant's) server, expose the endpoint of your (merchant's) application, so that the merchant application can interact with the merchant server, then access the Server API to obtain the SdkToken for the serialized selfie verification process and pull the final identity verification result via the SdkToken.
Overall Interaction Flow
Integrators only need to pass in the Token and start the corresponding Identity Verification(App SDK) to implement full-process user identity authentication, including document recognition + liveness detection + face comparison. After the end user completes the authentication, the integrator can obtain the complete authentication result via the API.
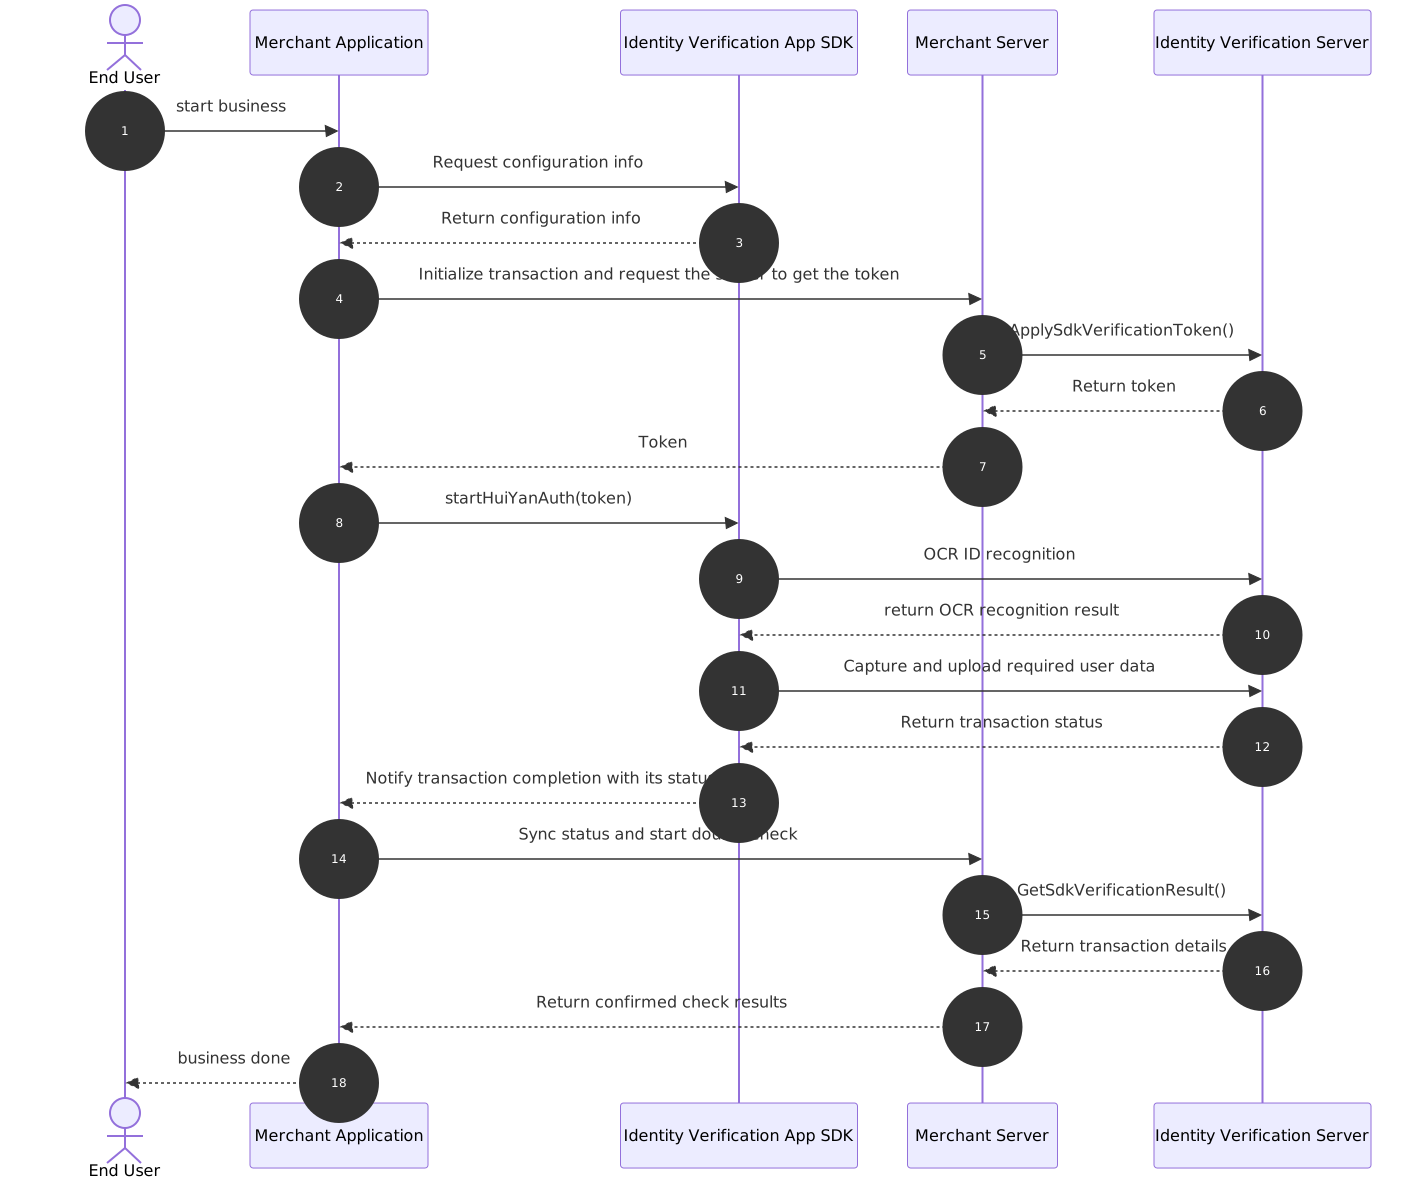
The following diagram illustrates the overall interaction logic among the SDK, client, and server. The diagram is responsible for module parsing:
End User: end user
Identity Verification(App SDK): the Identity Verification(App SDK) obtained during the preparation phase
Merchant Application: client-side business application using and integrating the Identity Verification SDK
Merchant Server: client's server program
Identity Verification Server: Tencent Cloud Identity Verification backend service API
The recommended interaction flow is detailed below:
1. The user triggers the Merchant Application to prepare for invoking the identity verification business scenario.
2. Merchant Application sends a request to Identity Verification(App SDK) to apply for configuration information matching the current user's device.
3. Identity Verification(App SDK) delivers configuration information matching the current user's device after receiving the request.
4. Merchant Application sends a request to Merchant Server, notifying it that a liveness business Token is required to initiate a selfie verification business operation. (Note: When using Identity Verification (App SDK) version v1.1.x or later, you must pass the configuration information obtained in step 3 via the MetaData parameter when applying for the Token.)
5. Merchant Server calls the TencentCloud API ApplySdkVerificationToken by passing in the relevant parameters.
6. Identity Verification Server receives the ApplySdkVerificationToken call and issues the token for this business session to Merchant Server.
7. Merchant Server can deliver the obtained business Token to the client's Merchant Application.
8. Merchant Application initiates selfie verification by calling the Identity Verification SDK startup API startHuiYanAuth and passing in the token and configuration information.
9. Identity Verification SDK initiates OCR to upload the ID photo to Identity Verification Server for extracting user identity information.
10. Identity Verification Server returns the identification results to Identity Verification SDK.
11. Identity Verification SDK captures and uploads the required user data, including liveness data, to Identity Verification Server.
12. Identity Verification Server returns the results to Identity Verification SDK after completing identity verification (including the liveness check and comparison process).
13. Identity Verification SDK triggers a callback to Merchant Application, notifying the completion and status of the verification.
14. After receiving the callback, the Merchant Application can send a request to notify the Merchant Server to proactively obtain the result of this selfie verification session for confirmation.
15. Merchant Server actively invokes the Identity Verification Server API GetSdkVerificationResult by passing relevant parameters and the Token for this business session to obtain the result of this identity verification.
16. Identity Verification Server receives the GetSdkVerificationResult call and returns the result of this identity verification to Merchant Server.
17. After the result of this selfie verification is received, the Merchant Server can deliver the required information to the Merchant Application.
18. Merchant Application displays the final result on the UI interface to inform the user of the authentication outcome.
Access Process
Server-side integration
Integration Preparation
Before server-side integration, you need to follow the instructions in Obtain API Key Guide to activate Tencent Cloud eKYC service and obtain the TencentCloud API access keys SecretId and SecretKey. Additionally, you need to follow the procedure in Connect to TencentCloud API to import the SDK package for your preferred programming language into your server-side module, ensuring successful calls to TencentCloud API and proper handling of API requests and responses.
Start integration
To ensure your (merchant) client application can interact properly with your (merchant) server, the merchant server needs to call the API ApplySdkVerificationToken provided by eKYC to obtain the SDKToken for orchestrating the full identity verification process, and call the GetSdkVerificationResult API to obtain the identity verification result. The merchant server also needs to provide corresponding endpoints for the merchant client to call. The sample code below uses the Go language as an example to demonstrate how to call TencentCloud API on the server side and obtain the correct response.
Note:
This example only demonstrates the processing logic required for the merchant server to interact with TencentCloud API. If needed, you must implement your own business logic, such as:
After you obtain the SDKToken through the ApplySdkVerificationToken API, you can return the other responses required by the client application together with the SDKToken to the client.
After you obtain the identity verification result via the GetSdkVerificationResult API, you can save the returned best-frame photo for use in subsequent business logic.
var FaceIdClient *faceid.Client
funcinit(){
// Initialize the client configuration object, where you can specify timeout and other configuration items.
prof := profile.NewClientProfile()
prof.HttpProfile.ReqTimeout =60
// TODO Replace with your account's SecretId and SecretKey
After completing the integration, you can test whether the integration is correct using Postman or curl commands. Access the http://ip:port/api/v1/get-token API to check whether the SDKToken is returned normally. Access the http://ip:port/api/v1/get-result API to check whether the response of the Result field is 0, thereby determining whether the server-side integration is successful. For detailed response results, refer to the API section.
Android integration
Dependencies
The current Android SDK supports API 21 (Android 5.0) and above.
Integration Steps
1. Add the ekyc-v1.1.x-release.aar, huiyansdk_android_overseas_1.0.x_release.aar, huiyanmodels_1.0.x_release.aar, OcrSDK-public-oversea-v4.0.x-release.aar, OcrSDK-card-model-new-v1.0.x-release.aar, tencent-ai-sdk-aicamera-1.0.x-release.aar, tencent-ai-sdk-common-1.1.x-release.aar, tencent-ai-sdk-network-1.0.x-release.aar, tencent-ai-sdk-youtu-base-1.0.x-release.aar, tencent-ai-sdk-risk-oversea-1.0.0.2-release.aar files (the specific version numbers are subject to the aar files provided in the SDK) to the libs directory of your project.
2. Configure as follows in the build.gradle file (under the App module) of your project:
// Set ndk so architecture filter (using arm64-v8a as an example; add armeabi-v7a if supported)
// Face model library (optional): If not imported, specify the external model directory path via EkycHyConfig.setFaceModelPath() (directory name must be face-tracker-v003), and ensure model file integrity
The version dependencies for all aar files are subject to the aar files provided in the SDK. Do not mix the aar files provided in eKYC with those provided by the standalone liveness or OCR components.
3. Declare the permissions in the AndroidManifest.xml file.
For users whose apps need to be compatible with Android 6.0 or later, in addition to declaring the above permissions in the AndroidManifest.xml file, you also need to add the code Dynamically apply for permissions.
Initialization
Call during App initialization, it is recommended to be performed in the Application, mainly for SDK initialization operations.
@Override
publicvoidonCreate(){
super.onCreate();
EkycHySdk.init(this);
}
Start the process
To initiate the verification process, simply call the EkycHySdk.startEkycCheck() function and pass in the following parameters:
Current Activity instance
SDK token (sdkToken)
Encrypted configuration string delivered by the server (serverParamInfo)
// If you need to enable the device risk control capability, pass in the lic file and turn on the local switch; if not enabled, no modification is required.
ekycHyConfig.setRiskLicenseName("risk.lic");
ekycHyConfig.setOpenCheckRiskMode(true);
// Custom UI configuration
OcrUiConfig config =newOcrUiConfig();
ekycHyConfig.setOcrUiConfig(config);
// Specific startup verification logic
// sdkToken is the unique credential for the current process, obtained from the server.
// serverParamInfo is the encrypted configuration string obtained from the server.
sdkToken is the unique credential for the current authentication process obtained from the server.
Note:
"ekycLicense.license" and "risk.lic" files require contacting business or customer service personnel for license application. Place the obtained license files under the assets directory.
├── app
│ ├── build.gradle
│ ├── libs
│ ├── proguard-rules.pro
│ └── src
│ └── main
│ └── assets
│ ├── ekycLicense.license
│ └── risk.lic
Token Acquisition Process Description
Before starting the full-process verification, you must first obtain the SdkToken and ServerParamInfo from the server. When calling the ApplySdkVerificationToken API, note the following new fields:
1.MetaData (Required - Full-process Mode)
When requesting a Token in Full-process Mode (CheckMode=1), you must pass the MetaData parameter to report device metadata for risk control and enhanced security. Obtain it using the static method provided by the SDK:
String metaData =EkycHySdk.createMetaData();
Note:
The Pure Liveness Mode (CheckMode=2/3) does not involve an OCR stage and does not require passing MetaData.
createMetaData() returns an encrypted Base64 string, or an empty string upon failure.
2.ServerParamInfo
The ApplySdkVerificationToken API returns the ServerParamInfo field along with the SdkToken. The integrator does not need to understand its content and can simply pass it as-is to startEkycCheck. If the server does not return this field, pass an **empty string ""**.
SDK resource release
When your App exits, you can call the SDK resource release API.
@Override
protectedvoidonDestroy(){
EkycHySdk.release();
super.onDestroy();
}
Configuring Obfuscation Rules
If your application has the obfuscation feature enabled, add the following sections to your obfuscation file to ensure the SDK functions properly.
# Objects to be obfuscated
-keep class com.google.gson.** {*;}
-keep class com.tencent.could.** {*;}
-keep class com.tencent.cloud.** {*;}
-keep class com.tencent.youtu.** {*;}
-keep class com.tencent.cloud.ocr.** {*;}
-keep class com.tencent.cloud.ekyc.** {*;}
-keep class com.tencent.could.huiyansdk.** {*;}
-keep class com.tencent.could.component.common.** {*;}
-keep class com.tencent.turingcam.** {*;}
-keep class com.turingface.sdk.** {*;}
Usage Instructions for Enhanced and PLUS Editions
The current version supports three security level modes: Basic, Enhance, and Plus. The Enhance and Plus modes can further improve the security of device and liveness detection. Enabling these two modes requires corresponding settings in both the SDK configuration and Token acquisition processes.
SDK Configuration Requirements
Whether enabling Enhanced mode or Plus mode, you need to enable the device risk control capability in the SDK and configure the corresponding risk control license file:
// Set the device risk control license file (must be placed in the assets directory)
ekycHyConfig.setRiskLicenseName("turing.lic");
// Enable device risk control capability
ekycHyConfig.setOpenCheckRiskMode(true);
Note:
The device risk control license is an independent file different from the identity verification authorization license and requires separate application.
Token Configuration
When calling the ApplySdkVerificationToken API to obtain the business Token, specify whether to enable Enhance mode or Plus mode by setting the SdkVersion parameter:
Enhanced mode: Set the corresponding SdkVersion value to ENHANCE.
PLUS mode: Set the corresponding SdkVersion value to PLUS.
1. Set the corresponding SdkVersion parameter when obtaining the Token.
2. Enable the device risk control capability in the SDK configuration (setOpenCheckRiskMode(true) + configure the risk control license).
3. Pass the configured Token and ServerParamInfo when calling the startEkycCheck method.
4. The SDK automatically enables the corresponding security level based on the mode information in the Token.
Note:
The device risk control license is an independent file different from the identity verification authorization license and requires separate application.
iOS integration
Dependencies
The development environment requires Xcode version 12.0 or above. It is recommended to use the latest version.
The SDK supports iOS 11.0 and above.
The SDK supports the ARM64 architecture for physical devices/simulators.
Note:
The ARM64 architecture for physical devices provides full functionality, while the ARM64 architecture for simulators only supports successful compilation and cannot utilize the full capabilities.
Integration Steps
Manual integration approach
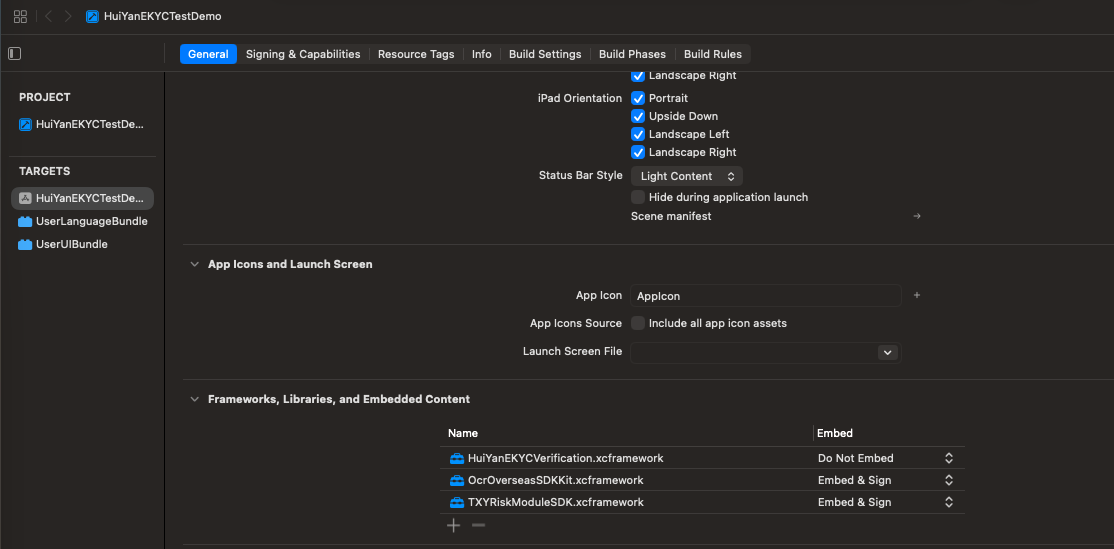
1. Import the relevant libraries and files. Add the following xcframework in your Xcode project under Target → General → Frameworks, Libraries, and Embedded Content:
├── HuiYanEKYCVerification.xcframework (static library, Do Not Embed)
The three xcframeworks have different library types and Embed settings. Configure them separately under Target → General → Frameworks, Libraries, and Embedded Content:
1) HuiYanEKYCVerification.xcframework is a static library. Its Embed column must be set to "Do Not Embed".
2) OcrOverseasSDKKit.xcframework and TXYRiskModuleSDK.xcframework are dynamic libraries. Their Embed column must be set to "Embed & Sign".
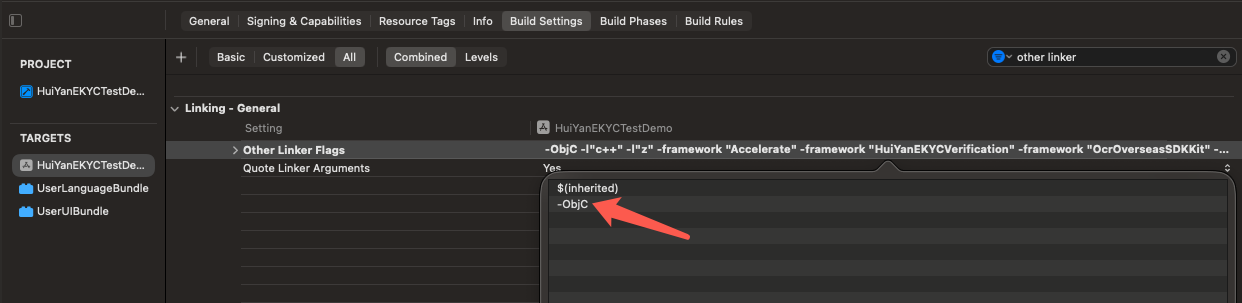
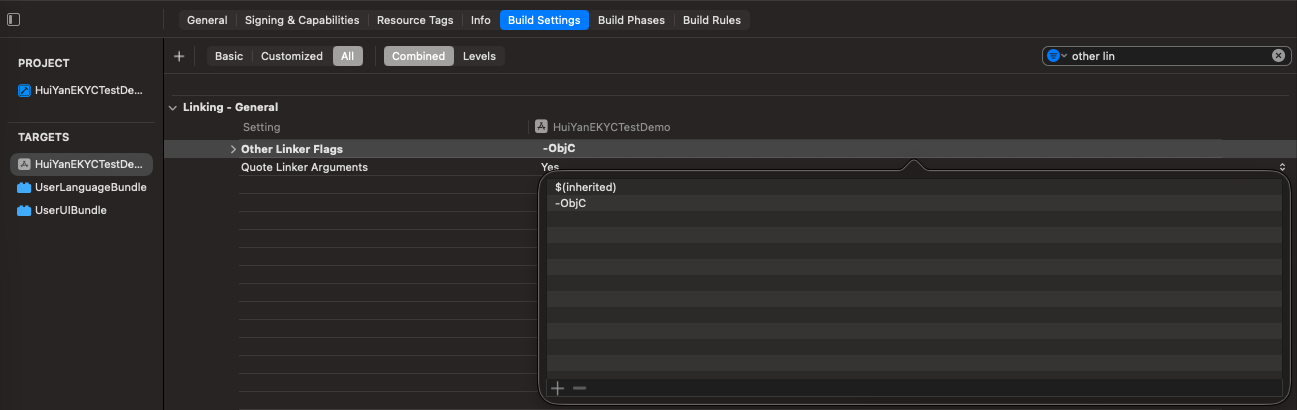
2. Add the compiler option -ObjC in Other Linker Flags.
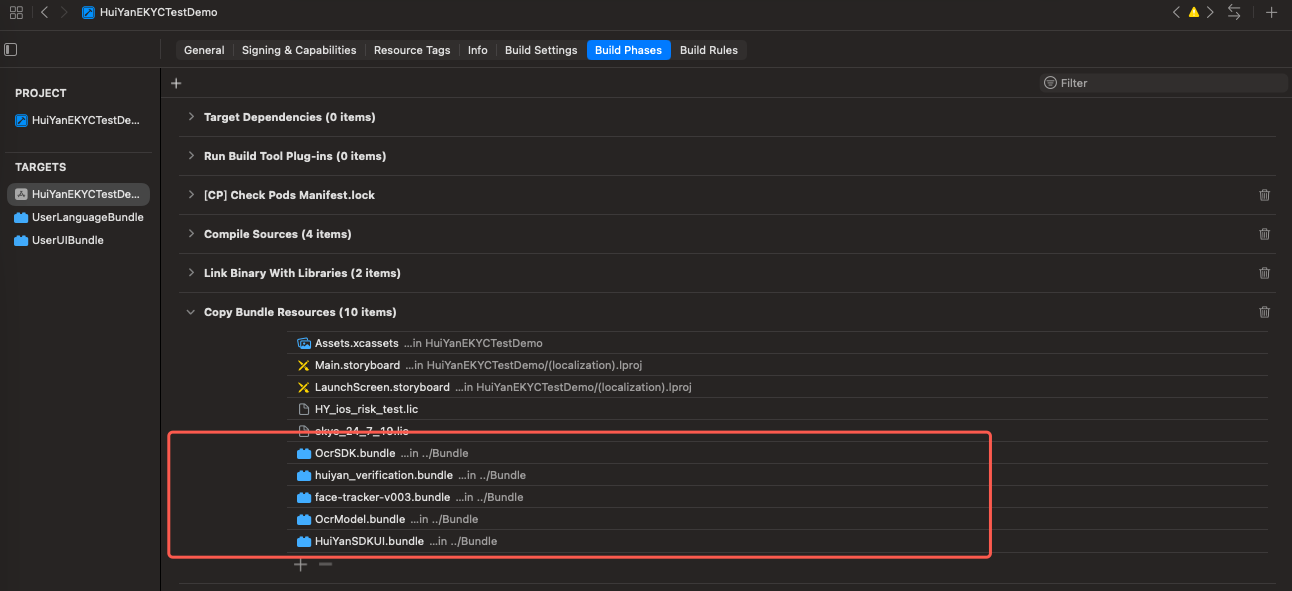
3. Import the authorization file and resource files in the Copy Bundle Resources section.
├── YTFaceSDK.license
├── face-tracker-v003.bundle
├── huiyan_verification.bundle
├── HuiYanSDKUI.bundle
├── OcrSDK.bundle
└── OcrModel.bundle
Integrate via local Pod
1. Create a CloudHuiYanSDK_FW.podspec file.
Pod::Spec.newdo|s|
s.name ="CloudHuiYanSDK_FW"
s.version ="1.0.0"
s.platform =:ios,"11.0"
s.summary = 'frameworks and bundle resources for eKYC SDK'
2. Create a CloudHuiYanSDK_FW folder in the project root directory, create Frameworks and Resources subdirectories, and move the SDK contents to these directories. The structure is as follows:
├──Project
├──CloudHuiYanSDK_FW
├───────CloudHuiYanSDK_FW.podspec
├───────Frameworks
├────────────HuiYanEKYCVerification.xcframework
├────────────OcrOverseasSDKKit.xcframework
├────────────TXYRiskModuleSDK.xcframework
├───────Resources
├────────────face-tracker-v003.bundle
├────────────huiyan_verification.bundle
├────────────HuiYanSDKUI.bundle
├────────────OcrSDK.bundle
└────────────OcrModel.bundle
3. Set in the Podfile:
target 'ProjectName' do
use_frameworks!
pod 'CloudHuiYanSDK_FW',:path => './CloudHuiYanSDK_FW'
end
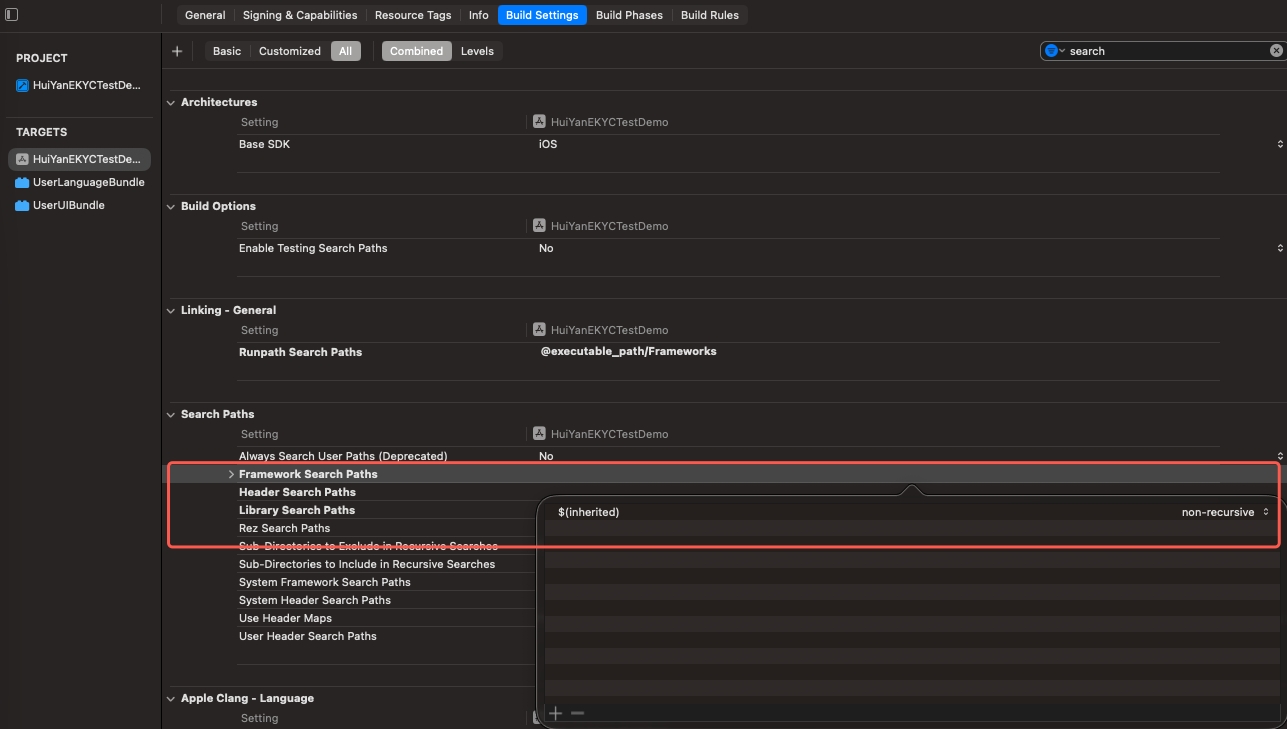
4. Check whether $(inherited) exists in the project's Build settings -> Framework Search Paths and Other Linker Flags; if not, add it manually.
5. Update using the pod install command.
Permission Settings
The SDK requires cellular network access and camera usage permission. Please add the corresponding permission declarations. Add the following key-value pairs in the main project's info.plist configuration.
<key>Privacy - Camera Usage Description</key>
<string>Requires access to your camera</string>
Initialization
Call during your App initialization, primarily to perform some SDK initialization operations.
eKYCToken is the unique credential for the current authentication process obtained from the server.
Note:
To obtain the "eKYC_license.lic" file, contact the business or customer service to apply for a license. Place the obtained license file under Copy Bundle Resources.
SDK resource release
When you have finished using the SDK, you can call the SDK resource release API:
Instructions for using the Enhanced Edition and Plus Edition
The service currently supports three security level modes: Basic, Enhanced, and Plus. The Enhanced and Plus modes can further improve the security of device and liveness detection. The following section describes the upgrade steps from the Basic face comparison mode to the Enhanced and Plus modes.
Upgrade the SDK version
The iOS version 1.0.0.x is the Basic edition. To use the Enhanced or Plus edition capabilities, you need to upgrade the SDK on both ends to version 1.0.1.x. The API of version 1.0.1.x is fully compatible with that of version 1.0.0.x. You can complete the upgrade by simply overwriting the old SDK with the new one. To switch between different editions, use the SdkVersion parameter in the ApplySdkVerificationToken API.
The capabilities of each edition are as follows:
SDK version
Basic edition (SdkVersion: BASIC)
Enhance edition (SdkVersion: ENHANCE)
Plus edition (SdkVersion: PLUS)
1.0.0.x
✅
❌
❌
1.0.1.x
✅
✅
✅
1.1.x (latest)
✅
✅
✅
Apply for authorization file
Apply for the SDK license file (example file name: YTFaceSDK.license).
Apply for the device risk control license file (example file name: turing.license).
Please contact customer service or the operations support team to obtain the corresponding license file, and configure your system using the actual file name.
//If device risk control is enabled, a risk control license must be provided. The Enhanced and Plus editions require this configuration to be enabled, while the Basic edition does not.
Place the license file in the current project directory and add it to the Copy Bundle Resources.
Mode Selection Configuration
When calling the ApplySdkVerificationToken API to obtain the business Token, specify whether to enable the Enhance edition or Plus edition by setting the SdkVersion parameter:
Enhanced edition: Set the corresponding SdkVersion value to ENHANCE.
Plus edition: Set the corresponding SdkVersion value to PLUS.
1. Token acquisition phase: When calling the GetFaceIdTokenIntl API, set the corresponding SdkVersion parameter.
2. SDK configuration phase: Enable the device risk control capability in the SDK initialization configuration. For details, refer to the iOS API overview documentation.
3. Feature invocation phase: When calling the start method, pass the configured Token.
4. Mode takes effect: The SDK automatically enables the corresponding security level based on the mode information in the Token.
SDK API Usage Instructions
When the SDK is started with the token (sdkToken) obtained from the corresponding ApplySdkVerificationToken API, the SDK will automatically enable the corresponding mode.
Startup Mode
Corresponding CheckMode Value
Mode Description
Identity verification
1
This mode includes the entire process of document recognition, liveness detection, and face comparison.
Selfie verification
2
This mode only includes but covers the entire process of liveness detection and face comparison.
Liveness detection mode
3
This mode only includes the liveness detection process.